Erhalten Sie Zugang zu diesem und mehr als 300000 Büchern ab EUR 5,99 monatlich.
- Herausgeber: IMM Lifestyle Books
- Kategorie: Lebensstil
- Sprache: Englisch
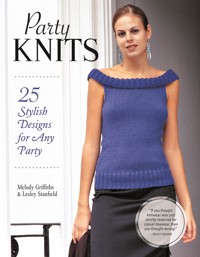
Knit one of these fabulous patterns and go party! This great new collection of 25 luxurious party knitwear patterns covers jumpers, cardigans, boleros, dressy tops, camisoles, sweaters, coats and sleeveless jackets, as well as accessories such as corsages and bags. Match a satin skirt with the shimmering copper top or the frill-edge bolero to a pretty summer dress to make a fabulous summer ensemble. Or keep warm at a winter party without any loss of style wearing the latest in shrugs, wraps and gilets. Go wild with bold and bright colors or stay chic with black and white. Making your own party pieces allows you to find just the right shade of wool to coordinate with your outfit and with the amazing range of glittering, metallic and ribbon yarns, the patterns in Party Knits will add instant glamour to your wardrobe.
Sie lesen das E-Book in den Legimi-Apps auf:
Seitenzahl: 170
Veröffentlichungsjahr: 2018
Das E-Book (TTS) können Sie hören im Abo „Legimi Premium” in Legimi-Apps auf:
Ähnliche


Published 2018—IMM Lifestyle Books
www.IMMLifestyleBooks.com
IMM Lifestyle Books are distributed in the UK by Grantham Book Service, Trent Road, Grantham, Lincolnshire, NG31 7XQ.
In North America, IMM Lifestyle Books are distributed by Fox Chapel Publishing, 903 Square Street, Mount Joy, PA 17552, www.FoxChapelPublishing.com.
© 2018 by IMM Lifestyle Books
Produced under license.
The patterns contained herein are copyrighted by the authors. Readers may make copies of these patterns for personal use. The patterns themselves, however, are not to be duplicated for resale or distribution under any circumstances. Any such copying is a violation of copyright law.
Print ISBN 978-1-5048-0103-4
eISBN 978-1-6076-5561-9
Party Knits is a collection of new and previously published material. Portions of this book have been reproduced from Party Knits (978-1-84773-224-8).
The Cataloging-in-Publication Data is on file with the Library of Congress.
We are always looking for talented authors. To submit an idea, please send a brief inquiry to [email protected].
This book has been published with the intent to provide accurate and authoritative information in regard to the subject matter within. While every precaution has been taken in the preparation of this book, the authors and publisher expressly disclaim any responsibility for any errors, omissions, or adverse effects arising from the use or application of the information contained herein.
Shutterstock photo credits: Esin Deniz (1); IrenaStar (2–3); grafvision (6); Happy Stock Photo (7); Nagy Mariann (9); Nataliia Pyzhova (10); Steve Mann (11 top left); Sandra van der Steen (11 top right); Anastasia E Kozlova (11 middle, back cover bottom); HP Productions (11 bottom left); Natasha Breen (11 bottom right); Tracey Helmboldt (13); Nor Gar (14 bottom left); Nadiia Ishchenko (18 bottom right); Dja65 (23 right); Kristina Iakushina (136); and Africa Studio (141).
Contents
Introduction
Equipment
Getting Started
JEWEL COLORS
Fun Furry Coat
Rose Corsage
Frill Edge Vest
Crushed Velvet Jacket
V-Back Sweater
Off-the-Shoulder Top
Lightweight Shrug
Cabled Camisole
Beaded Clutch Bag
SHIMMER AND SHINE
Sequin Tank Top
Skinny Scarf
Lurex Jacket
Glitter Wrap
Glimmering Vest
Studded “Denim” Jacket
Beaded Cardigan
Cardigan Coat
Lace Panel Top
BLACK AND WHITE
Furry Bolero
Slits and Slashes Sweater
Corset Top
Sequin Shoulder Bag
Faux Fur Hat
Lacy Fingerless Mitts
Beaded Lacy Jumper
Suppliers
Acknowledgements
Introduction
This is a collection of simple, inspired ideas to set your imagination racing. Knitwear can be curvy, cozy, decorated, textured, classic, clinging, see-through, or sophisticated. It can flatter your best features and gloss over the areas you want to hide. It can signal your individuality, whether you want to dress up or dress down. Best of all, hand knitting gives you the opportunity to create unique, luxurious clothes.
Here you’ll find everything you need for that special occasion. From simple accessories to stunning sweaters and jackets, there are 25 up-to-the-minute stylish fashion items all of which can be made using the basic knitting skills outlined in the clear and concise Getting Started section (see here), which includes extra explanation to help with any less familiar techniques.
There are three style sections to explore. All include designs for extra special evenings and for those daytime occasions when you want something a little dressier—from sexy shapes and daring body-conscious garments to fashion knits in fancy yarns; from subtle beaded decoration to all-over sequins—there’s something for every type of party.
Choose the style that enhances your look and make it in the color that suits you. Mix your makes with basic black or fabulous fabrics, pile on the jewelery, or leave them plain. And when you’ve invested the time and care in making these knits, you’ll find that they are fashion classics that will last many years, precious possessions that you wear over and over again.
Equipment
All you need to create beautiful hand knits is some yarn, knitting needles, simple sewing equipment, and patience!
YARNS
The designs in this book feature classic and fashion yarns. Enjoy the feel of luxury mixes such as cashmere, alpaca, and silk; choose shimmering metallic, smooth cotton, or man-made fibers with fabulous furry textures. Each design has been created with the particular qualities of the chosen yarn in mind. Ideally, you should always use the yarn specified, although the choice of color is up to you. Fashion yarns and colors change with the seasons, so if you do need to find a substitute yarn, check that the fiber content, yarn type, texture, and number of meters in a ball match the original as closely as possible.
These are the yarns used in this book (Note: Some brands may be difficult to locate in stores or online. You may either substitute it with a different brand similar in fiber content, or do an online search; Ebay is an excellent source for such instances.):
• Debbie Bliss Alpaca Silk DK: 80% baby alpaca, 20% silk. 115 yds. (105 m) per 1¾ oz. (50 g) ball.
• Debbie Bliss Cathay: 50% cotton, 35% microfiber, 15% silk. 110 yds. (100 m) per 1¾ oz. (50 g) ball.
• Debbie Bliss Pure Silk: 100% silk. 137 yds. (125 m) per 1¾ oz. (50 g) hank.
• Elle True Blue DK: 100% cotton. 118 yds. (108 m) per 1¾ oz. (50 g) ball.
• Jaeger Fur: 47% wool, 47% kid mohair, 6% polyamide. 22 yds. (20 m) per 1¾ oz. (50 g) ball.
• Rowan Lurex Shimmer: 80% viscose, 20% polyester. 104 yds. (95 m) per 1 oz. (25 g) ball.
• Rowan Kid Silk Haze: 70% super kid mohair, 30% silk. 229 yds. (210 m) per 1 oz. (25 g) ball.
• Rowan RYC Cashsoft DK: 57% extra fine merino, 33% microfiber, 10% cashmere. 142 yds. (130 m) per 1¾ oz. (50 g) ball.
• Rowan RYC Soft Lux: 64% extra fine merino wool, 10% angora, 24% nylon, 2% metallic fiber. 137 yds. (125 m) per 1¾ oz. (50 g) ball.
• Sirdar Boa: 100% polyester. 102 yds. (93 m) per 1¾ oz. (50 g) ball.
• Sirdar Foxy: 100% polyester. 44 yds. (40 m) per 1¾ oz. (50 g) ball.
• Sirdar Pure Cotton 4ply: 100% cotton. 370 yds. (338 m) per 3½ oz. (100 g) ball.
• Sirdar Town and Country 4ply: 75% wool, 25% nylon. 224 yds. (205 m) per 1¾ oz. (50 g) ball.
• Sirdar Wash ’n’ Wear 4ply: 55% acrylic, 45% nylon. 510 yds. (466 m) per 3½ oz. (100 g) ball.
• Sirdar Zanzibar: 86% nylon, 14% polyester. 137 yds. (125 m) per 1¾ oz. (50 g) ball.
NEEDLES
Pairs of straight needles are the type most often used but for some of the projects you will also need a circular needle, a set of double pointed needles, or a cable needle.
Experiment with different lengths of straight needles and try out needles made from bamboo, plastic, or wood as well as classic aluminum to find the type of needles that are most comfortable for you. Remember that circular needles can be used for flat knitting as well as working in the round.
The needle size given in the instructions is the size that the knitter used to get the tension given when the sample garment was made. This needle size should be treated only as a guide; the size you need to use is the size that gives you the correct tension. If you’re going out to buy needles, it makes sense to get one or two sizes above and below the recommended size, this way you’ll soon build up a collection.
ACCESSORIES
You’ll need a tape measure to check your tension and garment measurements and scissors to cut the yarn. A stitch holder can be useful, but you can always improvise with a circular needle or a length of yarn. Markers help keep track of the rows when shaping, or the stitches when working pattern repeats. Use the plastic hook-on type, safety pins, or loops of smooth contrast yarn. A blunt-pointed wool needle is essential for sewing up, a sharp pointed needle will split the stitches. Largeheaded pins set at right angles to the seam keep the pieces in place when sewing up, especially when fitting a sleeve head into the armhole, and a slim tapestry needle will slip through the holes more easily when sewing on buttons.
KNITTING NEEDLE CONVERSION CHART
Metric
American
British
2.00 mm
00
14
2.25 mm
1
13
2.75 mm
2
12
3.00 mm
2/3
11
3.25 mm
3
10
3.75 mm
5
9
4.00 mm
6
8
4.50 mm
7
7
5.00 mm
8
6
5.50 mm
8
5
6.00 mm
9
4
6.50 mm
10
3
7.00 mm
10½
2
7.50 mm
11
1
8.00 mm
12
0
9.00 mm
13
00
10.00 mm
15
000
BEADS AND SEQUINS
From scattered decoration to all-over coverage, even the simplest knits get the glamour treatment with added beads and sequins. Some of these designs have beads or sequins knitted in, others have the decoration sewn on after the knitting is finished. You can choose from lots of different types—glass, metallic, or plastic—and shapes of beads. Most of the round beads used in this book are rocaille or embroidery beads, often described as size 5 or 5/0, these can be sewn on or knitted in. Where you need a larger quantity of beads for knitting in, you’ll find that buying beads in packs of 10½ oz. (300 g) or 17½ oz. (500 g) works out cheaper than buying lots of small tubes, even if some beads are left over. Finer seed beads and bugle beads are only suitable for sewing on. Buying small packs makes sense as this will give you more choice. You could also recycle broken necklaces or use antique beads to give a vintage effect.
When buying beads or sequins, take a ball of the yarn along with you to be sure that they match or contrast with the color of the yarn and that, if necessary, the hole in the beads is big enough to thread them onto the yarn. Sequins are made in many different shapes and sizes, round flat, round cupped, square, or oval. Any type of sequin can be sewn on and it can often be effective to use several related shades in a design. The round, flat sequins for knitting in are usually sold in strands of 1,000. Check when you buy that they are on a thread not loose in a pack as this will make it a lot easier to thread them onto the yarn. If you are matching sequins and yarn, always choose a yarn color that is darker than the sequins; a lighter shade will dominate the sequin color.
Getting Started
FOLLOWING THE INSTRUCTIONS
Before you start to knit, read through the instructions to be sure that you understand the abbreviations and you can cope with all the techniques needed. Abbreviations are used for many of the repetitive words that occur in the instructions. See the box opposite for a list of the most frequently used abbreviations; any additional abbreviations are given with the instructions. Some abbreviations look complex but make sense once you realise that they explain a series of actions such as skpo for slip one stitch knitwise, knit one stitch, pass the slipped stitch over.
Square brackets are used to show how many times a series of stitches should be worked or to clarify working a group of stitches. Square brackets are also placed around stitch counts. Asterisks indicate where to repeat instructions from or which part of the instructions to work again.
Check that you know which measurements you are working to. The amount of movement room varies according to the design so if you are not sure which size to make, check the actual measurements given against an existing garment that fits you well.
Where instructions for different sizes are given, the smallest size is given first, followed by the other sizes in round brackets, separated by colons. If there is only one figure, it refers to all of the sizes.
ABBREVIATIONS
beg
beginning
cont
continu(e)(ing)
dec
decreas(e)(ing)
foll
following
inc
increas(e)(ing)
k
knit
kfb
knit into front and back of stitch
m1
make a stitch by lifting strand between stitches and knitting into the back of it
p
purl
patt
pattern
rem
remaining
rep
repeat
RS
right side
sl
slip
skpo
slip one knitwise, knit one, pass slipped stitch over
st(s)
stitch(es)
st-st
stocking stitch
tbl
through back of loop(s)
tog
together
WS
wrong side
yo
yarn over needle to make a stitch
CHECKING YOUR TENSION
This is the job that everyone hates! But you really must make sure that your tension matches the tension given or your garment will not be the correct size. Start with the needle size given and knit a swatch in the stitch pattern given for the item. The instructions under tension tell you how many stitches and how many rows make a 4-in. (10-cm) square, but cast on slightly more stitches and work a few more rows than given as the edge stitches will distort. Count and mark the correct number of stitches and rows from the center of the swatch. If your marked stitches and rows measure less than they should your knitting is too tight and the garment will be too small, so try again using larger needles. If they measure more, your knitting is too loose and the garment will be too big, try again using smaller needles. It can be difficult to see the stitches in some textured yarns so try holding the swatch up to the light to count and mark the stitches and rows, then lay it flat to measure.
Here’s a reminder of the essential knitting techniques.
MAKING A SLIP KNOT
A slip knot counts as the first stitch.
Leaving an end that’s long enough to cast on the required number of stitches, make a loop in the yarn. Insert the tip of the right needle and pull a loop through. Gently pull on the yarn to tighten the knot and to close the loop on the needle.
CASTING ON
Knitting into a loop around the thumb to make a stitch on the needle is the easiest and most versatile method of casting on.
After making a slip knot, hold the needle and the yarn from the ball in the right or left hand. Using the long end, make a loop around left thumb, and insert right needle tip. Bring the yarn up between thumb and needle and take it around the needle.
Draw yarn through to make a stitch on the needle, release loop from left thumb and tighten the long end ready to make the next stitch.
MAKING A KNIT STITCH (with yarn in right hand)
Hold the needle with the cast-on stitches in the left hand and the empty needle in the right hand. The yarn from the ball is at the back and is held in the right hand.
Bring right needle forward and taking it under left needle, insert it from left to right into front of first stitch, take the yarn up and around right needle.
With tip of right needle, draw a loop of yarn forward through the stitch on left needle, then drop stitch off left needle and tension yarn to make a stitch on right needle. Work into each stitch on the left needle in turn to complete a knit row.
MAKING A PURL STITCH (with yarn in right hand)
Hold the needles in the same way as for making a knit stitch but bring the yarn from the ball to the front.
Taking right needle under left needle, insert it from right to left into front of first stitch, take yarn over and around right needle.
Dip the tip of the right needle away from you to draw a loop of yarn through stitch on left needle, then drop stitch off left needle and tension yarn to make a stitch on right needle. Work into each stitch on the left needle in turn to complete a purl row.
MAKING A KNIT STITCH (with yarn in left hand)
Hold the needle with the cast-on stitches in the left hand and the empty needle in the right hand. The yarn from the ball is at the back and is held in the left hand, taut over the first finger.
Bring the right needle forward and taking it under left needle, insert it from left to right into front of first stitch, then hook the right needle over and under the yarn.
With tip of right needle, draw a loop of yarn forward and through the stitch on left needle, then drop stitch off left needle and tension the yarn to make a stitch on right needle. Work into each stitch in turn to complete a knit row.
MAKING A PURL STITCH (with yarn in left hand)
Hold the needles in the same way as for a knit stitch but bring the yarn from the ball to the front and hold it in the left hand, taut over the first finger.
Taking right needle under left needle, insert it from right to left into first stitch, then hook the right needle over and under the yarn. Dip the tip of the right needle downward and away from you to draw a loop of yarn through stitch on left needle, then drop stitch off left needle and tension the yarn to make a stitch on right needle. Work into each stitch on the left needle in turn to complete a purl row.
CASTING OFF
Lifting one stitch over the next secures the stitches and makes a neat edge. Working every stitch as a knit stitch will give a chain edge, casting off in purl will give a nubbly edge.
Knit two stitches. Use the point of the left needle to lift the first stitch over the second stitch and off the needle. Knit the next stitch so there are two stitches on right needle. Lift one stitch over and off right needle. Continue until there is one stitch left on right needle. Break yarn, draw end through, and pull it tight to secure the last stitch.
Special Techniques
This section leads you through a variety of ways to manipulate stitches to create everything from the subtlest shaping to delicate lace stitches or rich surface textures.
INCREASING
Simple increases make one stitch. The first method makes a little bar at the base of the new stitch, the second is almost invisible, and the third makes a decorative hole. More complex increases make two or more stitches integrated with the shaping or patterning.
Single increase: kfb
Knitting into the front and back of a stitch makes two stitches from one.
Knit a stitch in the usual way but do not allow stitch to drop off left needle, take right needle tip behind left needle to knit into the back of the same stitch, then drop stitch off left needle.
Single increase: m1
Working into the strand lying between stitches is a neat way to increase one stitch. Make sure that the strand crosses over at the base of the new stitch or you’ll make a hole in the work.
Bring left needle forward and inserting tip from front to back of work, lift the strand from between the needles. Take right needle behind to knit into back of strand. If you want the strand to cross over in the opposite direction, place the strand on the left needle in the opposite direction and work into the front of it. This type of increase can also be worked as a purl stitch, lift the strand in the same way, then purl into the back of it.
Single increase: yo
Taking the yarn around the needle makes a stitch with a decorative hole at the base. Larger holes can be made by working more yarn-overs.
Between two knit stitches, bring the yarn between the needles to the front of the work and over the needle ready to knit the next stitch.
Between a knit and a purl stitch, bring the yarn to the front, over the needle and to the front again ready to purl the next stitch.
Between a purl and a purl, take the yarn over the needle and to the front again ready to purl the next stitch.


