Erhalten Sie Zugang zu diesem und mehr als 300000 Büchern ab EUR 5,99 monatlich.
- Herausgeber: IMM Lifestyle Books
- Kategorie: Lebensstil
- Sprache: Englisch
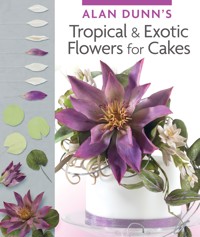
Features flowers that can be used on a cake or as a decorative arrangement. In this title, the designs include many species of orchid, rhizomes, gingers, heliconias, bird of paradise, bougainvillea and more. It also includes a comprehensive introduction covering all the essential information on materials, tools, techniques and basic recipes.
Sie lesen das E-Book in den Legimi-Apps auf:
Seitenzahl: 240
Veröffentlichungsjahr: 2016
Das E-Book (TTS) können Sie hören im Abo „Legimi Premium” in Legimi-Apps auf:
Ähnliche


Contents
Introduction
Equipment, materials, recipes and techniques
TROPICAL AND EXOTIC CAKES, FLOWERS AND SPRAYS
Perfumed perfection
Hawaiian perfume flower tree
Chinese yam (Dioscorea)
Ylang-ylang
Perfumed perfection bouquet
Flamingo floral
Anthurium
Flamingo flower
Frangipani bouquet
Butterflies and flowers
Butterfly flower tree
Zantedeschia berries
Joseph’s coat foliage
Butterfly flower bouquet
Moon and sun
Crane flower
Gingko
Monstera
Moon and sun bouquet
Painter’s paradise
Frangipani
Ladder fern
Message in a bottle
Flight of passion
Red passionflower
Passion and drama
Magical sensation
Scorpion orchid
Gum nuts
Umbrella tree stalks
Magical sensation spray
Tranquil waters
Devil’s ivy
Blue Egyptian water lily
Tuberose
Tranquil waters spray
African winds
Bird of paradise
Zantedeschia
Ixia
Flapjack kalanchoe
Bird of paradise bouquet
Dream shrine
Medinilla berries
Pink passionflower
Dream shrine spray
Lollipop vine and rose
Rose
Lollipop vine
King tillandsia
Rose and lollipop spray
Orchid vine wedding
Vanilla orchid
Begonia
Senecio
Orchid vine bouquet
Indian dream
Sacred lotus
Sacred lotus arrangement
Pink perfection
Peony
Pink perfection spray
Orchid trail wedding
Pink-fringed vanda orchid
Piper
Cordyline
Orchid trail bouquet
Templates
Suppliers
Index
Introduction
It is now almost twenty-five years since I started cake decorating and making sugar flowers. The first flowers I was taught were the rose, carnation and sweet-pea – all flowers that I loved making. However, it was the lessons that followed on exotic orchids and other more exotic and tropical flowers that really captured my imagination and fuelled my passion for making flowers.
I have included several exotic flowers in most of my previous books but I was thrilled to be given the chance to write this book concentrating on some of my more favourite tropical and exotic flowers and foliage. This book features many familiar exotic flowers as well as some more unusual species, combining them to create eye-catching displays that work well on all types of celebration cakes.
I love working with strong and vibrantly coloured flowers, foliage, berries and seed-heads, often using what seem like clashing colours at first glance but trying to strike a colour note that helps create a happy balance to make them ‘sing’ together. With the cakes and floral displays in this book I have tried to illustrate how the flowers can be used in a way that would appeal to the general public and cake decorators alike. It can sometimes be tricky introducing unusual and exotic flowers into cake design and sometimes the inclusion of the ever-popular and more familiar rose is all that is needed to convince a customer or recipient that tropical and exotic flowers can help add extra interest and drama to a cake design.
Whenever I travel I try to take photographs and sketches of the flowers I see, dissecting them to make templates, which always comes in very useful when I get home to start work on creating those flowers in sugar or cold porcelain. It is also fairly easy to obtain many species from garden centres and from florists. I also have a large collection of flower and gardening books, which can make reference work much easier, as well as images and a whole load of information at my disposal on the internet.
How closely you copy the flowers will depend on how you intend to use them. For a competition, you will need them to be fairly accurate. If you are creating flowers for you or a cake commission, however, don’t be afraid to alter and tweak the flowers to create something that might not be botanically correct but captures the spirit of the plant or reflects the mood that you yourself are in at the time of creating them. Go with your gut instinct and enjoy what can often be a fairly time-consuming process. This is what makes the work unique and adds character to a display. The cakes and floral displays in this book are there only as suggestions and you can decide to recreate them exactly or mix and match the elements to create designs individual to you.
Alan Dunn
EQUIPMENT, MATERIALS, RECIPES AND TECHNIQUES
There is a huge array of sugarcraft equipment and materials available commerically. Here, a variety of items that I consider to be very useful are listed.
EQUIPMENT
Non-stick board
This is an essential addition to the flower-maker’s workbox. Avoid white boards as they strain the eyes too much. Some boards can be very shiny, making it difficult to frill the petals against them. If this is the case, simply roughen up the surface using some fine glass paper prior to use or turn over the board and use the back, which is often less shiny. I always apply a thin layer of white vegetable fat rubbed into the surface of the board, then remove most of the excess with dry kitchen paper – this stops the paste sticking to the board and also makes you check each time to see if it is clean from food colour.
Rolling pins
It’s good to have a selection of non-stick rolling pins in various sizes. They are essential for rolling out flowerpaste, sugarpaste and almond paste successfully.
Foam pads
Foam pads are ideal to place petals and leaves on while you soften the edges. Make sure you buy one with a good surface as some have a rough-textured surface that will tear the edges of your petals or leave marks on them. I prefer either the large blue pad called a Billy’s block or the yellow celpad.
Wires and floristry tape
I buy mostly white paper-covered wires, preferring to colour or tape over as I work. The most consistent wires for quality are the Japanese Sunrise wires. These are available from 35-gauge (very fine but rare) to 18-gauge (thicker). Floristry tape is used in the construction of stems and bouquets. It contains a glue that is released when the tape is stretched. I use mainly Lion Brand nile green, brown and white tape.
Tape shredder
This tool contains three razor blades to cut floristry tape into quarter-widths. I have a couple of tape shredders and have removed two blades from one of them so that it cuts the tape into half-widths. Tape can often stick to an excess of glue left behind on the blades – rubbing a tiny amount of cold cream onto the blades with a cotton bud and also a little onto the lid that presses against the blades will help the tape run smoothly. It is also wise to remove any buildup of glue from the blades using fine-nose pliers and also to replace the blades regularly. Handle with care at all times.
Paintbrushes and dusting brushes
Good-quality, synthetic brushes or synthetic-blend brushes from art shops are best for flower-making. I use mainly short, flat, not too soft bristle brushes for applying layers of food colour dusts. To avoid having to wash them so regularly, it is best to keep brushes for certain colours. I use finer sable or synthetic-blend brushes for painting fine lines or detail spots onto petals.
Petal, flower and leaf cutters and veiners
There is a huge selection of cutters available from cake decorating shops, both in metal and plastic. There is also an impressive selection of commercial petal and leaf moulds/veiners to choose from. These are made from food-grade silicone rubber. They are useful for creating natural petal and leaf texturing for sugar work.
HOMEMADE LEAF/PETAL VEINERS
There are several craft products available that can be used to make moulds for leaves, petals, fruit, nuts and so on. It is important to try to find a food-grade product. Silicone plastique is a good medium to use with a quick-drying time. When making a mould of a petal or leaf, it is important to choose items with prominent veins. Note that most flowers and foliage produce stronger veins as they age. To make a mould:
1 Silicone plastique can be purchased as a kit. Mix the two compounds together thoroughly. The white material is the base and the blue is the catalyst – once mixed you will have about 10–20 minutes of working time before the medium sets – this often depends on the room temperature. It is important to flatten the product onto a sheet of plastic wrap or a plastic food bag as it tends to stick to everything in its sight.
2 Press the back of your chosen leaf or petal into the silicone putty, taking care to press the surface evenly to avoid air bubbles, which will create a fault in the veiner. When the compound has set, simply peel off the leaf or petal. Trim away any excess silicone from around the mould using a pair of scissors.
3 Next, very lightly grease the leaf veiner with cold cream cleanser – be careful not to block up the veins with the cream as this will ruin the final result. Mix up another amount of the two compounds and press firmly on top of the first half of the leaf veiner, again taking care to press evenly. When the second half has set, pull the two sides apart: you now have a double-sided leaf veiner.
Posy picks
These are used to hold the handle of a spray or bouquet of flowers in a cake. They come in various sizes and are made from food-grade plastic, which protects the cake from contamination by wires and floristry tape. Never push wires directly into a cake.
Stamens and thread
There is a huge selection of commercial stamens available from cake decorating shops. I use mainly fine white and seed-head stamens, which I can then colour using powder colours. Fine cotton thread is best for stamens. I use lace-making Brock 120 white thread, although thicker threads may be useful for larger flowers. An emery board is great for fluffing up the tips of the thread to form anthers.
Glue
Non-toxic glue sticks can be bought from stationery or art shops and are great for fixing ribbon to the cake drum’s edge. Always make sure that the glue does not come into direct contact with the cake. I use a hi-tack, non-toxic craft glue to attach stamens to the end of wires. The glue should not come into direct contact with the sugar petals as it will dissolve them.
Scissors, pliers, wire cutters and tweezers
Fine embroidery and curved scissors are very useful for cutting fine petals, thread and ribbons too. Larger florist’s scissors are useful for cutting wires and ribbon. Small, fine-nose pliers are another essential. Good-quality pliers from electrical supply shops are best – they are expensive but well worth the investment. Electrical wire cutters are useful for cutting heavier wires. It is important to use fine, angled tweezers without ridges (or teeth). They are useful for pinching ridges on petals and holding very fine petals and stamens. They are also handy when arranging flowers to push smaller items into difficult, tight areas of an arrangement or spray.
Plain-edge cutting wheel (PME) and scalpel
This is rather like a small double-sided pizza wheel. It is great for cutting out quick petals and leaves, and also for adding division lines to buds. A scalpel is essential for marking veins, adding texture and cutting out petal shapes too.
Metal ball tools (CC/Celcakes)
I use mostly metal ball tools to work the edges of petals and leaves. These are heavier than plastic ball tools, which means that less effort is needed to soften the paste. I mostly work the tool using a rubbing or rolling action against the paste, positioning it half on the petal/leaf edge and half on my hand or foam pad that the petal is resting against. It can also be used to ‘cup’ or hollow out petals to form interesting shapes.
Dresden/veining tool (J or PME)
The fine end of this tool is great for adding central veins to petals or leaves, and the broader end can be used for working the edges of a leaf to give a serrated effect or a ‘double-frilled’ effect on the edges of petals. Simply press the tool against the paste repeatedly to create a tight frilled effect or pull the tool against the paste on a non-stick board to create serrations. The fine end of the tool can also be used to cut into the edge of the paste to cut and flick finer serrated-edged leaves. I use a black tool by Jem for finer, smaller leaves and flowers, and the larger yellow PME tool for larger flowers.
Ceramic tools (HP/Holly Products)
A smooth ceramic tool is used for curling the edges of petals and hollowing out throats of small flowers, as well as serving the purpose of a mini rolling pin. Another of the ceramic tools, known as the silk veining tool, is wonderful for creating delicate veins and frills to petal edges.
Celsticks (CC/Celcakes)
Celsticks come in four sizes and are ideal for rolling out small petals and leaves and to create thick ridges. The pointed end of the tool is great for opening up the centre of ‘hat’-type flowers. The rounded end can be used in the same way as a ball tool, to soften edges and hollow out petals.
Kitchen paper ring formers
These are great for holding and supporting petals to create a cupped shape as they dry allowing the paste/petal to breathe, which speeds up the drying process (plastic formers tend to slow down the drying process). To make, cut a strip of kitchen paper diagonally in half, twist it back onto itself and then tie it in a loop, or for larger petals, cut a sheet of kitchen paper diagonally across, twist and tie.
MATERIALS
Egg white
You will need fresh egg white to stick petals together and to sometimes alter the consistency of the paste if it is too dry. Many cake decorators avoid the use of fresh egg white because of salmonella scares. I continue to use Lion brand eggs and always work with a fresh egg white each time I make flowers. There are commercially available edible glues that can be used instead of egg white but I find these tend to dissolve the sugar slightly before allowing it to dry, resulting in weak petals.
White vegetable fat
I use this to grease non-stick boards and then wipe of it off with dry kitchen paper. This conditions the board, helping prevent the flowerpaste sticking to it, and also removes any residual food colour. You can add a tiny amount of white fat to the paste if it is very sticky. You must be careful not to leave too much fat on the board as greasy patches will show up on the petals when you apply the dry dusting colours.
Cornflour bag
Cornflour is a life-saver when the flowerpaste is sticky. It is best to make a cornflour bag using disposable nappy liners. Fold a couple of layers of nappy liners together and add a good tablespoon of cornflour on top. Tie the nappy liner together into a bag using ribbon or an elastic band. This bag is then used to lightly dust the paste prior to rolling it out and also on petals/leaves before they are placed into a veiner.
Petal dusts
These food colour dusts contain a gum that helps them to adhere to the petal or leaf. They are wonderful for creating very soft and also very intense colouring to finished flowers. The dusts can be mixed together to form different colours or brushed on in layers, which creates more interest and depth to the finished flower or leaf. White petal dust can be added to soften the colours. If you are trying to create bold, strong colours it is best to dust the surface of the flowerpaste while it is still fairly pliable or at the leather-hard stage. A paint can also be made by adding clear alcohol (isopropyl) to the dust. This is good for adding spots and finer details. This dust can also be added to melted cocoa butter to make a paint that is ideal for painting designs onto the surface of a cake. Petal dusts can be used in small amounts to colour flowerpaste to create interesting and subtle base colours.
Paste food colours
These give quite a strong colour. I add paste colours to sugarpaste to cover cakes but I am not a huge fan of strongly coloured cake coverings. It is best to mix up a small ball of sugarpaste with some paste food colour and then add this ball to a larger amount of paste – this way, you will avoid adding too much colour to the entire amount of sugarpaste.
Liquid colours
These are generally used to colour royal icing, as they alter the consistency of flowerpaste, sugarpaste and almond paste but they can also be great to paint with. I mostly use cyclamen and poinsettia red liquid colours to paint fine spots and fine lines to petals.
Craft dusts
These are inedible so only intended for items that are not going to be eaten. Craft dusts are much stronger and much more light-fast than food colour dusts. Care must be taken – dust in an enclosed space, as once these colours get into the air they have a habit of landing where you don’t want them to.
Glazes and varnishes
See page 13.
RECIPES
COLD PORCELAIN
This is an inedible air-drying craft paste that can be used in almost exactly the same way as flowerpaste. The bonus with this paste is that the flowers made from it are much stronger and less prone to breakages. However, because it is inedible, anything made from this paste cannot come into direct contact with a cake’s surface, so flowers made from cold porcelain need to be placed in a vase, container, candle-holder or Perspex plaque. I tend to treat flowers made with this paste pretty much as I would fresh or silk flowers. There are several commercial cold porcelain pastes available but you can make your own – the recipe below is the one that I prefer. I use measuring spoons and measuring cups to measure out the ingredients.
INGREDIENTS
2½ tbsp baby oil
115 ml (4 fl oz/½ cup) non-toxic
hi-tack craft glue (Impex)
115 ml (4 fl oz/½ cup) white PVA wood glue (Liberon Super wood glue or Elmers)
125 g (4½ oz/1 cup) cornflour
Permanent white artist’s gouache paint
1 Work in a well-ventilated area when making this paste. Wear a filter mask if you suffer from asthma. Measure the baby oil and the two glues together in a non-stick saucepan to form an emulsion. Stir the cornflour into the mixture. It will go lumpy at this stage but this is normal.
2 Place the pan over a medium heat and stir the paste with a heavy-duty plastic or wooden spoon. The paste will gradually come away from the base and sides of the pan to form a ball around the spoon. Scrape any uncooked paste from the spoon and add it to the mix. The cooking time – usually around 10 minutes – will vary between gas, electric and ceramic hobs, but the general rule is the lower the heat and the slower you mix the paste, the smoother the resulting paste will be. I’m impatient so I tend to turn up the heat a little to cook faster. Keep on stirring the paste to cook it evenly. You will need to split the paste and press the inner parts of the ball against the heat of the pan to cook it too – be careful not to overcook.
3 Turn the paste onto a non-stick board and knead until smooth. The paste is quite hot at this stage. The kneading should help distribute some heat through the paste to cook any undercooked areas. If the paste is very sticky then you will need to put it back in the pan to cook longer. It is better if it is slightly undercooked as you can always add heat later – if the paste is overcooked then it is almost impossible to work with.
4 Wrap in plastic wrap and leave to cool – moisture will build up on the surface of the paste that, if left, will encourage mould growth, so it is important to re-knead the paste when cool and then re-wrap. Place in a plastic food bag and then in an airtight container, and store at room temperature. This paste has been known to work well two years after it was made if stored like this.
5 Prior to making flowers you will need to add a smidge of permanent white gouache paint. The paste looks white but by its very nature dries clear, giving a translucence to the finished flower. Adding the paint makes the finish more opaque. Handling the paste is quite similar to working with sugar except I use cold cream cleanser instead of white vegetable fat, and glue or anti-bacterial wipes/water to moisten the petals to stick them. Cornflour is used as for handling flowerpaste. The paste shrinks a little as it dries – this is because of the glue. This can be disconcerting to begin with but you will gradually get used to it and it can be an advantage when making miniature flowers.
FLOWERPASTE
I always buy ready-made commercial flowerpaste (APOC) as it tends to be more consistent than homemade pastes. The following recipe is the one I used prior to discovering the joys of ready-made flowerpaste! Gum tragacanth gives the paste stretch and strength too.
INGREDIENTS
5 tsp cold water
2 tsp powdered gelatine
500 g (1 lb 2 oz/3 cups) icing sugar, sifted
3 tsp gum tragacanth
2 tsp liquid glucose
3 tsp white vegetable fat,
plus 1 extra tsp to add later
1 large fresh egg white
1 Mix the cold water and gelatine together in a small bowl and leave to stand for 30 minutes. Sift the icing sugar and gum tragacanth together into the bowl of a heavy-duty mixer and fit to the machine.
2 Place the bowl with the gelatine mixture over a saucepan of hot water and stir until the gelatine has dissolved. Warm a teaspoon in hot water and then measure out the liquid glucose – the heat of the spoon should help to ease the glucose on its way. Add the glucose and 3 teaspoons of white vegetable fat to the gelatine mixture, and continue to heat until all the ingredients have dissolved and are thoroughly mixed together.
3 Add the dissolved gelatine mixture to the icing sugar/gum tragacanth with the egg white. Beat at the mixer’s lowest speed, then gradually increase the speed to maximum until the paste is white and stringy.
4 Remove the paste from the bowl, knead into a smooth ball and cover with the remaining teaspoon of white vegetable fat – this helps to prevent the paste forming a dry crust that can leave hard bits in the paste at the rolling out stage. Place in a plastic food bag and store in an airtight container. Allow the paste to rest and mature for 12 hours before use.
5 The paste should be well-kneaded before you start to roll it out or model it into a flower shape, otherwise it has a tendency to dry out and crack around the edges. This is an air-drying paste so when you are not using it make sure it is well wrapped in a plastic bag. If you have cut out lots of petals, cover them over with a plastic bag.
TECHNIQUES
COATING A CAKE WITH ALMOND PASTE
I adore the flavour and texture of almond paste. A layer of natural-coloured white almond paste gives a smooth, round-edged base on which to apply a layer of sugarpaste, creating a more professional finish and excellent eating quality too! It is important that the work surface is free of flour or cornflour, as if any gets trapped between the almond paste and the sugarpaste it can cause fermentation, encouraging air bubbles. It is best, but not always essential, to leave the almond paste-coated cake to dry out and firm up for a few days prior to icing.
1 Before applying any form of coating, the cake must be level. To do this, carefully cut off the top of the cake if it has formed a dome during baking. Then turn the cake upside down so that the flat bottom becomes the top. Fill any large indentations with almond paste if required. Place the cake onto a thin cake board the same size as the cake so that it is easier to move. You might also prefer to add a strip of almond paste around the base of the cake to seal it and the cake board tightly together.
2 Warm some apricot jam and a dash of water, brandy or Cointreau, and then sieve to make an apricot glaze that can be painted onto the surface of the cake. This will help to stick the almond paste to the cake and help seal it to keep it fresh. Apricot glaze is used as the colour is not too dark and the flavour tends not to fight with the taste of the cake or almond paste. You may also be able to buy ready-sieved apricot glaze in a jar – which also benefits from a dash of alcohol.
3 You will need a long, non-stick rolling pin large enough to roll out almond paste to cover at least a 30 cm (12 in) cake. Plastic smoothers are also essential to create a professional finish: a curved smoother for the top of the cake and a square-edged one for the sides. Rolling out almond paste to an even thickness can be tricky, and a novice cake decorator might find a pair of marzipan spacers useful to roll against. Depending which way they are placed, they can produce thick or thin sheets of almond paste/sugarpaste. Store the paste in a warm place prior to kneading to help soften it slightly – otherwise it can be quite hard to work with. Knead the paste on a clean, dry surface to make it pliable.
4 Lightly dust the work surface with icing sugar. Place the almond paste on top and if needed position the spacers on either side of the paste. Roll the paste out lengthways using the non-stick rolling pin. Turn it sideways and reposition the spacers on either side again. Continue to roll out the paste until it is large enough to cover the cake. A measuring tape, string or even using the length of the rolling pin to gauge the exact size of the cake top and its sides can be useful. It is always best to allow slightly more than you think you will need, especially for awkward-shaped cakes or anything with corners to it.
5 Using a round-edged plastic smoother, polish and smooth out the surface of the almond paste. Start gently, gradually increasing the pressure to even out any slightly uneven areas of the paste.
6 Place the rolling pin on top of the almond paste and use it to help lift the paste over the cake. Remove the rolling pin and ease the almond paste into place. Smooth the surface of the cake to remove any air bubbles. Tuck the paste to fit the sides. If you are working on a cake with corners, it is best to concentrate on these first of all.
7 Use the curved-edge smoother to polish the top of the cake. Use strong, firm hand movements to ‘iron out’ any imperfections. Use the edge of the straight-edged smoother to cut and flick away the excess paste from the base of the cake. Finally, use the straight-edged smoother to iron out the sides of the cake using a fair amount of pressure. Place the cake onto a sheet of greaseproof paper and, if time allows, leave to firm up overnight or for a few days prior to coating with sugarpaste.
COATING A CAKE AND CAKE DRUM WITH SUGARPASTE
Plastic sugarpaste smoothers are essential when covering a cake with sugarpaste. The round-edged smoother is good for working on the top of the cake and the straight-edged smoother is good for working on the sides, giving a sharper edge at the base. Covering a cake with sugarpaste is a fairly straightforward process – however, practice is needed to achieve very neat results. If you are colouring the sugarpaste it is best to use paste food colour or to thicken liquid colours with icing sugar. It is safer to colour a small amount of sugarpaste and then knead this into the larger amount of paste to control the depth of colour rather than create a paste that is too brightly coloured.
1 Knead the sugarpaste on a clean, dry sugar- and flour-free surface until smooth and pliable. Try not to knead in too many air bubbles. When kneaded, lightly dust the work surface with sieved icing sugar and place the sugarpaste on top, with any cracks against the work surface. Roll out, smooth and polish the paste as described for almond paste coating.
2 Moisten the surface of the almond paste with clear alcohol (Cointreau, kirsch or white rum can all be used). Use a sponge to apply the alcohol as this gives a more even covering. Any dry areas will encourage air bubbles to be trapped between the almond paste and the sugarpaste. The alcohol helps to stick the sugarpaste to the almond paste and also acts as an antibacterial agent.
WIRING PETALS AND LEAVES
This is my favourite method of constructing flowers. It gives the flowers much more movement and extra strength too, resulting in fewer breakages.
1


