Erhalten Sie Zugang zu diesem und mehr als 300000 Büchern ab EUR 5,99 monatlich.
- Herausgeber: Fox Chapel Publishing
- Kategorie: Lebensstil
- Sprache: Englisch
A fresh approach to designing and building chicken coops with seven stylish designs that your flock will adore and your neighbors will envy. Hop on board the backyard chicken raising trend! Use your woodworking skills and the fun designs in this book to build your flock a stylish coop.
Sie lesen das E-Book in den Legimi-Apps auf:
Seitenzahl: 152
Veröffentlichungsjahr: 2011
Das E-Book (TTS) können Sie hören im Abo „Legimi Premium” in Legimi-Apps auf:
Ähnliche


Acknowledgments
A lot of people were involved in helping this book to become a reality. I would like to start by thanking Wasatch Community Gardens for promoting the cause of backyard chickens in Northern Utah. I would also like to thank Kerri Landis for doing such a smart and careful job as an editor, and Peg Couch at Fox Chapel Publishing earned my appreciation for taking a chance with a new author. Here’s to more great projects down the road!
From the Author
Having grown up on a dairy farm in upstate New York, it wasn’t a large stretch for me to begin raising chickens as an adult. My wife and I caught the bug about six years ago, and have been backyard poultry enthusiasts and evangelists ever since. We have had anywhere from six to twenty-five birds at a time. In addition to building and selling coops, I do a lot of consulting with small-flock owners in our area. This has led me to teach chicken coop workshops in conjunction with Wasatch Community Gardens. More than two hundred people attended my last class, and it has become an annual event. I very much enjoy the daily pleasures of raising chickens and helping others to get involved. Welcome to one of the most interesting and rewarding backyard hobbies you can find!
Here’s one of my coops, chock-full of our current flock. Though we don’t name our chickens, we really enjoy watching them go about their daily business.
My daughter, Abigail, has grown up helping us raise chickens—one of the perks of this hobby is being able to show your kids firsthand where some of their food comes from.
Chris Gleason is the author of several books for the DIY market including Built-In Furniture for the Home, Kitchen Makeovers for Any Budget, Complete Custom Closet, Old-School Woodshop Accessories, and Building Real Furniture for Everyday Life. He currently builds and sells chicken coops, and has owned Gleason Woodworking Studio for more than 13 years.
CONTENTS
ABOUT THIS BOOK
COOP DESIGNS
Coop #1: SUNNY SIDE UP
A Classic Design with an Easily Accessible Nest Box
Coop #2: CHICKEN CONDO
A Multilevel Coop with a Small Footprint
Coop #3: SIMPLY SALVAGED
Rustic Board-and-Batten Siding Complements This 3-Level
Profile #1: JIMMY & BRIT
Coop #4: RUSTIC SOPHISTICATION
Fish Scale Shingles and a Front Porch Add Victorian Class
Coop #5: LITTLE BIG BARN
A Low Design to Create Easy Access for Children
Profile #2: ANDREW STONE
Coop #6: GYPSY HEN CARAVAN
A Whimsical Nomadic Coop
Coop #7: HOW THE CHICKEN CROSSED THE ROAD
A Movable Coop that Makes Cleanup Easy
Profile #3: KATE & MOLLY
COOP RUNS
MORE COOP IDEAS
Index
ABOUT THIS BOOK
This book is primarily a handbook to guide your creation of the perfect chicken coop for your backyard flock. There are plans and step-by-step illustrated instructions for constructing seven unique coops, and a brief gallery for more inspiration.
the coops
Just over half of the coop designs are sized to fit a flock of 6—I figured this was a good size that most people would use. There are also designed options for 12, 14, and 15 chickens. However, if you see a coop you like, but it isn’t sized correctly for your flock, the easiest method for resizing is simply enlarging the floor area of the coop by 2 square feet (.2 square meters) per additional bird and then adapting the other parts to fit. You will also need 8" to 10" (200mm to 250mm) of roost space per bird; and don’t forget that you need one nest box for every 4 chickens.
I like to use as much salvaged and recycled construction material as possible, so you’ll often see me utilizing old cabinet doors as coop doors, partial sheets of plywood rescued from another project, or even old hardware and fixtures. I encourage you to piece together your coop using creativity and salvaged materials, but of course you can always go to the nearest lumber supply store and pick up new plywood and 2x4s.
After you’ve finished building your coop of choice, turn to page 136 to read up on building a run. You’ll need one of those unless you already have a fenced-in area for your flock, or if you’re comfortable allowing your chickens to really be free range!
HOW MANY CHICKENS FIT IN THESE COOPS?
•6 chickens: Coop #2, #3, #4, #6
•12 chickens: Coop #1
•14 chickens: Coop #5
•15 chickens: Coop #7
A Word About Metric
The measurements in this book appear first in imperial (inches, feet), followed by metric (millimeters), in order to accommodate woodworkers who use both measurement systems. When the measurement must be exact—as when one piece must fit with another precisely—we’ve rounded to the nearest whole millimeter. When the measurement is more general, we’ve rounded to the nearest 0, 2, or 5mm. With regard to nominal lumber measurements (2x4, 1x6, etc.), we’ve listed the metric actual measurement—in other words, the measurement that the piece of wood actually is, rather than what it was originally sawn to. By this reasoning, a 2x4 is 38x89mm, rather than 50x100mm. Additionally, plywood thickness is shown as the most common actual metric thickness; for example, though ½"-thick plywood can be anywhere from 11 to 12 ½mm, the most common thickness (and how we will list it) is 11mm.
Coop #1:
SUNNY SIDE UP
Coop #2:
CHICKEN CONDO
Coop #3:
SIMPLY SALVAGED
Coop #4:
RUSTIC SOPHISTICATION
Coop #5:
LITTLE BIG BARN
Coop #6:
GYPSY HEN CARAVAN
Coop #7:
HOW THE CHICKEN CROSSED THE ROAD
advice and entertainment
Building a coop is not all instructions and assembly—you need inspiration and encouragement. And let’s not forget why you’re embarking on this endeavor—you want to raise chickens! For these reasons, I tossed in a lot of fun and useful information to help you on your way toward being a good flock parent. There are photo- and advice-filled profiles from three chicken keepers who’ve lived the chicken-keeping life. Also, keep your eyes peeled for the sidebars and tidbits on the bottom of each right-hand page throughout the text. This informational egg hunt will yield interesting, helpful, and just-plain-entertaining information about raising chickens, egg dishes from around the world, advice on selecting breeds, and more!
coop-a-doodle-do:Coop DESIGNS
Which came first: the chicken or the egg?
The correct answer to this age-old question is neither. The coop came first.
This section contains seven coop designs to get you on your way to housing your peeps. Whether you have a large amount of space or a small backyard, six birds to house or fifteen, lots of money to spend or little—you’ll find a design here to help your chickens get cooped up in style!
When you’ve finished your coop, flip to page 136 for information on building a run to fence in your chickens.
Important Coop Parts
□Roosts: To sit on
□Ladders: To climb up
□Nest Boxes: To lay eggs in
□Floor: To stand and poop on
□Windows and Doors: To ventilate and allow easy cleaning
□Roof: To keep the weather out
□Run: To keep predators out and keep chickens from wandering away
ESSENTIAL DIMENSIONS FOR COOP BUILDING
When resizing a coop design to fit your flock, pay special attention to the following dimensions:
•2 square feet (.2 square meters) of coop space per bird
•1 nest box per 4 birds
•8" to 10" (200mm to 250mm) of roost space per bird
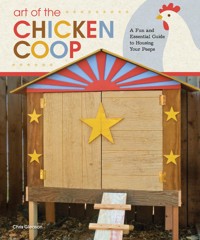
coop #1
SUNNY SIDE UP
A Classic Design with an Easily Accessible Nest Box
I’ve built a number of coops in this style, and they’ve worked out really well. I like to dress them up a bit, but I’m sure different folks will enjoy personalizing their coops to match their own unique tastes. Regardless of the aesthetic treatments you might use, there are a number of practical qualities to this design that any poultry owner will appreciate.
In terms of size alone, this design is pretty versatile. The coop measures 4’ x 6’ (1200 x 1800mm), which provides 24 square feet (2.2 square meters) of floor space. With an allotment of 2 square feet (.2 square meters)/bird, a structure of this size could house up to 12 chickens. You could certainly scale the concept to accommodate smaller or larger flocks, too.
The nest boxes are contained in a separate area—often called a sidecar—that is easily accessible from outside of the run. Some people like this aspect, while others don’t seem to mind entering the run every day to collect eggs. I fall into this latter camp, but then again, I am somebody who likes to pull a folding chair into the run daily and relax with the chickens.
Because this coop is up on stilts, its large footprint provides a big shady area for birds to escape to on hot days. This also makes for good airflow; the area below the coop receives a breeze to keep the ground dry, which is an important consideration for disease prevention. And speaking of ventilation, the coop has two large sets of double doors that allow for great interior circulation. The doors also make clean-out easier, and the roosts are removable to help with this as well.
Because I often build my coops off-site, I need to be able to transport them to their final homes. In this case, the coop was a skosh too large for my van, so I built it to be easy to take apart and re-assemble. This may not be a consideration for you, but it is a real-world fact of life for some of us.
Shakshuka, Israeli: Eggs poached in spicy tomato sauce.
1Start with the bottom. The place to start building a coop like this is with the bottom (A). I used a 4’ x 8’ (1200 x 2400mm) sheet of ⅝" (15mm) plywood, although any thickness between ½" (11mm) and ¼" (6mm) would be fine. The bottom of the coop will be 4’ x 6’ (1200 x 1800mm), so I needed to trim down the plywood—I used a straightedge to draw a line for the cut.
2Cut out the bottom. I used a jigsaw, since it tends to be my go-to saw, but a circular saw would be a great choice too. Keeping the plywood up on sawhorses makes the process a bit easier.
MATERIALS LIST
item
material
dimensions
quantity
A Platform (floor)
⅝” (15mm) plywood
4' x 6' (1200 x 1800mm)
1
B Long-side floor framing
2x4 (38 x 89mm)
6' (1800mm)
2
C Short-side and middle floor framing
2x4 (38 x 89mm)
45" (1100mm)
3
D Side wall panels
½" (11mm) plywood
6' x 3' (1800 x 900mm)
2*
E Front and back wall panels
⅝” (15mm) plywood
4' x 3' (1200 x 900mm)
2*
F Wall corner posts
2x2 (38 x 38mm)
32" (800mm)
4
G Nest box bottom
¾" (17mm) plywood
43½ 1" x 12" (1100 x 300mm)
1
H Nest box sides
¾" (17mm) plywood
1' x 1' (300 x 300mm)
2
I Nest box back
½" (6mm) plywood
45" x 10" (1100 x 300mm)
1
J Nest box lid
¾" (17mm) plywood
46" x ½" (1200 x 300mm)
1
K Long nest box divider
¾" (17mm) plywood
12" x 10" (300 x 300mm)
1
L Short nest box dividers
¾" (17mm) plywood
6" x 10" (150 x 250mm)
2
M Side door trim
1x4 (19 x 89mm) pine
various lengths
10 linear feet
N Gable end panels
¾" (17mm) OSB
48" x 14" (1200 x 400mm)
2
O Truss
2x2 (38 x 38mm)
48" (1200mm)
2
P Truss cross-tie
½" (6mm) plywood
48" x 10" (1200 x 300mm)
1
Q Roof panels
⅜" (8mm) plywood
84" x 40" (2100 x 1000mm)
2
R Gable trim
2x2 (38 x 38mm)
40" (1000mm)
2
S Door panels
¾" (17mm) MDF or similar
28" x 16" (700 x 400mm)
4
T Sunburst overlay
¼" (6mm) plywood
48" x 14" (1200 x 400mm)
1
U Legs
2x4 (38 x 89mm)
18" (500mm)
4
Scrap metal
Screws
Hinges
Paint
Brass hook and catch
Tar paper
Galvanized roofing
Chicken wire
Staples
* Note that I didn’t have pieces of these dimensions for this coop, so I patched together smaller pieces and reinforced the joints as needed. Follow whatever approach works for you.
Kookoo-e Baademjan, Iranian: A baked dish with eggs, eggplant, onion, garlic, saffron, and lime.
3Screw on the 2x4 frame. The stiffness of the floor comes mostly from the framing (B, C) along its edges. 2x4s provide a great deal of rigidity when they’re screwed to the plywood with 2" (50mm) screws at 12" (300mm) intervals. Attach the 3 shorter 2x4s (C) on the two short edges and the middle of the floor (A).
4Screw the 2x4 corners. To get a tight joint on the corners, I used a long pipe clamp and screwed the 2x4 corners together. Pre-drilling wasn’t necessary. You’ll notice that the wood is used—I love to build coops from reclaimed materials, and the patina on this wood doesn’t affect its strength or structural integrity.
5Make the solid side panel. I made one solid side (D) from ½" (11mm) plywood with 2x2s screwed to the underside at the vertical edges. The 2x2s (F) will act as corner posts to attach the adjacent side panels to. I set up the 2x2s 4" (100mm) from the bottom of the plywood so that the side panels will hang down and cover up the 2x4 of the bottom assembly.
6Attach the solid side panel. One side panel (D) can be screwed to the bottom assembly with 1 ½" (40mm) screws. This joint can be reinforced with construction adhesive if you’d like.
7Make the front panel. The front of the coop (E) was made from a pair of ½" (11mm) plywood panels. I used two panels because that was what I had to work with. In an ideal world, I would’ve used a single piece, but with reclaimed materials, sometimes you have to make compromises. This photo shows the first panel set in place.
8Prepare to cut in door openings. The front of the coop (E) requires a large set of doors (S) to provide easy access for cleaning and good ventilation. I laid out the opening with a framing square. Sometimes I build chicken coop doors out of old cabinet doors, which require a precisely-sized opening. In this case, I’ll be building the doors later, so the exact size of the opening isn’t critical.
9Cut front door openings. I used a jigsaw to cut out the opening on the first panel and then drew lines for a matching cut on the other panel.
10Reinforce the front panels. When the opening is cut out, it is important to reinforce the joint between the two panels. On the interior, I screwed a piece of scrap with plenty of surface area for screws and glue. This piece was 20" (510mm) long, leaving 10" (255mm) on either side of the joint to work with.
The first documented use of the word “squawk” was in 1821.
11Construct the first back panel. The back of the coop (E) was assembled in a similar fashion. A major difference was the size of the opening—the nest box will be installed here. Again, I could’ve used a single plywood panel, and then made a cutout for the entrance into the nest boxes, but since I didn’t have large pieces of plywood to work with, I began by setting a vertical piece into place to build up the back.
12Construct the second back panel. The other vertical panel that makes up the back (E) was constructed just like the solid side panel (D), using a 2x2 corner post (F).
13Construct the last back panel. With both vertical panels in place, I measured for the middle horizontal panel and cut it out on the table saw.
14Reinforce the back panel. The middle panel has to be reinforced on the inside just like the joint on the front panel. This construction method provides plenty of strength, while still allowing you to be resourceful with the materials you have on hand.
15Construct the side door panel. The other side of the coop (D) went together just like the back panel. Again, I could’ve used a large plywood panel for this, but—you guessed it—I didn’t have any on hand, and this method allowed me to use up odds and ends that otherwise might’ve ended up in a landfill. This side is perfect for scraps because it also has a large set of doors (S) to aid with cleanup.
16Construct the nest box. The external nest box is essentially a four-sided box that is constructed with butt joints. The sides (H) are cut so that they taper toward the outside of the box, and the whole subassembly is open on the back side so that the chickens will have easy access to the nest boxes from the coop interior. I used ¾" (17mm)-thick plywood scraps for the nest box sides (H) and bottom (G).
17Attach the nest box. I had some scrap sheet metal that I used to fabricate the simple L-shaped brackets that attach the nest box to the coop. Tin snips, a metal-cutting jigsaw blade, or an angle grinder will help you to cut the metal to the right size, or you could just use pre-made brackets.
18Notch the bottom. The nest box is also supported by the floor of the coop—I cut out the edges of the bottom of the nest box so that the floor could be set into the opening in the side panel. This makes for a really strong connection between the nest box and the main structure.
Provide 1 nest box for every 4 birds.
19Install nest box dividers. Because this nest box measures nearly 4' (1200mm) long, I could’ve divided it into 4 separate compartments (12" [300mm] wide is considered sufficient for most layers), but I divided it into 2 main parts using a long divider (K) and then partially divided the halves with shorter dividers (L). I like to build nest boxes on the big side—in my experience, it isn’t uncommon for multiple hens to occupy a box at the same time, so I figured a little extra space wouldn’t hurt.
20Attach trim to the front. Once the main structural elements are in place, I turn my attention to the details. I like to make and attach fancy trim to the most visible sides of the coop. In this case, the horizontal trim piece (M) above the side door opening also serves to reinforce the joints between the plywood sub-panels. You can also see the ladder here.
21Cut out the first gable.


