Erhalten Sie Zugang zu diesem und mehr als 300000 Büchern ab EUR 5,99 monatlich.
- Herausgeber: Robert Hale Non Fiction
- Kategorie: Geisteswissenschaft
- Sprache: Englisch
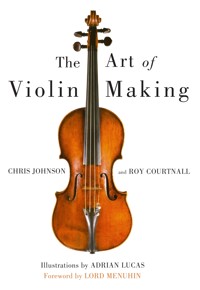
"The Art of Violin Making" is the major work for the craftsman, bringing into one volume a summary of essential information for the violin maker and player, as well as providing a historical reference. Part One: The Violin Makers is devoted to separate chapters on the life and work of some of the greatest of all violin makers; the families of Amati, Stradivari and Guarneri, and the unique genius of Jacob Stainer. These chapters include superb colour photographs of examples of their work. Also included is a chapter covering the work of some leading contemporary violin makers. Part Two: The Workshop, Tools and Materials provides essential information on the tools, working environment and material needed by violin makers. Part Three: Violin Construction comprises a detailed, step-by-step guide to the traditional method of violin making, based closely on the teaching system employed at the world-famous Newark School of Violin Making in England.
Sie lesen das E-Book in den Legimi-Apps auf:
Seitenzahl: 450
Veröffentlichungsjahr: 1999
Das E-Book (TTS) können Sie hören im Abo „Legimi Premium” in Legimi-Apps auf:
Ähnliche


The Art of Violin Making
By the same author
Making Master Guitars (Roy Courtnall)
The Art ofViolin Making
Chris Johnson and Roy Courtnall
Illustrations by
Adrian Lucas
Foreword by Lord Menuhin
First published in 1999 by Robert Hale, an imprint ofThe Crowood Press Ltd, Ramsbury, Marlborough Wiltshire SN8 2HR
www.crowood.com
This impression 2020
This e-book first published in 2024
© Chris Johnson and Roy Courtnall 1999
All rights reserved. This e-book is copyright material and must not be copied, reproduced, transferred, distributed, leased, licensed or publicly performed or used in any way except as specifically permitted in writing by the publishers, as allowed under the terms and conditions under which it was purchased or as strictly permitted by applicable copyright law. Any unauthorised distribution or use of this text may be a direct infringement of the author’s and publisher’s rights, and those responsible may be liable in law accordingly.
British Library Cataloguing-in-Publication DataA catalogue record for this book is available from the British Library.
ISBN 978 0 7198 3166 9
The right of Chris Johnson and Roy Courtnall to be identified as authors of this work has been asserted by them in accordance with the Copyright, Designs and Patents Act 1988.
Contents
Foreword by Yehudi Menuhin
Acknowledgements
List of Illustrations
Introduction
Part I The Violin Makers
1 Amati
2 Stradivari
3 Guarneri
4 Stainer
5 Contemporary Violin Makers
Part II The Maker’s Workshop
6 The Workshop, Tools and Materials
Part III Violin Construction
Introduction
7 Mould
8 Ribs
9 Linings
10 Front
11 Back
12 Plate Tuning
13 Neck and Scroll
14 Assembly
15 Varnish
16 Fittings and Set-up
Sound Adjustment by Gerald Botteley
Appendices
1 Technical terms
2 Metric/imperial conversion tables
3 Suppliers of tools, materials, plans and journals
4 Collections of musical instruments
Bibliography
Index
In memory of Rowan Armour-Brown,who brought freshness to violin making
Foreword by Yehudi Menuhin
This very comprehensive treatise on an art cherished as much by the professional as by the amateur, will be gratefully acclaimed by both.
Exhaustive in its detailed exposition of the actual process of construction (and beautifully illustrated), conceived, as it is, by two disciples of a distinguished English achievement – The Newark School of Violin Making – it carries the inspiration and the authority of that commitment to perfection, which is the supreme beauty of sound, aspect and touch of a violin.
I believe that the British inborn love for wood, the superlative excellence of its craftsmen and great artists in the creation of some of the world’s most beautiful furniture, together with the cultivation of the human voice in song and choir and with that exquisite sense of texture in the caressing and dramatic painting of nature as of people, bringing together the visually aesthetic, the living vibrations of sound, and the ‘feel’ of something we love, are all three responsible for the great number of amateur violin makers, often of excellent quality, and the establishment of the Newark School.
Because of the inbuilt, inescapable demands of an object which must satisfy these three essential elements, the art of violin making has always been served by dedicated human beings who have placed their work ahead of their pocket. Of course, the market place today is a favourable one, for almost no violinists can afford the ever-rising prices of the past masters of this European art – in Italy especially, but also, importantly, in England, in France, in Spain, in Bohemia, and in Germany. The good violin maker of today can finally actually make a living but always, and forever, remains true to himself (now also herself). The ‘luthier’ (violin maker) remains an artist.
We should also remember that while the skill of violin making became a commanding art form, the violin remained an instrument of the people in regions as removed from each other as Russia, the Ukraine, Bohemia, Scotland, Norway, and the Blue Mountains of America. A remarkable museum in Moscow is witness to this folk-art. The exhibits reveal a rough-hewn assembly of shapes and sizes as odd and diverse as possible, but are all violins (fiddles) shaped to allow the use of a bow over four strings, and are playable at outdoor village and castle festivities in every kind of inclement weather and every degree of temperature. (Chagall has immortalized these Klesmer.) The violin has accompanied dancing from the armadillo-backed instruments of tribes in Senegal to the eighteenth-century ‘pochette’ violins of European dancing-masters. (It seems to me that we must have evolved at least in one way since 1769, when Lord Chesterfield described the world of music thus: ‘fiddlers, pipers and id ganus omne, most unedifying and unbecoming company for a man of fashion’.)
The violin is truly the most immediate instrument of human motion, as of human emotion. As a perfect instrument it cannot be otherwise. I know that, aided by this book, it will continue to fulfil the demands of composers, of interpreters, of our improvisers, and of our publics in the same way as it has served the dances and the stylized dances of Bach’s day, the waltzes of Strauss’s Vienna, our great classical heritage, as it still serves the heartfelt dictates of gypsy and Jew.
Acknowledgements
We are grateful to the many people who have helped with the production of the book; in particular, we thank the following (in alphabetical order): Charles Beare, Gerald Botteley (for his words of wisdom), Paul Bowers, Kerry Boylan, Glen Collins, Georgina Coulam, Joseph Curtin, John Dilworth, Daniel Draley, David Green, Roger Hargrave, Malcolm Hunt, Dr Carleen Hutchins, Helen Johnson (whose hands appear throughout Part III, for her patience, hard work and word-processing), Patrick Jowett, Ian Kalinowski (for his photography), Joan Littlejohn, Adrian Lucas, Bernard Michaud, Katie Owen (Sotheby’s London), Sunshine Patterson and Edward Francis (for translation services), Robert Payn, Patrick and Andrea Robin-Frandsen, Duane Rosengard, Wilf Saunders, Anne Steinberg (The Ashmolean Museum, Oxford), Jenny Summerfield (for historical research in Part I), Dianne Terry and Peter Trevelyan (for making the Jacob Stainer violin available) and the owner of the Andrea Guarneri violin (a kind lady).
Chris Johnson
Roy Courtnall
England 1998
Illustrations
1.1–1.7 The ‘Alard’ violin by Nicolò Amati 1649
2.1–2.7 ‘Le Messie’ violin by Antonio Stradivari 1716
3.1–3.8 Violin by Andrea Guarneri 1650
4.1–4.8 Violin by Jacob Stainer 1671
5.1 Paul Bowers
5.2 A violin by Paul Bowers
5.3 Glen Collins
5.4 A late del Gesù copy by Glen Collins, made for Catherine Frith
5.5 John Dilworth with assistant Tibor Szemmelweisz
5.6 A Stradivari-model cello by John Dilworth
5.7 Roger Hargrave marking cellos at Manchester in 1996
5.8 Copy of an Anselmo Bellosio violin by Roger Hargrave
5.9 Patrick Jowett
5.10 A violin by Patrick Jowett
5.11 Patrick and Andrea Robin-Frandsen
5.12 A violin by Andrea Robin-Frandsen
5.13 Cello scroll by Patrick Robin
6.1 Fretsaw, small razor saw, tenon saw, large razor saw, coping saw
6.2 Jack plane, smoothing plane, block plane
6.3 Sliding bevel, small engineer’s square, steel rule, vernier calliper, odd leg calliper, medium and small dividers
6.4 Various files and rasps
6.5 Various gouges
6.6 Large, medium and small ‘G’ clamps, spool clamps, bass-bar clamps, peg lining clamp
6.7 Thicknessing callipers, purfling marker, thickness marker
6.8 Various knives
6.9 Bending irons
6.10 Peg shapers, soundpost setter, inspection light, inspection mirrors, peg-hole reamer
6.11 Various thumb planes
6.12 A pair of ‘f’ hole cutters
6.13 Various scrapers
6.14 Violin backs being cut at Wright’s Sawmill, Elston, Nottinghamshire
6.15 Violin backs drying at Wright’s Sawmill
6.16 End-grain view of spruce magnified x248, showing one year’s growth
7.1 Moulds from the Hill Collection at Newark School of Violin Making
7.2 A half-template is produced giving a line 3.75mm inside the final outline
7.3 How the corner is formed
7.4 Mark the position of the holes in the template, and cut the notches in the edge
7.5 Typical mould showing positions of block recesses and clamping holes
7.6 Filing the mould edge
7.7 Dimensions of the clamping blocks
7.8 Marking the clamping blocks
7.9 Adjusting the angles of the ‘C’ clamping block to suit the ‘C’ rib ends
7.10 Splitting wood for the blocks
7.11 Ensuring that the grain runs away from the mould when sawn wood is used for the blocks
7.12 Block dimensions before fitting to mould
7.13 The rib heights tapering towards the top block
7.14 The blocks which should extend beyond the outline before trimming
7.15 The mould being raised from a flat surface
7.16 Gluing the blocks to the mould
7.17 The tops of the blocks being made level
7.18 Marking the centreline on the top and bottom blocks
8.1 Medullary rays which are parallel to the surface
8.2 Planing the edge of the ribs
8.3 The grain configuration of figured maple
8.4 Modified block plane blade, used with bevel facing upwards
8.5 Planing the ribs
8.6 Measuring the rib thickness
8.7 Scraping the ribs
8.8 Cutting the corner blocks
8.9 Checking the block
8.10 Using the template
8.11 Continuing the curve into the waste area
8.12 Marking a line past the tip of the corner
8.13 Paring back the corner block
8.14 Using a damp cloth with a bending strap
8.15 Heating the end of the rib
8.16 Forming the first curve
8.17 Checking the ‘C’ rib
8.18 The ‘C’ rib in place on the mould
8.19 Correcting the curve
8.20 Straightening a rib curve
8.21 Marking the ribs
8.22 Cutting the ribs
8.23 Squaring the end of the ribs
8.24 The gap between the clamping block and the corner block after the clamp is tightened
8.25 Clamping the ‘C’ rib
8.26 The ‘C’ rib edge is proud of the corner block
8.27 Planing the ‘C’ rib
8.28 Finishing the bottom block curve
8.29 The squared off rib of the bout at the point where the ‘C’ rib feathers off
8.30 Continuing the curve of the template across the ‘C’rib
8.31 Trimming the corner blocks
8.32 Feather-edging the ‘C’ rib
8.33 The rib of the bout extending beyond the end of the ‘C’ rib
8.34 Positioning the lower rib
8.35 Removing a corner of the rib
8.36 Checking the joint of the ribs
8.37 The gap between the ribs
8.38 Forming the rib joint at the bottom block
8.39 Planing the ribs
8.40 Finishing the rib corners
8.41 Shortening a rib corner which may expose the ‘C’ rib end
9.1 The linings which are glued along the rib edges
9.2 Bending the linings
9.3 The use of adapted clothes pegs to make lining clamps
9.4 The ‘C’ rib linings being let into mortices in the corner blocks
9.5 Dimensions of mortices in corner blocks
9.6 Cutting the mortices
9.7 The template in position
9.8 The linings glued in
9.9 Dimensions of finished linings
9.10 Trimming the linings
10.1 Annual rings when viewed from the end
10.2 Staining at the joint edge
10.3 Establishing the minimum thickness at the centre joint
10.4 Front half mounted ready for planing the joint edge
10.5 The 90 degree angle of the joint
10.6 Checking that the edge is square
10.7 Testing the joint
10.8 Establishing faults in the joint
10.9 Gluing the joint
10.10 The front which can be wedged between fixed batons before planing the lower surface
10.11 The washer used to mark the front outline
10.12 Marking the front at the centreline
10.13 Drilling the pin holes
10.14 Clamping the ribs to the front
10.15 Marking the rib outline
10.16 Marking the overhang
10.17 Marking the rib corners
10.18 Extending a line across the corner to the centreline when constructing the corner shapes
10.19 The front mounted for sawing the outline
10.20 Sawing the outline
10.21 Carving board. Use 19mm plywood or similar
10.22 The pilot holes
10.23 The front planed at each end
10.24 The reduced edge thickness
10.25 The arching which may rise steeply from the edge at the ‘C’ bouts
10.26 Shaping the outline
10.27 Finish the two radii of the corners before shaping the end
10.28 The plates can be pinned to the ribs
10.29 The edge thickness may increase at the corners
10.30 Use a cutting gauge to mark the edge thickness
10.31 Mark the edge thicknesses clearly
10.32 Establishing the final edge thickness
10.33 Be sensitive to the grain direction when paring down the edges
10.34 Ensure that the lowest point is at the edge itself
10.35 A line is marked parallel to the outline
10.36 A platform is formed around the edge
10.37 Typical purfling thicknesses after scraping
10.38 Establish the correct distance from the purfling to the edge
10.38a Purfling too close to edge
10.38b Purfling too far from edge
10.39 The purfling sometimes points across the corner slightly
10.40 The outer black extended slightly to form ‘bee sting’
10.41 Marking the purfling channel
10.42 The walls of the purfling channel should remain vertical
10.43 Purfling knife with bevel on one side only
10.44 Cutting the purfling channel
10.45 Cleaning out the channel
10.46 The two lower edges of the purfling can be lightly bevelled
10.47 When cutting the purfling mitres the strips should remain parallel
10.48 Fitting the purfling
10.49 Gluing the purfling
10.50 The long-arch template may need to be stiffened along its edge
10.51 The long-arch template is placed along the centre line
10.52 Rough arching
10.53 Forming the long arch
10.54 Blending the arching
10.55 Contour tool made from 19mm plywood or hardwood
10.56 Using the contour marker
10.57 Contour lines
10.58 It may be necessary to work in both directions when fluting the purfling
10.59 The edge is fluted up to the high point mark
10.60 Fluting the edges
10.61 Fluting the corners
10.62 Using a straightedge on the long arch
10.63 Shape of flexible scraper used for arching
10.64 Using shadow when scraping
10.65 Using a flexible scraper
10.66 Fluting the soundhole wings
10.67 The corner of the wing remains level with the arching
10.68 Blend the wing fluting into the ‘C’ bout
10.69 Fixture used for hollowing front made from 19mm plywood or similar
10.70 Mark the boundary line before hollowing
10.71 Hollowing the front
10.72 Thicknessing the front
10.73 Checking the thickness
10.74 Scraping the front
10.75 Positioning the soundholes
10.76 Tool for cutting soundhole circles
10.77 Drilling the pilot holes
10.78 Cutting the upper holes
10.79 Sawing the soundholes
10.80 Sequence for sawing out soundhole
10.81 Sections through soundholes showing styles of undercutting
10.82 The knife follows the grain direction when cutting the soundholes
10.83 Cutting the soundholes
10.84 The nicks are produced with four knife cuts
10.85 If the wood for the bass bar splits in a curve, mark the concave side as ‘top’
10.86 The bass bar position relative to the bridge foot
10.87 Positioning the bass bar
10.88 The bass bar in position
10.89 Marking the curve
10.90 Chamfering down to the line
10.91 The fitting studs are trimmed to hold the bass bar in position
10.92 Simple clamp made from 16mm plywood. Five are required
10.93 Bevel the top of the bass bar before fitting
10.94 Gluing the bass bar
10.95 Paring the studs
10.96 Planing the bass bar
10.97 Approximate heights of bass bar before plate tuning
10.98 The cross section of the bass bar changes throughout its length
10.99 Trimming the bass bar
10.100 Trim the ends of the bass bar neatly
10.101 Prepared block for centre joint studs
10.102 After gluing, trim the studs back neatly
11.1 Plane the top edges next to the joint to the same height
11.2 Marking the joint
11.3 Arrangement for clamping the back joint
11.4 Clamping a two-piece back
11.5 Leave the button oversized when cutting the outline
11.6 The edge thickness often increases in the button area
11.7 Trim the edge of the bass side purfling to the right of the centreline
11.8 Trim the treble purfling to form a scarf joint
11.9 Initial thicknesses of the back before tuning
11.10 Simple rest used for drilling the back
11.11 Feeler gauge made from hardwood
11.12 Pre-drilling the back
11.13 Hollowing the back
12.1 Dr Carleen Hutchins
12.2 Normal vibrational modes of a xylophone bar
12.3 Chladni patterns in well-tuned free violin plates
12.4 Twisting the plate slightly
12.5 Flexing across the grain
12.6 Flexing along the grain
12.7 Tapping the plate
12.8 Assessing the bass bar
13.1 Template for marking end of the neckblock. Use transparent plastic sheet
13.2 Use template to ‘correct’ poorly quartered block
13.3 Add softwood piece to side of block if necessary
13.4 Typical scroll template (actual size)
13.5 Typical pegbox template (actual size)
13.6 Typical fishtail template (actual size)
13.7 Marking the scroll
13.8 Squaring a line at the nut position
13.9 The peg holes are drilled at right angles
13.10 Chamfering down to the line
13.11 Shaping the scroll profile
13.12 Planing the neck root
13.13 Marking the pegbox
13.14 The edge of the chin should coincide with the squared line of the nut position
13.15 Sawing the pegbox
13.16 Removing the waste
13.17 Sawing the chin
13.18 Sawing the first turn
13.19 Make saw-cuts around the first turn of the scroll as far as the throat
13.20 Trimming the first turn
13.21 Shaping the pegbox
13.22 Removing the waste from the pegbox
13.23 When shaping the chin, slope away from the line
13.24 Shaping the first turn
13.25 Paring the ‘vertical’ walls
13.26 Extending the ‘vertical’ walls
13.27 Typical scroll widths
13.28 Mark the second turn in pencil
13.29 Continue the pencil lines on the front of the scroll out to the edges
13.30 Sawing the second turn
13.31 Removing the waste
13.32 Trimming the second turn
13.33 Round the edges of the gouges slightly
13.34 Cutting the eye
13.35 Establishing the eye
13.36 Shaping the scroll edges
13.37 Chamfering the edges
13.38 Undercutting the volute
13.39 A chisel can be re-shaped to form a flat gouge
13.40 Cleaning the throat
13.41 The pegbox
13.42 Making the pegbox walls
13.43 Hollowing the pegbox
13.44 The peg holes are revealed
13.45 Trimming the pegbox walls
13.46 Section through pegbox
13.47 Trimming the end of the pegbox
13.48 Finishing the inner walls
13.49 Lowering the pegbox floor
13.50 Establishing the fluting
13.51 The four small runs blend into one
13.52 Protecting the pegbox walls
13.53 Completing the fluting
13.54 Working across the grain
13.55 Using a knife to extend the fluting
13.56 Finished dimensions of the fingerboard
13.57 Fingerboard holder made from hardwood. Dimensions to suit fingerboard blank
13.58 The fingerboard in the holder
13.59 Adjustable shooting board for trimming fingerboard ends
13.60 Establishing the angle of the fingerboard end
13.61 Marking the centreline
13.62 Hardwood clamping block for fingerboard – three required
13.63 The fingerboard in position
13.64 Small guide blocks are glued on
13.65 Gluing the fingerboard
13.66 Template for fingerboard
13.67 Plane the top edge of the fingerboard to establish the edge thickness
13.68 Using the template
13.69 Planing the fingerboard
13.70 Shaping the underside
13.71 Nut dimensions before shaping
13.72 Planing the nut
13.73 Offering the nut in place
13.74 The front of the nut is planed to match the angle of the pegbox
13.75 Marking the nut
13.76 Constructing the neck root
13.77 Marking the neck root
13.78 Marking the bottom of the neck root
13.79 Sawing the sides of the neck
13.80 Removing the waste
13.81 When finished the sides of the fingerboard are rounded
13.82 Use a rasp in the shaded area until the neck is flush with the fingerboard
13.83 Planing the neck root
13.84 Finished neck thicknesses and sections
13.85 Template for neck shaping (actual size)
13.86 Marking the neck profile
13.87 Sawing the neck profile
13.88 Marking the underside
13.89 Marking the side
13.90 Shaping the curve at the chin
13.91 The highest point of the nut is always where it meets the fingerboard
13.92 Filing the nut
13.93 Height of the nut above fingerboard
13.94 Marking the string positions
13.95 Marking the grooves
13.96 Filing the grooves
13.97 The corners of the nut are rounded to form a ‘D’ shape at the front
14.1 The rib is pressed firmly when tapping the block
14.2 Using a parting knife
14.3 Easing the corner blocks outwards
14.4 Removing the ribs
14.5 Finished block shapes
14.6 Shaping the blocks
14.7 The lower edges of the back and front are chamfered before fitting to the ribs
14.8 Chamfering the lower edge
14.9 Spool clamps – thirty-two required
14.10 Clamping the back
14.11 Clamping the top block
14.12 Gluing the back
14.13 Mark the endpin slightly below centre
14.14 Drilling the endpin hole
14.15 Classical edgework
14.16 The edgework is shaped by a series of chamfers
14.17 Shaping the edges
14.18 The corner ends are often slightly curved
14.19 The edgework at the corner is often slightly squarer
14.20 Correctly fitted neck
14.21 Measurements are taken from the neck root to make initial openings
14.22 Marking the top of the mortice
14.23 Marking the bottom of the mortice
14.24 Pressing a knife into the edge
14.25 Extending the lines
14.26 Marking the back of the mortice
14.27 Chopping the edge
14.28 Halving the edge
14.29 Removing the half-edge
14.30 Marking the sides of the mortice
14.31 Cutting through the ribs
14.32 Making the opening
14.33 Measuring the neck stop
14.34 Measuring the elevation
14.35 Measuring the neck step
14.36 The bridge in position
14.37 Centring the neck
14.38 Bevel the lower edge of the neck root slightly
14.39 Clamping the neck
14.40 Button dimensions
14.41a–c Rotating the neck when shaping
15.1 Removing the fingerboard
15.2 The colour wheel
15.3 Varnishing the scroll
15.4 Varnishing the pegbox
15.5 Varnishing the ribs
15.6 Varnishing the back
15.7 Varnishing the front
16.1 Baroque and modern saddles
16.2 Saddle dimensions before fitting
16.3 The saddle opening is made level with the inner edge of the purfling
16.4 The opening is cut square to the bottom block
16.5 Marking the saddle
16.6 The front edge of the saddle is planed at an angle
16.7 Peg shaper made from hardwood – three to four required (see text)
16.8 Marking the reamer
16.9 Viewing the reamer from the front
16.10 Viewing the reamer from the end of the scroll
16.11 Marking the end of the peg
16.12 Marking the string holes
16.13 Drilling the string holes
16.14 Ensure that the fine tuner fits the underside of the tailpiece
16.15 The back of the bridge is at right angles to the arching
16.16 Useful knife shape for cutting bridge feet
16.17 Cutting the bridge feet
16.18 Checking for high spots in the centre
16.19 Bridge template, actual size
16.20 Marking the top curve of the bridge
16.21 Cutting the top curve
16.22 Chamfering the top curve
16.23 Holder for bridge. Use hardwood
16.24 Arching the front of the bridge
16.25 Arching the bridge. Figures in millimetres
16.26 Suggested cutting of the bridge
16.27 Simple sound post gauge – use plastic film around 0.5mm thick
16.28 Testing the angle of the end of the soundpost
16.29 The soundpost position in relation to the bridge
16.30 Using the flexible gauge
16.31 Gerald Botteley
Illustration Credits
Ashmolean Museum Oxford: 1.1–2.7. Ian Kalinowski: 3.1–4.8. Paul Bowers: 5.2. Glen Collins: 5.4. John Dilworth: 5.6. Roger Hargrave: 5.8. Patrick Jowett: 5.10. Andrea Robin-Frandsen: 5.12. Guy Bara: 5.13. Carleen Hutchins: 12.1.
All other photographs by Chris Johnson or Roy Courtnall.
Introduction
The violin has fascinated both makers and players for over four hundred years. It is an instrument of exceptional musical versatility, and its long-established design has undergone surprisingly few changes over the centuries. Many musicians see the violin as a direct parallel to the human voice; it enables the musician to express a wide range of moods and emotions; soft, lyrical and sensitive, but also powerful and dynamic.
As an assembly of wooden components, the violin appears relatively simple, but its acoustic functioning is extremely complicated. Thus the violin maker is working within well-defined parameters, yet strives to impart some extra quality of life and vitality into the instrument; this is what makes violin making an art. It is not enough to slavishly follow the dimensions provided on a blueprint. The violin maker is working with a variety of different types of wood, and even wood of the same species can exhibit differing structural and therefore acoustic properties. The explanations and instructions provided in this book aim to help the new violin maker to produce an instrument that exploits to the full the well-established design of the violin, and the tonal properties inherent in the chosen wood.
An interesting debate continues as to whether violin making is an art or a craft, and this arises because the violin maker may appear to be merely copying what has gone before. Whilst this is true to some extent, there are numerous examples from the arts where a particular form or theme is very clearly defined: in music the pavane and galliard, the minuet and trio and the sonata form; in literature the sonnet, the Japanese haiku and the whodunit; in painting, the madonna and child, the pietà and so on. In each case, the artist works within the constraints of the genre to produce a new interpretation, and imparts his or her personality to the work.
The violin form was perfected almost as soon as it appeared, and an appreciation of the work of the great makers of the past has become one of the cornerstones of modern making. We therefore believe that it is useful for the reader to gain some understanding of the background to the subject, before picking up wood and chisel. While it would be impossible to provide a complete history of violin making in a book of this kind, we have included a brief summary of the lives and work of some of the greatest makers of the past, as well as insights from some contemporary craftspeople, and hope this provides the reader with a reference point from which to move forward.
In England, the Newark School of Violin Making has been teaching students from all over the world for more than twenty years, and it is internationally renowned for the high level of instrument making that its students produce; many of its graduates have gone on to establish themselves at the forefront of this art. The method of violin making described in this book is based on the approach at the Newark School, and the reader can therefore be confident that he or she will be learning to make instruments in a traditional and time-proven way.
Violin Design
The fundamental character of a violin is determined by many factors; the woods used, the way in which the instrument is assembled and the precise thicknesses to which the front, back and ribs are worked. However, there are also some additional components which can be adjusted to obtain the optimum tone from the instrument, in particular the bass-bar and the soundpost. Running along the inner surface of the front is the long bass-bar, situated just beneath the bass side of the bridge. The dimensions of this bar affect the tonal quality and response of the violin, and are carefully adjusted by the maker when assembling the instrument. Just behind the outside edge of the bridge on the treble side, is fitted the soundpost. This thin spruce rod is wedged lightly between the front and back of the violin. Its two ends are shaped to exactly match the internal contours of the front and back surfaces, and it serves to resist the downward pressure of the strings, and to activate the back in a specific way. This soundpost, like the bass-bar, has an important effect on the tone of the violin, depending on the position in which it is placed. The maker can adjust its position with a special tool, inserted through the treble soundhole.
The violin’s visual beauty is enhanced by our knowledge that its shape is extremely functional; to a large extent, its form follows from its function, and this element of design/integrity lends an added sense of purity to the instrument.
The arching of the front and back, for example, helps produce an extremely strong construction, much more so than if these parts were flat. The pattern of this arching, whether high or low, influences the tone of the instrument. The narrow waist facilitates playing on the lowest and highest strings, without the bow touching the edges of the violin. The thin inlay of purfling, which travels around the perimeter of the front and back, helps to strengthen the vulnerable edges of the plates and prevents cracks from developing. The purfling may also contribute to the tone of the instrument.
The beauty of the maple and spruce, which constitute the major parts of the instrument, is further enhanced by careful varnishing. However, the varnishing of a violin is not simply an aesthetic matter, as the varnish is a factor in tonal quality:
The influence of varnish upon carrying tone is considerable. A varnish which, when completely dry, has a hard consistency generally causes an instrument to produce a hard, glassy sound with a limited range of tone colour.1
Visual Style
The interdependence of form and function in violin design means that it is difficult to discuss aesthetics in isolation. The impression created by the appearance of a Stainer violin will differ from the visual impact of a Stradivari or an Amati. All of these great makers produced their own design solutions to the playing qualities of the violin and they also made violins with a clear visual style. Whether an individual maker considered first the visual appearance or the practical usage of the instrument is not known. The new violin maker may be drawn to a particular pattern of violin and, whether this is for aesthetic or constructional reasons, should aim to make the instrument work as a whole.
Volume and Projection
A particular violin will have a specific potential for volume and projection. Exploiting this potential depends on numerous factors; the type of strings and their tension at concert pitch, the design and material of the bridge and other fittings, the bow used by the player and the player’s technique. Once the bow has caused the strings to move, the vibrations are transmitted, via the bridge and soundpost, to the belly and back. The entire body vibrates and these vibrations are transmitted to the surrounding air and to the ear of the listener.
Development of the Violin
Violins can be seen in Italian paintings from the mid-sixteenth century and the earliest surviving violins known were produced in northern Italy in the second half of the sixteenth century. Whilst the majority of the great violin makers worked in three areas of Italy, Cremona, Brescia and Venice, it was nevertheless common for craftsmen to migrate across Europe at that time. Makers would often be forced to move away by the economic climate, taking with them their expertise, and thus helping to raise standards of craftsmanship elsewhere. It is possible that Jacob Stainer worked in Cremona before returning to Austria, and later, the Sicilian maker Vincenzo Panormo is thought to have studied in the Bergonzi workshop before working in Paris, London and possibly Dublin. Violin making was often centred around family workshops, with several generations carrying on the established designs and perpetuating their family names. The greatest among these were the families of Amati, Stradivari and Guarneri.
During the first part of the sixteenth century, violin design was not standardized. Outline patterns, as well as the overall dimensions of the instrument, varied considerably. It was the fine craftsmanship of Andrea Amati which set the standard for makers ahead. His surviving violin, dated 1564, demonstrates a remarkable vision and innovation in design. He perfected the scroll’s classical proportions. The elaborate inlays evident on earlier instruments now gave way to a more subtle and simple aesthetic, revealing perhaps that now the maker’s prime concern was with the functioning of the instrument rather than its decorative effect. Amati defined the single row of purfling which runs all around the edges of the instrument, and by sinking the surface in the area of the purfling, he created a channel which in turn altered the way in which the arching was carried out. Andrea was followed by Antonio, Girolamo, Nicolò and finally Girolamo II, who died in 1740. Meanwhile, Antonio Stradivari was perfecting further the overall design of the violin. He preferred flatter archings, which resulted in a more powerful sound, and he substantially altered the outline of the instrument. The third family that was to become a legend in the violin making world was that of the Guarneri. Having studied his craft with Nicolò Amati, Andrea Guarneri worked with the same preoccupation for strong design, but his use of tools and materials was much freer – his instruments often exhibit a charming asymmetry and the surfaces sometimes still show the signs of planes and gouges. The Guarneri tradition continued for several generations, producing the genius of Giuseppe, who was born in 1698 and became known as ‘del Gesù’.
There were many other makers across Europe, some of equal skill to the best of Cremona’s craftspeople. Further research has yet to uncover the full scope of the contribution made by other traditions. But in many cases makers were forced to work quickly to survive, often leaving behind poor examples of their work – for which posterity judges them.
Although the fundamental design of the violin had been established by the early eighteenth century, some important changes have occurred since that time. These changes went hand in hand with the development of new musical forms and advances in string making. By 1800 old violins were being altered in an attempt to make them produce a more powerful sound, and to enable them to be tuned to a higher pitch. The basic alteration was for the neck to be removed, and a new, longer one to be fixed in place. This new neck, approximately one centimetre longer, was set back at a steeper angle. Together with a more substantial bass bar, the instrument could sustain much greater string tension. There was now much more force being exerted downwards, through the bridge, and into the front of the violin. Acoustically, the result was to produce a far louder and more brilliant tone.
One can speculate as to why a developing musical culture seems to strive for an ever-increasing pitch and volume in its music; over the centuries musicians and composers have made greater demands on the instrument, and the maker has responded by adapting the instrument accordingly.
Musical Culture and Gender
Whilst there have always been female violinists, it is not clear to what extent female makers or assistants existed in the past. (The modern maker is as likely to be female as male.) There is some evidence, for example, that female makers existed within the Guarneri family but that the prevailing culture since their day has tended to play down the possibility.
Musical culture has tended to use gendered language as a descriptive tool. In the case of musical instrument making, this has taken the form of aesthetic qualities being described in gendered terms. It is common to read, for example, of a violin of ‘masculine build’. The words ‘muscular’ and ‘virile’ are also sometimes used in this context. Smaller and lighter built instruments tend to be referred to as ‘feminine’:
His [Stradivari’s] Amatise violins have much of his own early genius; they are bolder, more adventurous, perhaps more masculine than the lovely, somewhat ‘feminine’ small pattern violins made by Nicolò Amati.2
A new generation of makers will need to decide whether these descriptive terms are still useful, or whether other types of language would be preferable.
Latinization and Labels
In spite of the secularization and wider use of the vernacular which the Renaissance had brought about, the influence of the Church was still overriding, and Latin was in general use as the language of documentation. With reference to musical instrument making, this found expression in the way in which makers’ labels were written. The entire text was in Latin, for example ‘fecit’ for ‘made by’. However, the ordinary name of the maker was also generally given a latinized form, thus ‘Antonio Stradivari’ would become ‘Antonius Stradivarius’. This explains why one maker may appear to have several expressions of his name. A further aspect is that the Christian name was sometimes translated into a Latin form, for example ‘Giuseppe’ became ‘Joseph’ or ‘Josephus’.
The Violin Bow
During the seventeenth and eighteenth centuries, violin makers often made bows as well as violins. There was no standard design for the bow at that time, and it would have had some variation from one maker to another. In the late eighteenth century, bow design became standardized, and the bow acquired its modern proportions:
Both F. Tourte and John Dodd are considered to have arrived at similar solutions to the problem of bow-design before the end of the 18th century, although Tourte is usually named as the originator of the modern bow, with possible advice from Viotti. He standardised the length of playing-hair at approximately 25½ inches [648 mm] slightly less for viola and cello.3
Historical Background to the Cremonese Makers
It should be noted that the development of the violin did not occur primarily within the Renaissance period in Italy, but at a time when freedom of intellectual enquiry was diminishing. Roger Hargrave points out that from 1539
The Spanish dominion in Italy was finally established and the intellectual agitation of the Renaissance was stifled by a combination of the Jesuits [and] the Inquisition . . . Only Venice and to some extent Naples, maintained independence from Spain and hence liberty of thought and speech.4
The Contribution of the Hill Brothers
The first serious attempts to research the background of Cremonese violin makers were made by the Hill brothers (W. Henry Hill, Arthur F. Hill and Alfred E. Hill) in two important works, the first on Stradivari and the second on the Guarneri family, published in 1902 and 1931 respectively. These books put new information into the public domain, and, although very many questions remain unanswered, the two books are still the standard works on the subject today. The Hills also carried out research into the Amati family, but this was never published. Research appears to be in progress into a large number of areas relating to violin technology and its associated history, and it is possible that the emergence of further information will enhance understanding of the development of the violin.
Construction Method
Our modern method of constructing the violin differs in some ways from the sequence of steps followed by the old masters. Stradivari, for example, probably worked in the following way: the mould was prepared and the blocks fixed in place. Then two long lengths of rib were prepared; these ‘onepiece’ ribs were bent and fitted to the mould, each spanning the central axis of the instrument; that is, there would be no join formed at the centres of the top and bottom blocks. The back linings were glued in place and the resulting surface planed flat. Next the front linings were fitted, and possibly glued in place as well, as it is quite possible to remove the mould with both sets of linings in place, provided a certain amount of pre-shaping of blocks and linings is carried out.
The ribs would also be tapered slightly while the assembly was on the mould. The roughly prepared back could then be placed on the ribs, and pinned with small pegs at the top and bottom blocks. This would aid relocation in the same position later on. With the back in place, the approximate outline of the ribs could be drawn onto the back, using the ribs as a template. But before finalizing this outline, the ribs were removed from the mould, and the neck was attached by gluing and nailing through the top block. With the neck attached, the back plate could be placed in position, located by the two little pegs. Some careful adjustments would then be required, to ensure that the neck was correctly aligned with the central axis of the instrument – the entire structure would be quite flexible at this stage. Once in place, the rib blocks could be spot-glued or clamped in position, and the final outline of the instrument scribed onto the back. It may be that the entire back was then completed – arching, hollowing and purfling, before being glued to the ribs.
The resulting rigid structure would then present a sound basis for transferring the outline to the front, which would be worked in the same way, and then glued in place. The fingerboard could then be attached, supported by its wedge-shaped support. (But it is equally possible that the front and back plates were fixed in position before the final shape was carved. This latter method would necessitate the purfling and final arching being completed later on – once a clear outline had been formed.)
The modern method of violin making begins in a similar way, with the ribs being fixed to the mould, although it is more usual to make separate ribs which meet at the centre of the top and bottom blocks. The front and back linings can then be glued in place. Because we no longer attach the neck with nails, but rather use a mortice which is cut into the neck block, it is possible to close up the entire sound box before attaching the neck. Although the neck must be fitted with the utmost care to ensure correct alignment in all planes, it is perhaps a simpler procedure than trying to do this before the front is in place, as the fingerboard is now of minimal thickness and cannot be altered to correct the geometry, as was the case when a wedge was used to set the angle.
It is also quite common for the front and back to be entirely completed, including the fitting of the purfling, before gluing them to the ribs. The other differences are mainly due to the modern functioning of the instrument; a taller bridge and a longer fingerboard.
So when one begins making a violin there is a rich tapestry of knowledge and experience on which to draw. In practical terms, there are several different established violin patterns which may be followed. The ultimate goal must be to successfully manipulate all the factors of design and the characteristics of the timber. The creative aspect of making a stringed instrument lies in the fact that it is made from natural materials, and this means that there is always a degree of uncertainty as to what the final character of the instrument will be. Indeed, the character of the finished violin often suggests changes in approach when making the next one. But careful workmanship, close attention to the established patterns and a great deal of patience will be well rewarded when all these factors come together to create a successful musical instrument.
Notes
1. Sadie, Stanley (ed.), The New Grove Dictionary of Music and Musicians, vol. 18, p. 196
2. Wechsberg, Joseph, The Violin, p. 62
3. Nelson, Sheila, The Violin and Viola, p. 126
4. Hargrave, R., The Strad, October 1990, p. 780
PART I
THE VIOLIN MAKERS
1 Amati
Andrea Amati
Andrea Amati is the first violin maker recorded as working in Cremona, and it is assumed that he was born there, although the date of his birth is uncertain. He had two sons, Antonio and Girolamo (Hieronymous), who went on to become violin makers as well. The Amati family lived in the Cremonese parish of San Faustino, adjacent to San Matteo, where the Stradivari and Guarneri households were later located. Although the following generations of the Amati would have acquired their violin making skills in the family workshop, the question arises as to where Andrea, the first of the line, received his training.
During the nineteenth century, the idea was current that he had begun his career as a maker of viols, only subsequently turning to violins after they had originated with certain Brescian makers. The belief that the violin had its origins in Brescia led to the notion that Andrea had copied and adapted violins from there, and that he could have been apprenticed to a violin maker in the first place, the suggested maker being Gasparo da Salò (1540–1609). Research done by Carlo Bonetti, however, established that Andrea had in fact been born earlier than da Salò, making this idea impossible.
Andrea’s apprenticeship is particularly important as it may have a bearing on the question of where, and by whom the first recognizable violins were made. Whilst tradition suggests Brescia, with the Cremonese School developing slightly later, the fact that Andrea’s birth date preceded that of da Salò by as much as four decades has led more recently to the assumption that Cremona must be credited with having produced the earliest violins.
Details of Andrea’s apprenticeship thus remain unknown. Present opinion tends to favour Cremona as the place of the violin’s origin. However, it is still possible that Brescia was the location both of the earliest violins and of Andrea’s teacher, when the fact that da Salò’s forebears were also musical instrument makers is taken into account:
This birth certificate shows that Gasparo da Salò was born on the 20th May 1540, at least 15 years after Andrea Amati became a master luthier. This same certificate clearly records the fact that Gasparo’s father and grandfather were both violin makers.1
Daniel Draley, a long-established researcher into the Amati family, has estimated Andrea’s total output to have been approximately two hundred and twenty-five instruments. One reason why so few of these survive today may be that during the sixteenth century the Church not only at times forbade the playing of the violin, but also ordered its destruction in parts of Italy.
It is not possible to decide whether Andrea’s career fell into distinct periods displaying differences and developments of style, as all the extant instruments date from late in his life. Nevertheless, some of his surviving instruments are quite plain, whilst others are elaborately decorated, probably indicating that they had been made for an Italian noble family.
His workmanship is important because it set standards for those who were to follow him, even though each maker would develop his own style. In general, the work shows precision and attention to detail, and Andrea made both a larger and a smaller pattern of violin. Hargrave says of the Ashmolean violin:
Like most Amati scrolls, this one has the feeling of pure simplicity about it. The centre bouts are also well-rounded. The back arching has a figure of eight fullness which falls quickly at the edges to a well-scooped channel. The wings of the sound holes are characteristically long, thin and straight.2
In the workshop, Andrea would have had the assistance of his two sons, but due to their ages this could only have been late in his life. Antonio could have assisted from about 1555 onwards, and Girolamo not until a year or two before Andrea’s death. The fact that Andrea fulfilled a large commission for the French Court is an indication that his workshop was busy. The workshop probably also produced all the bows and cases for the instruments, so Andrea must have had considerable help.
There are a number of legends about Andrea’s relationship with his wood. He is said to have roamed through the forests of the Southern Alps, searching for suitable trees. He would use a wooden mallet to knock against their trunks, the resulting sound telling him if the core of the tree was free from rot. It seems unlikely that a busy violin maker, overseeing a thriving workshop, would have had the time for this kind of activity, given the difficulty of access into the forests, and the lack of any efficient transport. Yet it is clear that he chose good wood for his instruments – the one-piece maple back on the Ashmolean violin has a well-pronounced figure, typical of many of his instruments. In contrast, the necks were made from plain wood, probably to make the carving of the head easier. His use of a combination of highly figured and plain wood, for different parts of the instrument, became the norm in violin making.
The instruments were finished with either a light-brown, or a golden-coloured varnish. As with his choice of wood, legend has him selecting the ingredients for his varnish with great care, supposedly travelling to Venice to purchase amber, resins and dyes.
In the past, Amati instruments tended to be evaluated either negatively, or as lacking in power:
The tone is more mellow and silvery but small, rather than brilliant, the fourth string in particular being often very weak, and consequently of no use to the modern performer.3
These opinions are not shared by those who now play the instruments; even a smaller than full-size violin by Andrea, which is regularly played today, has a powerful and sonorous tone. Experiments have been carried out comparing a variety of instruments in a concert hall at the same time. The violin maker Roger Hargrave, for example, was present when a cello by Andrea Amati compared very favourably with instruments by a number of other makers, leading Hargrave to conclude:
Amongst the instruments we tried against the Amati in a large concert hall were a Francesco Ruggieri, a Montagnana, a Gofriller and a Grancino. I have never been so impressed by the sound of an instrument, either before or since. Much to my personal surprise, the pure sound of the Andrea Amati seemed to power its way into every corner of the auditorium.4
With Andrea’s death on 26 December 1577, the Cremonese violin making tradition had been safely established, and would be developed further by his two sons.
The Brothers Antonio and Hieronymous Amati
Antonio was born about 1540, and by 1556 he had completed his training in his father’s workshop, and was listed in the parish register as his father’s assistant. He probably carried on in this role until his father’s death in 1577. No marriage details are recorded for Antonio, although there is a legend that he had a daughter who assisted in the workshop, making scrolls.
Hieronymous was born about 1561, and he would therefore only have had a short time in which to learn from his father before Andrea’s death in 1577. Hieronymous’ marriage to Lucrezio de Cornetis is recorded as having taken place in 1574, and two daughters were born between 1580 and 1583, before Lucrezio’s death shortly afterwards.
In 1584 Hieronymous married for the second time. His bride was Laura de Medici Lazzarini. One of their nine children was Nicolò, who went on to become the most highly regarded violin maker of the Amati family.
The brothers Antonio and Hieronymous had a close working relationship, and this continued even after the division of their assets in 1588. They produced violins together, and also individually. Whatever the individual output of either brother (separately from the brothers’ label) might have been, it seems that very little of it is known today. A large amount of work, however, is attributed to them jointly, and a good deal of this survives. Daniel Draley estimates that between 550 and 650 instruments were produced jointly by the brothers.
Most experts agree that several hands are evident on their work, but the identity of these assistants is not known, although they could have been other members of the Amati family. Nicolò is the only son known to have learnt his craft from his father.
The brothers’ workmanship was of a high standard, and although their instruments resembled those of their father, they perfected their own designs. Some of their instruments were experimental, and they are often credited, together with others, with developing the tenor viola and alto viola. They also made a number of large- and small-size cellos, and a bass viol with certain cello features is in the Ashmolean Museum. Their violins were made in a variety of sizes, and they also experimented with the violin pattern – some were made with very shallow fluting, and these instruments are especially powerful. One such example is played by Emmanuel Hurwitz. As with Andrea, the current perception of the brothers’ instruments is much more favourable than in the past, and as many more survive, there is more opportunity for them to be heard. The ‘Borghese’ Amati viola, for example, and three other Amati family instruments, are owned by the University of Saskatchewan, which loans them out to players as a quartet.
The brothers generally used very beautiful wood; maple from the Alpine region, or perhaps the Balkans. They often joined two-piece backs with the figure continuing in the same direction across the joint, a practice they had learnt from their father; and, like him, they used purfling with a strong black colour, achieved by dyeing a lighter wood. White inlays were of poplar, sycamore or maple, and the linings were made from willow. The brothers used either a golden-brown, or a golden-orange/amber-toned varnish, with the orange tone tending to be later. It has a warm and transparent appearance.
A number of instruments survive with painted decoration and other rich ornamentation such as gilding and tortoiseshell purfling. These instruments were made for aristocratic clients, and follow in the tradition established by Andrea. It seems that they were able to continue making instruments for the same wealthy clientele established by their father.
The Brothers Amati improved upon their father’s models, being more innovative in their own right, and their work was influential on other makers. Their instruments were of a consistently high standard. They were soon copied, and a number of fake Brothers Amati instruments were made.
Nicolò Amati
Nicolò, the third son of Hieronymous I, became the most well-known member of the Amati family. He lived for the whole of his life at Casa Amati in Cremona, and he married Lucrezia Pagliani in 1645. Of the nine children born to the marriage, six survived into adulthood. A son, Hieronymous, was later to succeed Nicolò in the workshop.


