How-To Book of Christmas Carving E-Book
Erhalten Sie Zugang zu diesem und mehr als 300000 Büchern ab EUR 5,99 monatlich.
- Herausgeber: Fox Chapel Publishing
- Kategorie: Lebensstil
- Sprache: Englisch
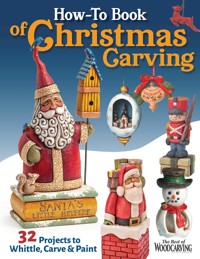
Get ready for another special holiday season with How-To Book of Christmas Carving! This carving book contains over 40 of the best, most classic and unique projects previously published in Woodcarving Illustrated magazine in the last decade, from whittled ornaments and caricature decorations to chip carved and relief gifts and keepsakes. With a mix of illustrated step-by-step guides for beginners and more challenging patterns for advanced carvers, this compilation is perfect for anyone of all skill levels. From reindeer, snowmen, elves, and penguins to an entire Santa section and so much more, this volume has everything you need to make nonstop woodchips for the most wonderful time of the year. The featured carving patterns and projects are from some of today's leading carving experts, including Dave Stetson, Dwayne Gosnell, Carol Leavy, Russell Scott, Sara Barraclough, Betty Padden, Tom Hindes, Nikki Reese, and many more. There's a project inside this best-of Woodcarving Illustrated collection for everyone, from beginners to advanced craftsmen. With step-by-step instructions and color photos, readers are guaranteed a very merry carving experience.
Sie lesen das E-Book in den Legimi-Apps auf:
Seitenzahl: 191
Veröffentlichungsjahr: 2023
Das E-Book (TTS) können Sie hören im Abo „Legimi Premium” in Legimi-Apps auf:
Ähnliche


© 2023 by Fox Chapel Publishing Company, Inc., 903 Square Street, Mount Joy, PA 17552.
How-To Book of Christmas Carving is an original work, first published in 2023 by Fox Chapel Publishing Company, Inc. The patterns contained herein are copyrighted by the authors. Readers may make copies of these patterns for personal use. The patterns themselves, however, are not to be duplicated for resale or distribution under any circumstances. Any such copying is a violation of copyright law.
Print ISBN 978-1-4971-0408-2eISBN 978-1-6374-1275-6
Library of Congress Control Number: 2023907616
To learn more about the other great books from Fox Chapel Publishing, or to find a retailer near you, call toll-free 800-457-9112 or visit us at www.FoxChapelPublishing.com.
We are always looking for talented authors. To submit an idea, please send a brief inquiry to [email protected].
For a printable PDF of the patterns used in this book, please contact Fox Chapel Publishing at [email protected], with 9781497104082 How-To Book of Christmas Carving in the subject line.
Introduction
Whether you are looking to make a gift from the heart or add to your Christmas decorations, this book is chock-full of projects to get you into the season! We've included 32 holiday-themed favorites from past issues of Woodcarving Illustrated, ranging from Santas and ornaments to angels and Arctic animals. This book also features a range of carving styles, including chip carving, relief carving, woodburning, whittling, caricature carving, and more.
Whatever project you start with, we know you’ll create some Christmas magic and memories.
Happy carving!
The Woodcarving Illustrated Team
Contents
Getting Started
Materials
Tools
Safety
Basic Cuts
Painting and Finishing
Projects
Peekaboo Santa Ornaments
Chimney Santa
Simple Santa
Whittling a Santa
Grouchy Santa Ornament
Personalized Ribbon Ornament
A Snowy Ride
Saucer Sled Santa
Workshop Santa
Lantern Santa
Santa’s Little Helpers
Flat-Plane Reindeer Ornament
Pinecone Ornament
Thoughtful Angel
Burned and Painted Nativity Ornaments
A Chip-Carved Christmas
Traditional Ornament
Snowman Ornament
Layered Relief Ornament
Norbert the Elf
Kitten in a Mitten Ornament
Tramp Art Christmas Tree
Comfort Penguins
Folk-Art Napkin Rings
Momma Polar Bear and Cub
Block Nativity
Ball-in-Cage Snowman
Circle of Love Nativity
Winter Solstice Tomte
Toy Soldier
Santa’s Helper
Bringing Home the Tree
About the Authors
Getting Started
Before jumping into these projects, take some time to check out the primary materials and tools needed to carve the projects, tips on carving safely and successfully, basic cuts to keep in mind, and ways to paint and finish your carvings, which are all included in this section.
Materials
These projects can be completed with just a few materials, all of which are easy to find at your local craft store or woodcarving supplier.
Basswood: Basswood is a great beginner wood for carvers; it’s lightweight and consistent in grain, with no prominent air pockets. It also takes paint well given its light color. Most of the projects in this book are carved from basswood, but some use medium or darker wood shades for a natural finish. Other wood types used are butternut, cherry, ipe, maple, and walnut.
Basswood is great for beginners because its consistent grain makes carving easier.
Acrylic or oil paints:
Thinned acrylic paints or oil-based paints add color to carvings while still letting the woodgrain show through.
Stains: If you do not want to paint your carvings, you can apply stains for a more natural finish.
Sandpaper: Sandpaper smooths out and removes fuzzies from carvings before moving onto painting and finishing.
Acrylic paints thinned with water allow the woodgrain to show through.
Pencil, pen, or marker: Use it to mark the areas you plan to remove on a carving, or to sketch on details before you begin to carve.
Graphite transfer paper or acetone: If you do not wish to sketch the pattern directly onto the wood, use graphite transfer paper or acetone.
Cyanoacrylate (CA) glue, wood glue, or two-part epoxy: Glue or epoxy allows you to attach additional details to the carvings.
Two-part epoxy resin can be used to attach additional details to carvings.
Boiled linseed oil or danish oil: These oils add a protective coating to your carving. Boiled linseed oil is often mixed with mineral spirits to create a protective finish.
Finishing wax: Wax can be used to add a protective coat to finished carvings.
Screw eye: Screw eyes are metal hooks that allow any carving to be turned into an ornament to display.
Drywall screws: If you prefer to make your carvings into a stand-alone piece instead of an ornament, drywall screws allow you to attach carvings to a base.
Paper towels or cloths: Paper towels and cloths can be used to wipe off and clean carvings before painting and after adding a finish.
Cleaner and degreaser: Use Dawn® dish soap or similar to clean off dirt and pencil marks before applying paint or finish.
Craft wire: Wire can be used to attach separate details to finished carvings.
Craft wire can be used to attach smaller carvings to the main carving.
Toothpicks or stylus: These are a useful addition to your painting arsenal, as they’re perfect for making small, identical dots.
Antiquing wax or medium: Use this to enhance the shadow areas and give the carving an antique-like appearance.
Use antiquing wax or medium to give carvings an old-fashioned appearance.
String or ribbon: To make the carvings into ornaments, attach a ribbon or string to the screw eye or hook.
Clear finish: Once the painting stage is complete, protect all those fine details with a clear spray finish.
Tools
You’ll need some basic tools to complete these projects:
Knife: A bench knife with a larger blade (at least 1 ½" long) is a great place to start. When choosing a knife, make sure it’s forged from quality steel and fits nicely in your hand.
When choosing a carving knife, make sure to consider the quality and comfort of the tool before purchasing.
Gouges: In numerous projects in this book, gouges are used to carve and refine details. Gouges come in various sizes and sweeps (levels of curvature) depending on your project needs.
Gouges come in handy for carving and refining details on carvings.
V-tool: V-tools allow you to separate features on a carving as you rough out; they’re also useful for adding hair, fur, and grass texture.
Use V-tools to add texture, such as hair and fur.
Additional details such as a walking stick for Santa (here) or a rifle for a toy soldier (here) can be attached to the main carving by using a drill.
Drill with assorted bits: Some carvings have moving parts or additional details. You'll need to drill holes to attach the different pieces.
Rotary tool: Use to sand, smooth, and define carving areas.
Ruler or compass: Before you begin carving, some patterns and will need to be marked and measured on the wood blank with a ruler. For marking pattern diameters, a compass is ideal. For carvings with brick patterns (1 and 2), a ruler allows each brick to be the same size and evenly carved. Before carving projects with rounded tops (here), a compass allows you to draw circles with accurate diameters on the top of a blank.
Belt sanders are one of the many sanding tools you can use to smooth out rough areas.
Belt sander: If you have multiple rough areas on your projects, a belt sander can be used to easily smooth these areas.
Band saw, scroll saw, or pull saw: Instead of spending a lot of time roughing out from thick wood, a band saw, scroll saw, or pull saw can be used to cut the basic shape of a project.
To save time, cut out the shape of your projects on a scroll saw.
Instead of carving small details, use a woodburner to burn them into the carving.
Woodburner: If you do not wish to carve smaller details, you can use a woodburner to burn them into carvings.
Paintbrushes: Brushes allow you to easily apply finishes, paints, and stains to carvings. Paintbrushes can also be used to remove fuzzies in tight places or help clean up a carving before painting or applying a finish.
Paintbrushes can be used to apply various finishes such as paints, stains, and antiquing and finishing wax.
Hot glue gun: Some projects with separate details and materials such as craft wire need to be glued to the main carving. You'll need a hot glue gun and glue sticks to secure the pieces.
Hair dryer: Use to speed up drying between paint coats.
Safety
Carving can be a fun pastime, but if you don’t take care, injuries can happen. Here are a few things to keep in mind before you make your first cut to ensure a safe and successful carving experience.
Wear protective gear: To ensure a safe carving session, make sure to wear a carving glove on your non-dominant hand to avoid injury. If you do not want to wear a glove on your dominant hand, wear a thumb guard or wrap your thumb in medical tape to protect it from the knife. It may be uncomfortable to wear at first, but this will lessen the likelihood of injuries in the long run. Also, when using power tools, such as a band saw for cutting blanks to shape, be sure to wear goggles and a mask rated to filter out small particles (0.1–0.3 microns).
Wear carving gloves to protect your hands from injury.
Be aware of where you are carving: Make sure you are aware of your cutting direction and the location of your fingers before making a cut. If your finger is in the way of the cut, there is a chance you will injure yourself if the blade behaves unpredictably. Determine the stopping point before making your cut, and always keep a firm grip on the tool. If your tool does slip and fall, never grab it, even if you are wearing cut-resistant gloves.
Protect your your eyes and lungs while carving with a mask and safety glasses.
Avoid dangerous or distracting environments while carving: Keep in mind your surroundings when you are carving to ensure a safe and stress-free session. This means keeping pets away from work areas and being mindful of children. Make sure to never leave your unsheathed tools unattended.
Dress for success: While carving, make sure to wear closed-toe shoes in case a tool falls. Carving barefoot or with open shoes such as sandals increases the risk for carving-related injuries.
Remember accidents happen: Keep a first-aid kit near your work area while carving. Even if you’re wearing safety gear, an accident can happen, and it is helpful to have bandages handy.
Take breaks: Make sure not to overwork yourself; take regular breaks to stretch your hands and walk around. Never carve when tired or preoccupied. Before making that final cut, put the piece down and come back to it another day. Don’t rush; it’s not a competition.
Basic Cuts
Carving is a subtractive art—you remove all of the material that isn’t part of your vision for the final piece. For example, to carve a dog, remove all of the wood that doesn’t contribute to the shape of the animal.
Most carvers use four basic cuts to remove excess wood: the push cut, the paring cut, the stop cut, and the V-shaped cut. Master these four basic types of cuts, and you’ll be ready to tackle a multitude of projects.
Stop Cut
As the name suggests, the stop cut is used to create a hard line at the end of another cut. Your hand position depends on the placement of the cut you need to make. Regardless of your hand position, simply cut straight into the wood to create a stop cut. Stop cuts are used to prevent a consecutive cut from extending beyond the intended area, and to free a chip of wood remaining from a primary cut.
Stop cut
Push Cut
For the push cut, hold the wood in one hand. Hold the knife in your other hand with the thumb pressing on the back of the blade. Push the knife through the wood, away from your body. This type of cut is also called the straightaway cut. For additional control or power, place the thumb of the wood-holding hand on top of the thumb on the blade, and then use the wood-holding thumb as a pivot while you rotate the wrist of your knife-holding hand. This maneuver is often called the thumb-pushing cut or lever cut.
Push cut
Paring Cut
The paring cut gives you a great deal of control but requires you to cut toward your thumb. Wear a thumb guard and be aware of the knife position at all times, especially if it slips beyond the anticipated stopping point. To perform the paring cut, which is also called a draw cut, hold the wood in one hand. Hold the knife in the other hand with four fingers. The cutting edge points toward your thumb. Rest the thumb of your knife-holding hand on the wood behind the area you want to carve. Extend the thumb as much as possible. Close your hand, pulling the knife toward your thumb, to slice through the wood. This is the same action used to peel (or pare) potatoes.
Pairing cut
V-Shaped Cut
To make a V-shaped cut, hold the knife the same way you do when making a paring cut. Anchor the thumb of the knife hand against the wood, and then cut in at an angle with the tip of the knife. Rotate the wood, anchor your thumb on the other side of the cut, and cut in at an angle, running beside the first cut. Angle the two cuts so the deepest parts of the cuts meet in the center. This creates a V-shaped groove. Use the center of the cutting edge to make intersecting angled cuts on the corner of a blank, creating V-shaped notches.
V-shaped cut
Painting and Finishing
Take time to look over your piece before painting. Remove all fuzzies, knife marks, and pencil marks. Make sure your carving is ready to paint or your mistakes will show. Use a knife and a V-tool to remove blemishes and undercut areas you want to shade with paint; considering how you’ll paint as you carve will help the carved and painted details work together on the piece.
Before touching brush to wood, consider where and how much you want to add paint to your carving.
A Word on Brushes
Start with good-quality brushes and maintain them. Before you store your brushes, make sure to wash all the paint out of the bristles with water and soap, such as Murphy® Oil Soap.
Color Scheme
Decide on a color scheme before you begin and stay with your choice all the way to the end. On any given project, try to use the same color in three different places. If you want a color to stand out, though, only use that color once.
If you wish to have the woodgrain show through, thin your paints by mixing acrylic paint with at least a few drops of water to create a small pool of thinned color. Add very light coats of this mixture to your carving; it may take two or three coats to reach the desired strength. You can always add more coats later; it is not easy to remove them. Some colors will dry darker, so allow time for them to dry before applying another coat. Note: White and metallic paints do not dilute well and should be used at full strength wherever possible.
Sealing
Before painting, mix boiled linseed oil (BLO) with a small amount of burnt sienna oil paint, squeezing about an inch into a 16-oz. container. Mix it well, and then brush it over the entire piece. This seals the carving, creating a better painting surface. It can also create a natural skin tone, depending on the subject. Wipe off as much as you can as soon as you can, and then dispose of the paper towels appropriately, as they can spontaneously combust. Let the carving dry for 12 to 24 hours, and then you are ready to paint.
Drybrushing
Drybrushing is a technique that allows you to highlight different areas on a carving. It can add interest to a carved texture on fur or a beard, draw attention to prominent facets on a flat-plane carving, or add a distressed, folk-art look to a decorative design. If you choose to drybrush your carving, make sure to use a color that contrasts with the surface you’re painting. Wait until the carving is dry, take a small amount of paint on the tip of a flat dry brush, and then dab it several times on a cloth or paper towel.
Drag the bristles lightly over the area you want to drybrush. You only want to catch the high points, so no need to push hard.
Make sure to take your time when painting. Look at how other people paint and don’t be afraid to try new techniques. Create your own style and have some fun!
Drybrushing highlights the facets on a carving for a folk-art look.
Projects
From Santas and ornaments to hand-carved gifts for all your friends and family, these Christmas-themed projects will keep you busy carving all holiday season long. No matter your carving level or style, this section has a project for anyone looking to get into the Christmas spirit!
Materials
• Basswood, ⅜" (10mm) thick: 3" x 6" (7.6cm x 15.2cm)
• Sandpaper: 150-grit
• Screw eye with a 3/32" (3mm)-dia. hole: ½" (1.3cm) long
• Graphite paper or acetone
• Acrylic paints, such as Delta Ceramcoat®: black, medium flesh, navy, tompte red, white
• Varnish: water-based clear
Tools
• Carving knife
• Assorted gouges and micro tools
• Paintbrushes: #0, #02, #03 round, #6, #10 shader
Peekaboo Santa Ornaments
By Carolea Hower
Every year I design a new Christmas ornament. My original pattern for this year was a Santa Claus with a droopy hat covering one eye. Several of my carving students do not like to carve eyes, so I redrew the pattern with the hat covering both eyes. Then, after seeing the one-eyed Santa, a customer ordered her ornaments with both eyes showing. We’ve provided all three patterns for you. Feel free to adapt them further to fit your mood and skill level.
Carving the Ornaments
Transfer the pattern to the wood. Use graphite paper, or place a fresh laser copy facedown on the blank. Wearing rubber gloves in an area with adequate ventilation, apply acetone to the back of the paper. The acetone will soak through the paper, pick up bit of the toner, and transfer a mirror image of the pattern to the blank. Then, cut the blank to shape, and carve it using the tools of your choice. I use a variety of carving knives, gouges, and micro tools. Note: Make sure your knife is sharpened before you make the first cut. A dull knife will cause more damage than a sharp one.
Peekaboo Santa Ornaments Patterns
Chimney Santa
By Bob Kozakiewicz
I give ornaments to my family members and friends for Christmas each year, and my list seems to be growing longer and longer. As such, I am always looking for something quick and easy to carve, like this Chimney Santa ornament. It’s a simple whittling project for beginners that requires just a carving knife; most new carvers can complete one in just a few hours. Carve one for everyone on your list and remind them Santa nose if they’ve been bad or good!
Materials
• Basswood, 1” (2.5cm) square: 5¼” (13.3cm) long
• Pencil
• Acrylic paint, such as LiquitexTM: Naphthol crimson, parchment, titanium white; such as Americana®: medium flesh, tomato red; such as Craftsmart:® brick red, wine
• Glue: cyanoacrylate (CA) or tacky, such as Aleene’s (put trademark copyright symbol here) (optional)
• Finish: satin spray lacquer, such as Deft®
• Screw eye: brass, ⅛” (3mm) opening
• Ribbon: ¼” (6mm) wide
• Small decorative lights (optional)
Tools
• Band saw (optional)
• Carving knife
• Ruler
• Paintbrushes
Prepping and Carving
Mark the chimney cap. With a pencil and ruler, mark a horizontal line on all four sides 2¼” (5.7cm) up from the bottom of the block. Then mark another line on all four sides ⅜” (1cm) above the first one.
Mark the edges of the chimney. From the lower line, mark vertical lines running down on all of the corners approximately 1/16” (2mm) in from the edges. Note: You will draw eight of these marks. The measurements do not have to be exact.
Shape the chimney. Carve a stop cut around the lower chimney line. Use a knife. Carve off the edges of the block on all four sides toward the 1/16” (2mm) marks and up to the stop cut. If desired, you can do this with a band saw to save time.
Draw the chimney bricks. Using a ruler, mark five parallel horizontal lines on all four sides ⅜” (1cm) apart, moving up from the bottom to the lower chimney line.
Finish drawing the bricks. Mark alternating vertical lines between the horizontal lines on all four sides. Then draw the Santa. Rough sketch Santa’s nose and hat above the chimney.
Begin carving the chimney bricks. Make long, deliberate V-cuts to carve the horizontal lines of the bricks on all four sides.
Finish carving the bricks. Using short V-cuts, carve the vertical portions of the bricks on all four sides. Don’t forget the bricks on the chimney cap.
Begin carving the Santa. Round off the nose and define the hat trim. I like to leave lots of carved facets on the nose to give it texture. Then begin shaping the hat.
Finish shaping the hat. Add a slight rippling movement to the body of the hat and round the trim edges. Add other details or embellishments as desired; you can make the hat more twisty or straight depending on your preference. Carve the ball on top of the hat and clean up any fuzzies with the knife.
Painting and Finishing
Paint the entire chimney with undiluted parchment, making sure the paint gets into the crevices of the bricks. When that layer dries, randomly paint just the brick surfaces with undiluted brick red, making sure not to allow the paint to bleed into the crevices. Leave several bricks unpainted. Paint the remaining (unpainted) bricks with undiluted wine. Then paint Santa’s nose with undiluted medium flesh, add a dab of tomato red into the end, and blend it into the rest of the nose. Paint the hat trim and ball with undiluted titanium white. Finally, paint the hat with diluted Naphthol crimson.


