Erhalten Sie Zugang zu diesem und mehr als 300000 Büchern ab EUR 5,99 monatlich.
- Herausgeber: Fox Chapel Publishing
- Kategorie: Lebensstil
- Sprache: Englisch
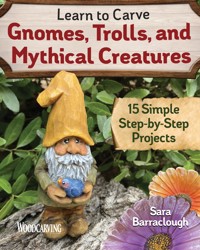
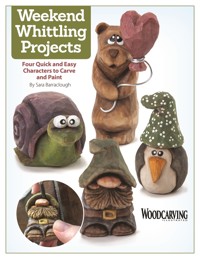
A woodcarving book devoted solely to magical little gnomes and other charming creatures! The perfect source of inspiration for beginning and experienced whittlers and carvers alike, Learn to Carve Gnomes, Trolls, and Mythical Creatures boasts a menagerie of 15 woodcarving projects that range in difficulty from easy to more challenging. With complete plans and step-by-step instructions and photography, carve charismatic characters and objects, from a mushroom house, unicorn, and gnome to a wizard, dragon, hedgehog, and much more. Sara Barraclough is a master carver and a regular contributor to Woodcarving Illustrated Magazine, as well as the author of the incredibly charming Weekend Whittling Projects.
Sie lesen das E-Book in den Legimi-Apps auf:
Seitenzahl: 91
Veröffentlichungsjahr: 2020
Das E-Book (TTS) können Sie hören im Abo „Legimi Premium” in Legimi-Apps auf:
Ähnliche


Dedication
Every ounce of credit for this book goes to my mum. I’d still be on the preface if it weren’t for her. I also want to give a shout-out to my little love bug, who has proudly taken sole custody and ownership of all carvings in this book. In loving memory of my uncle Ron, and to Wendy—I love you dearly.
I must also add that this project was fueled by copious amounts of Red Bull and a whole lot of no sleep.
• Layout Designer: Chris Morrison
• Producing Editors: Hannah Rachel Carroll and Kaylee Schofield
• Contributing Photographer: Mike Mihalo
• Step-by-Step Photographer: Sara Barraclough
© 2020 by Sara Barraclough and Fox Chapel Publishing Company, Inc., 903 Square Street, Mount Joy, PA 17552.
Learn to Carve Gnomes, Trolls, and Mythical Creatures is an original work, first published in 2020 by Fox Chapel Publishing Company, Inc. The patterns contained herein are copyrighted by the author. Readers may make copies of these patterns for personal use. The patterns themselves, however, are not to be duplicated for resale or distribution under any circumstances. Any such copying is a violation of copyright law.
For a printable PDF of the patterns used in this book, please contact Fox Chapel Publishing at [email protected], quoting the ISBN and title of this book, as well as the pattern or patterns required.
Print ISBN: 978-1-4971-0112-8eISBN: 978-1-6076-5822-1
To learn more about the other great books from Fox Chapel Publishing, or to find a retailer near you, call toll-free 800-457-9112 or visit us at www.FoxChapelPublishing.com.
We are always looking for talented authors. To submit an idea, please send a brief inquiry to [email protected].
Preface
My biggest hope is that you have as much fun carving these characters as I had coming up with them.
I am so excited to share these projects with you! My one and only inspiration for everything is my three-year-old little girl. She has more imagination and character in her pinky finger than anyone I’ve ever met—which makes life pretty darn fun. She lives in a world of magic and fairies, talking animals, and all things cartoons … and to be quite honest, I’d much rather live in a world with talking animals and magic than one without. My goal with these projects is to capture that magic and wonder in a small space.
I tried to design carves that would be fun and new, and hopefully have a little something that everyone would enjoy. My hope is that as you go through the book and take on these projects, you can find ways to change them and make them your own. Carving books and patterns should be viewed as blueprints and guidelines, rather than hard-andfast rules. The wonderful thing about art, in all its forms, is that no two people produce the same thing—even from the same pattern. We all have our own artistic fingerprint, and that is worth celebrating.
St. George, Utah
Table of Contents
Materials
Tools
Projects
Beginner Projects
Hoot Owl
Simple Acorn & Leaves
Tiny Woodsman21
Sleepy Fox
Happy Hedgehog
Mushroom House
Intermediate Projects
Sassy Squirrel
Romantic Raccoon
Cheeky Toad
Oma Elf
Friendly Gnome
Advanced Projects
Darling Dragon
Forgetful Wizard
Troll with a Will-o’-the-Wisp
Starlight the Unicorn
Patterns
About the Author
Materials
All of the materials referenced in this book can be purchased at your local craft and woodworking supply stores. Affordable options are available for everything from paints to wood; these projects are infinitely adaptable, so use the brands and products that work best for you.
Basswood
Basswood is my go-to wood for carving, as it’s soft and lightweight with a tight, consistent, and understated grain. Some carvers prefer poplar, pine, cherry, or even walnut, although these are typically more expensive and harder to work. (Each wood absorbs paints and finishes differently, too.) Use what you’re comfortable with and what’s available to you.
Acrylic Paints
My preferred paints are acrylic; I don’t use watercolors or oils. I love the painting process as much as the carving and enjoy experimenting with acrylic paints to achieve different effects. As you’ll see in the pages to follow. Plaid Crafts makes some fun varieties of paint that can really add personality to your carves. Don’t be afraid to try new things!
I thin my paints substantially before applying them to carvings to see a hint of the wood grain peeking through whenever possible. Another benefit of thinning your paints is that you can stretch them farther, so they last longer.
Basswood is soft and lightweight with a tight grain.
I use acrylic paints from my local craft store.
Boiled Linseed Oil
I always treat my carvings prior to painting. This is a personal preference—not everyone likes or wants to use boiled linseed oil. Acrylic paint is water-based, and boiled linseed oil is (obviously) oil, so a slight learning curve is required in order to make the two work together harmoniously. I will dip my carving (or apply the BLO with a sponge brush if it’s too big to fit into the jar) and then let it sit on a paper towel while I get my paints and supplies all set up (so only a few minutes). Once I’m ready to paint, I will wipe down any standing or residual oil still on the carve with a clean paper towel or rag. You don’t want oil to pool in the creases or anywhere else; it should only just be absorbed into the wood.
Antiquing Wax
A common question I get about painting regards the use of antiquing wax. I did not use antiquing wax on any of the projects in this book for a reason. I have found that it’s easy to misuse or abuse antiquing wax, which can make a really good carve look dirty rather than adding the depth and character you may have been going for. Instead, I use a common acrylic painting technique called ‘floating’ or shading, as demonstrated in many of the projects throughout this book. Shading provides a graduated look to give a project dimension and depth.
Sealers
There are a number of ways to ‘finish’ or seal your carving. Clear polyurethane, Krylon®, Howard’s Feed-n’-Wax, beeswax … each of these will give a different finished look to your carve, so it all comes down to personal preference. Krylon comes in satin, matte, and gloss and each look different. Howard’s Feed-n’-Wax doesn’t change the overall finished look of the wood. Decide what kind of finished look you want, experiment with different products, and determine which works best for you.
Wire
I use a lot of aluminum craft wire in various sizes, ranging from 6 to 22 gauge. Whenever I see some on sale at the craft store, I grab it ... you never know when it might just be the perfect addition to a project. For example, you’ll see that I used it as the stem for the Romantic Raccoon’s flower (see here).
Other Useful Items
I carved the “accessory” items, such as the Friendly Gnome’s pet bird (see here) and the Forgetful Wizard’s wand (see here), as one piece with their respective blanks, but if you choose to carve them separately from scrap wood, you’ll need a trusty wood glue (such as Titebond or Gorilla Glue) or cyanoacrylate (CA) glue. These are good products to have on hand, in general.
I use Coban self-adherent wrap to improve my grip on knife handles, and toothpicks to paint on small details such as eye highlights. A firm toothbrush or denture brush will come in handy for the projects in this book, as well; if your carvings tend to get dirty during the process, a light scrub with water will remove any surface grime before you apply finish.
Tools
One of my favorite things about carving is that it really can ultimately be done with just a knife. Of course, there are tools that make certain tasks easier and more time-efficient, but having one knife need not limit you. You may just have to be a little more innovative with your methods. That said, here’s a look into some of the tools I use in my projects.
Safety Gear
Every carver should invest in a carving glove, thumb guard, leather strop, and stropping compound in order to keep blades sharp and hands safe from injury. You’ll wear the carving glove on your non-carving hand (the one holding the carving) and the thumb guard on your carving hand (the one holding the knife). No project is too simple or small for safety gear; I have drawn blood on simple whittles as well as complex carves. Wear a dust mask and safety goggles when using power tools such as band saws. Taking precautions ensures that you can keep carving without difficulty for years to come!
Band Saws
Because of the size of most of these projects, you will need a band saw to cut the blanks (the rough shapes of the pieces) before you begin to carve. Practice proper precautions as you cut. All blanks for this book were cut on a 10" (25.4cm) band saw.
Knives
A classic bench knife with a 1"-1½" (2.5cm-3.8cm) blade should suit you for most everyday projects, but not all knives are created equal. Carving knives come in an endless array of shapes, sizes, and materials, but one of the most important things to consider is how the tool feels and fits in your hand. The knife is quite literally an extension of your hand, and if it isn’t comfortable to hold and you don’t have complete control over it, you’re creating a mess for yourself before you start carving.
Case in point: because I am a fairly petite female, knives with a large or girthy handle don’t work for me. When you’re out looking for the perfect knife, hold each one in your hand. If you have friends that carve, ask if you can visit their workshop and test some of their knives. Figure out what you like and don’t like. Helvie makes some fabulous knives and blades; I am fortunate enough to have a friend that took some Helvie blades and made handles for them that fit my hand perfectly.
A classic bench knife with a 1"-1½" (2.5cm-3.8cm) blade works well for the projects in this book.
Gouges, V-tools, and Micro Tools
I also use an assortment of gouges, V-tools, and micro tools.
Gouges are great for scooping out large quantities of wood in just a few passes, or adding small details like nostrils and buttons. You’ll notice throughout the project instructions that the numbers next to the gouges vary. The lower the number, the flatter the gouge. A #9 will have a more dramatic curve than a #3, for example.
V-tools are great for adding textures—such as hair, fur, or grass—because of the clean, sharp lines they create. They’re also useful for separating clothing layers.


