Erhalten Sie Zugang zu diesem und mehr als 300000 Büchern ab EUR 5,99 monatlich.
- Herausgeber: Old Pond Books
- Kategorie: Lebensstil
- Sprache: Englisch
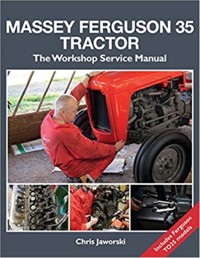
Learn everything you need to know about the Ferguson MF 35 and TO35! Featuring step-by-step instructions for weekly checks, operator maintenance, engines, cooling and fuel systems, transmissions, brakes, hydraulics, and so much more, this user-friendly restoration service manual goes back to the basics, detailing a wide range of topics so you can understand your tractor machinery from the inside out! Also included are more than 650 photographs, helpful charts for service schedules, torques, data specs, tool lists, and troubleshooting, and even a buying guide! Author Chris Jaworski is a technical writer, Tractor & Machinery magazine and a restoration enthusiast. For owners involved in servicing, repairs, or restoration of the Massey Ferguson MF 35 or TO35, this crystal-clear guide will help you enjoy getting the work done quickly, efficiently, and correctly!
Sie lesen das E-Book in den Legimi-Apps auf:
Seitenzahl: 309
Veröffentlichungsjahr: 2020
Das E-Book (TTS) können Sie hören im Abo „Legimi Premium” in Legimi-Apps auf:
Ähnliche


MASSEY FERGUSON 35 TRACTOR
The Workshop Service Manual
ALSO COVERS FERGUSON TO35 MODELS
The Massey Ferguson 35 Tractor
Old Pond Publishing is an imprint of Fox Chapel Publishers International Ltd.
Project TeamEditor: Sarah BloxhamLayout: Liz Whatling
Copyright © 2013, 2020 by Chris Jaworski and Fox Chapel Publishers International Ltd.
All rights reserved. No part of this book may be reproduced, stored in a retrieval system, or transmitted in any form or by any means, electronic, mechanical, photocopying, recording, or otherwise, without the prior written permission of Fox Chapel Publishers, except for the inclusion of brief quotations in an acknowledged review.
ISBN 978-1-912158-51-5 (paperback)978-1-913618-03-2 (ebook)
A catalogue record for this book is available from the British Library.
Fox Chapel Publishing, 903 Square Street, Mount Joy, PA 17552, U.S.A.
Fox Chapel Publishers International Ltd., 7 Danefield Road, Selsey (Chichester), West Sussex PO20 9DA, U.K.
www.oldpond.com
Acknowledgements
My grateful thanks to the following for their help and support: Bicton College engineering staff and students, George French, Nick Jackman, Ray Pile, Raymond Taylor, Vapormatic Ltd and Bill Vellacott, and of course, my wife Pam. To my special grandchildren Ben, Evelyn, Hugo and Livvy.
Contents
Safety
Introduction
1 Buying and Safety
2 Weekly Checks
3 Operator Maintenance
4 Engines
• 4-cylinder 23c diesel engine overhaul
• 4-cylinder 87mm Petrol/TVO engine overhaul
• 3-cylinder 3.152 engine overhaul
5 Cooling Systems
6 Fuel Systems
• Carburettors
• Fuel lift pump overhaul
• 3-cylinder diesel fuel system
• 4-cylinder diesel fuel system
• Air cleaner operation and service
• Diesel fuel injectors
• DPA type distributor fuel injection pump
7 Transmissions
• 3-cylinder engine clutch repair
• 4-cylinder engine double clutch and flywheel overhaul
• Single clutch and flywheel overhaul
• Six-speed gearbox overhaul
• Multi-power gearbox overhaul
8 Rear Axle and PTO
9 Brakes
10 Hydraulic System
11 Steering and Front Axle
12 Electrics
• Disposal of a lead acid battery
• Inertia starter test and repair
• Pre-engaged starter system test and repair
• 3-cylinder electrics
• 4-cylinder electrics
• Petrol/TVO electrics
13 Bodywork
• Bonnet repair
• Paintwork
• Fitting a new bonnet
Safety
Before carrying out any maintenance on your tractor it is important to remember a few safety rules:
• Use lots of trays/containers for the disassembled parts and use masking tape to label them where required.
• Always use axle stands with hydraulic jacks.
• Beware of sharp casing – machine-edge cuts are easily made when lifting.
• When setting up for a job be sure to choose level ground to work on.
• Wear protective gloves when working with oils/fluids.
• Be careful when dismantling the major components as it can affect the stability of the chassis unit.
• Beware of moving parts if making adjustments to them.
• Work slowly and carefully. Haste is a common cause of accidents.
• All fluids and filters have to be disposed of responsibly either at a recycling point or by a local dealer. They cannot be deposited in domestic waste.
• Use masking or duct tape to block off any open fuel lines to prevent dirt from entering.
• Battery acid is highly corrosive. It is advisable to wear goggles and protective gloves when working with the battery.
• Be careful when working with hot engine oil.
• Wear protective goggles when working with antifreeze.
• Be careful to avoid splashing oil or antifreeze on your clothes or skin.
• Only operate the ignition key from the driver’s seat.
• Allow the engine to cool before draining coolant or replacing any parts.
• Ensure the engine is cold or allow it to cool for at least an hour before removing the radiator cap.
• Wear a dust mask when cleaning the paper air filter.
• Use oxy-acetylene with care and beware of potential fire hazards.
• Always replace axle sets, i.e. fit new shoes or lining to both the left-hand and right-hand brakes.
• Beware of asbestos brake dust.
• Dampen down dust with brake cleaner. Do not use airline to clean off dust.
• Wear gloves and a dust mask when removing and/or cleaning brakes.
• Care must be taken when removing brake return springs.
• Always disconnect the battery before working on the electrical system.
• Unsure of a task? Ask someone who is more experienced or consult a professional.
Disclaimer
All reasonable steps have been taken to ensure that the information in The Massey Ferguson 35 Tractor Workshop Service Manual is correct. Care should always been taken when performing the procedures outlined in this manual and when in doubt please consult a professional. The author and publisher cannot be held liable or responsible for any kind of injury or damage that may result to the reader or a third party as a result of the use of this book.
The History of the Massey Ferguson 35
This workshop manual covers Massey Ferguson 35 tractors from 1956 to 1964. During this period, over 387,000 tractors were produced, making the MF 35 one of the most popular tractors produced. This manual will prove invaluable to the potential buyer, operator and restoration enthusiast because of its simple and logical approach to tackling even the most daunting of tasks. Each chapter is written concisely to enable the reader to carry out maintenance work and understand the components of the tractor. Within each chapter certain jobs are explained using a logical photographic sequence; these will help the reader to safely perform repairs or major restoration.
The Massey Ferguson 35 tractors were updated versions of the Ferguson TE 20 range with a number of new features, including an up-rated engine, a dual clutch option to provide live-drive PTO and a dual range gearbox to increase forward speeds from four to six or twelve with Multi-Power option. The MF 35s also had ground speed PTO and increased hydraulic lift capacity with separate draft and position controls.
Two versions were available: the standard and the De-Luxe. The latter version was fitted with the dual clutch, live PTO, differential lock, tractormeter, step assemblies and cushion foam seat as standard. But, as was commonly found, options could be retrofitted later.
Grey and Gold
The first of the Ferguson 35 tractors were built in October 1956 at the Banner Lane factory in Coventry, England. These were painted with grey tinwork and metallic copper-coloured castings. The tractors were officially called the FE35s but were often referred to simply as the ‘grey and golds’. Power was provided from a Standard Motor Company petrol/TVO or 23c 4-cylinder diesel engine. Both engines were updated versions of the ones previously used in the TE 20s.
The Standard 23c diesel engine featured a larger bore, an improved rotary fuel injection pump and new cylinder head design which enabled it to produce 37 bhp.
Ferguson grey and gold Petrol/TVO model
A genuine original
The Petrol/TVO/lamp oil engines were similar to the TE 20 engines but bored out to 87 mm and fitted with a new carburettor. Their outputs increased to 37, 30 and 29 bhp respectively.
Transition to Massey Ferguson 35
Massey-Harris and Ferguson merged on 12 August 1953 and the new company was known as Massey-Harris-Ferguson. The company name was changed to Massey-Ferguson (note the hyphen) following an announcement on 19 November 1957, but then the hyphen was dropped early in 1958. The now familiar triple triangle logo also emerged as a part of global reorganisation.
The production colour changed from grey and gold (with the last tractor produced in this livery at serial number 74655) to the more familiar – and standard across the entire Massey Ferguson range – red bonnet, wings and grey castings in late 1957.
Bonnets, Wings and Castings
The two push button bonnet catches that first appeared on the FE 35 were used until 1959 (specifically serial number 141140) after which a swivel catch was fitted on top of the bonnet lid itself. The six-stud outer half shaft housing that was used on the grey and gold tractors continued to be used for the production of the first 2972 red and grey Massey Ferguson badged tractors before being replaced with the twelve-stud version on later castings.
There were many small changes and options to the tractors over the period of manufacture. The first of the Perkins engine tractors retained the old-style air inlet under the bonnet, but this changed to the raised ‘mushroom’ air cleaner intake that went through the bonnet and had to be removed before the bonnet could be lifted.
In 1962 the wings changed from the shell design to the extension mudguards that connected to revised footplates. This change was made to ensure health and safety compliance.
Engines and Transmission
In January 1959, Massey Ferguson acquired Perkins engines and took over the Banner Lane factory from Standard Motor Co. This move enabled them to adopt the Perkins A3.152 engine (from serial number 165596).
MF 35 23c 4-cylinder
MF 35 3-cylinder restored
In 1962, the MF 35 was improved with the addition of an optional differential lock and Power Adjusted Variable Track (PAVT) rear wheels. This enabled the rear track width to be altered by simply driving the tractor forwards or backwards at which point the wheels would ‘wind’ in or out.
In December 1962, a new gearbox was introduced called the ‘Multi-Power’. This gearbox was able to achieve a higher gear through a power-operated wet clutch without de-clutching, thus giving twelve forward and four reverse gears and a slightly higher road speed.
MF 35X
The last change in 1962 came with the introduction of the Massey Ferguson 35X, which used an up-rated AD3.152 direct-injection engine and resulted in a power increase to 44.5 bhp.
MF 135
The last MF 35 tractors were produced in 1964 before Massey Ferguson announced their new ‘Red Giants’. This was the result of four years of development and produced the 100 series tractors. The MF 35 had undergone 598 changes in order to emerge as the MF 135 tractor.
MF 35X 3-cylinder 3.152
MF 35X 3-cylinder Multi-Power
Chapter 1 Buying and Safety
Prior to potential purchase an assessment must be made in order to ascertain whether the tractor is priced correctly. This will be influenced by a number of factors including how much it will to cost to fully restore or to mechanically overhaul the tractor and whether or not you are willing to commit the time and effort to refurbish an ‘old dog’. Once the tractor has been purchased a more detailed examination hopefully will not reveal any nasty (read expensive) surprises.
Three Essential Checks
There are three checks that you can perform upon viewing a potential purchase. The first two checks (see chart) can be made easily with a knowledgeable friend or local agricultural engineer. It is unwise for the inexperienced person to buy a tractor on looks alone as shiny paint can hide a multitude of problems. The third check requires technical tools and knowledge to complete effectively, but will usually only confirm the expert’s opinion of the condition.
1 Tractor component visual condition
Tractor make
Massey Ferguson
Model
35
Registration number
123 ABC this should relate to the V5 document and the casting age marks
Engine condition
Good – Starts easily and quickly from cold; no strange noises; when revving engine some black smoke; pulls well when driven; no oil leaks; good oil pressure on dash gauge.
Average – Starts with good battery; some blue/black smoke; slight oil stains.
Poor – Difficult starting and needs a good battery and a sniff of ether spray to fire into life.
Excessive crankcase compression (oil blowing out of the dip stick hole).
Engine oil leaking from the front and rear oil seals.
Low oil pressure indicated on the dash oil gauge.
Rattle/knocking noises from internal engine.
Electrics
Good – New battery; terminals tight and in good condition; wiring insulation good and secured; charging light goes out upon starting and ancillary electrics (wipers, heater, lights, etc.) working.
Average – Battery starts tractor but is more than two years old; wiring needs attention, securing and some repairs. Most ancillaries work.
Poor – Very old battery requires jump start; no battery charging evident.
Wiring condition frayed, unsecured and disconnected/broken. Requires new loom. Starter motor operation poor when new battery fitted.
Charging ammeter not working.
Lighting and other ancillaries not working.
Transmission
CLUTCH
Good – Gear selection and changing smooth and easy; no noises when clutch pedal depressed; free play correct; clutch stalls engine when clutch slip test carried out.
Average – Clutch slight drag and sticking in gear possibly due to lack of use; PTO moves in and out of gear easily. Free play needs attention.
Poor – Difficulty engaging and disengaging gears without grinding noise; judder when taking up drive; clutch will not stall engine on clutch slip test; noise from clutch housing when pedal depressed.
GEARBOX/ REAR AXLE
Good – No whine or bearing whine noise from gearbox; gear levers select range easily; ‘change on the move’ ‘Multi-Power’ range works efficiently.
Average – Some low noise evident; gear levers lift up and down too much. Some side play inside selectors.
Poor – Difficult to select gears; jumps out on over run; loud gear and bearing noise; ‘change on the move’ range not working.
Brakes
Good – Pedal has good feel/bite; brakes hold on hill and slow tractor when applied in a straight line; pedal free play correct; hand brake catch works well.
Average – Pedal free play needs adjusting; effort needed to slow tractor; hand brake works on last catch. Adjustment required.
Poor – Both clutch and brake pedal have lost diamond grip indicating hard life/work carried out. Oil leaks evident from rear axle seals onto brake drums; poor stopping ability; hand brake will not hold tractor on slope.
Steering
Good – Steering wheels react quickly with no play when steering wheel wobbled; no play in steering joints, no free play in wheel bearings and king pins; front axle pivot pin secure.
Average – Slight play inside steering box (in straight ahead position) as well as in steering joints, wheel bearings and king pins.
Poor – Excessively worn and slack in steering components; front wheel bearings noisy and loose; excessive play in the trunnion pin and bushes. Drag links bent both sides. Steering wheel disintegrating.
Hydraulics
Good – Rear linkage arms and top link have little play and adjustable arm moves freely; responds quickly to operating levers movement and will lift a heavy load (3-furrow plough). Test oil pressure: 175 bar (2,500 psi) is good.
Average – Slight wear in rear linkage; lubrication and some adjustment required. Oil pressure slightly below maximum.
Poor – Very worn pins and link arms; excessive play in top link draft spring housing; oil pressure well below maximum limit; rear arms will not lift heavy load, hydraulic pump noisy on full load.
Tyres
Good – Front and rear tyres new and same brand with no cuts or surface cracks; all hold air pressure. Rims in good condition: no damage and rusting, pitting.
Average – 50% worn fronts and rears with slight perishing; different brands. Slight rim damage and light pitting to rims.
Poor – Front and rear tyres 80% worn and cracking on surfaces with cuts on side walls. Both rims dented and very badly corroded.
Body work
Good – Unmolested as original with good paintwork and no damage due to corrosion or accidents to body work. No badges or lights missing. Well looked after with V5 registration log book present.
Average – Some good repairs carried out over time; working order but may need tidying to reach a good condition; some cosmetic parts missing. V5 registration log book not present but registration number available.
Poor – Very badly damaged and corroded body work in need of replacement or extensive repair; no badges or complete lighting. No V5 document or registration plate.
The above chart can act as a guide to help you determine:
(a) whether the tractor is really worth purchasing and/or haggling down the price;(b) and the initial cost of the restoration, bearing in mind it will always cost more than anticipated.
2 Identifying the originality
This helps to understand the production codes, serial and model numbers and transmission code interpretation. Each major casting on the tractor has a casting manufacturing date embossed on its surface, e.g.: MF 35
Rear transmission casting number
K-16-L
Rear axle trumpet housings casting number
K-10-L
Bell housing casting number
J-3-L
Tractor serial number
SNMYW343872
Engine serial number
1997156C
Therefore our interpretation of the tractor age from the bell housing numbering:
The following table shows the serial numbers of the tractor and the corresponding year of manufacture letter prefix as found on the component castings:
MF 35
Year
Prefix
Tractor serial number
1957
F
74656-79552
1958
G
79553-125067
1959
H
125068-171470
1960
I
171471-220613
1961
J
220614-267527
1962
K
267528-307230
1963
L
307231-352254
1964
M
352255-388382
The engine casting mark is K-16-L.
This gives us the date of manufacture as (K) November 16 (L) 1963 which coincides age-wise with all the other casting marks. This indicates the major casting components are highly likely to be the originals and the tractor has not had any major casting swaps. Changing of the castings often occurs when people are trying to achieve a cheap restoration. They will swap complete engines, gearboxes or rear axles instead of repairing the internal components. This action may detract from the originality of the finished tractor.
The tractor serial number SNMYW343872 is explained as follows:
As all the options are fitted to the tractor we can safely assume it is a factory original.
Other serial number codes are as follows:
Chassis
Engine
Clutch
Transmission
3 Technical assessment
Cylinder compression test
To ascertain the condition of an engine we can carry out a cylinder compression test. This involves removing the fuel injectors and replacing them with a dummy injector and pressure gauge. Typical results recorded are:
Cylinder number
Dry test psi
Wet test psi
1
300
330
2
200
210
3
250
310
The ‘wet’ test involves squirting 8–10 shots of engine oil into each cylinder using an oil can. This seals the piston rings and the compression readings will normally rise.
The above results show that the engine is worn and will not start easily (ideally it should be above 380 psi minimum) without utilising starting (ether) spray because of the low internal cylinder pressure reading. The piston rings are then sealed by adding the oil into each of the engine cylinders. If the readings increase by more than 25–30 psi, the rings and or bores are worn, i.e. not sealing. If the reading remains the same, the compression loss is due to a fault above the pistons, i.e. head gasket or leaking inlet/exhaust valves. The lower reading indicates that there is obviously a more serious problem with cylinder number 2.
Note: when carrying out the above test on a Massey Ferguson 35 petrol/TVO engine a pressure gauge is screwed into the spark plug hole (on the respective cylinder to be tested) and all the spark plugs must be removed to permit the engine to turn over quickly.
The readings for an engine in good condition are 90 to 100 psi, any lower than this and a ‘wet’ test should be carried out as per the diesel test to ascertain where the loss of compression has occurred.
Using a PTO-driven dynamometer can easily highlight the following faults:
• Engine power and torque output
• Engine breathing
• Clutch slip transmission and PTO
• Oil and fuel leaks
• Blocked air cleaner
• Cooling system operation
• Unusual noises or vibrations
• Exhaust smoke colour
• Blue – worn engine
• White – coolant leak into engine
• Black – fuel system problem and misfire or air cleaner blocked
Rear hydraulic oil pressure test
A hydraulic oil pressure gauge can be connected to the tapping, supplying the trailer tipping pipe feed, and readings taken with the oil hot, i.e. after operating the tractor with the arms in the fully raised position for over one hour. A pressure reading of 172 bar (2,500 psi) is the tractor’s specification. This indicates a good pump and/or pressure relief valve.
1.01. Typical hedgerow
1.01. A typical hedgerow tractor probably would have been exposed to the elements for many years and therefore care must be taken in examining it to ascertain the extent of the harm done. The engine is likely to be stuck due to water ingress and the tyres perished because of ultra-violet light deterioration. Therefore repair costs must be realistically considered.
1.02. Genuine original
1.02. This is a rare example of a one farm from new tractor. It has been used but was well cared for with regular repairs and servicing to keep it in good condition. If the tractor came up for sale it would achieve top market price because of its originality. It would be unfortunate if it was re-painted as this tractor is invaluable to restorers to check for originality of parts.
1.03. Fully restored
1.03. To save the problems, time and knowledge required to carry out a restoration one option is to buy a tractor that is already finished. Again this will require a high initial outlay on purchasing the tractor, but guarantees that the tractor will be ready to use. One downside is that one does not know the ‘level’ of the restoration. Was it just a paint job and a few replacement parts or a full, expensive rebuild? Photographs of the restoration would give the prospective buyer the necessary information.
1.04. Blow by
1.04. As the engine is revved and the engine oil becomes warm, it is seen to blow out of the dipstick hole. This fault indicates that there are compression gases leaking past the worn piston rings and bore and pressurising the crankcase (sump), thus forcing out the oil.
1.05. Blue exhaust
1.05. As the engine is revved, oil is drawn past the worn piston rings and bore and is burnt by the engine. This is indicated by the blue tint of the exhaust smoke.
1.06. Dynamometer test
1.06. The PTO-driven oil-operated dynamometer is connected the tractor PTO shaft via a torque transducer (the small black unit fitted to the tractor PTO). This unit measures the twist of the PTO shaft (torque) and the speed in RPM and then calculates accurately (+ or – 1%) the power available.
1.07. Rear axle serial number
1.07. To ensure the tractor casings, and therefore the internal parts, are from the original tractor that left the factory, the casting date numbers can be checked using the reference charts. The dates should all coincide with each other within a few months and the same year. The rear casing number is just in front of the round inspection cover on the left-hand side of the axle, i.e. K16L.
1.08. Multi-Power test
1.08. If the tractor is fitted with a Multi-Power change-onthe-move high/low gearbox, this must be checked for correct operation. Test 1 is carried out on an incline; the tractor is driven up the hill in high and then the clutch is depressed. As the tractor rolls backwards the transmission should ‘lock up’ and stop the tractor, thus confirming that the Multi-Power is ok. The second test involves driving the tractor at various speeds and on differing inclines to check that the Multi-Power lever selects and de-selects high and low firmly and positively. Drive for at least two miles or one hour to bring the engine and transmission to working temperature then carry out tests again.
1.09. Hydraulic pump test
1.09. Since the hydraulic arms raise and lower with the movement of the operating lever, we know that oil pressure is present. By connecting an oil pressure gauge to the tipping pipe outlet, we can confirm that our reading shows an operating pressure of 2,000 psi. This is below the recommended operating pressure of 2,500 psi, thus indicating a worn hydraulic pump or relief valve.
1.10. Check wear of link arms
1.10. Grab the two lower link arms and lift them, this will reveal any play in the pins and joints. As is typical of a yard tractor, the link arms flopped and rattled all over the place. New arms and pins will definitely be needed. Note the oil leaking from the lower arm pins under the trumpet housings; this indicates loose pins in the housing.
1.11. Play in draft spring
1.11. Hold the top draft spring attachment point and pull it in and out; there should be only a very small amount of free play. This tractor has lots and therefore the internal hydraulic linkage will need to be inspected and parts replaced.
1.12. Oil leak onto brakes
1.12. The rear trumpet housings have oil seals in the ends of the half shaft housing. Unfortunately when they leak the oil reaches the brakes as shown by the oil stain. Replacing these seals is a major job and requires special tools and oxyacetylene equipment.
1.13. Diesel compression testing
1.13. To determine the engine condition we can carry out a cylinder compression test. This involves removing the fuel injectors and replacing them with a dummy injector and pressure gauge.
1.14. Petrol compression test
1.14. When carrying out a compression test on a Massey Ferguson 35 with a petrol/TVO engine, a pressure gauge is screwed into the spark plug hole (on the respective cylinder to be tested). All the spark plugs must be removed to permit the engine to turn over quickly.
1.15. Date ageing
1.15. Number and letter marks in the major castings indicate the date of manufacture and therefore whether the major parts – e.g. engine, gearbox or rear axle centre castings – have been replaced in the tractor’s life.
General Safety
Avoid fires
When you work around fuel, do not smoke or work near heaters or other fire hazards. Make sure to store flammable fluids away from fire hazards. Do not incinerate or puncture pressurised containers. Make sure the machine that you are using is clean of rubbish, grease and debris. Do not store oily rags; they can ignite and burn spontaneously.
Cooling system
An explosive release of fluids from a pressurised cooling system could cause serious burns. Shut off the engine. Only remove the filler cap when cool enough to touch with bare hands. Slowly loosen cap to first stop to relieve pressure before removing completely.
Prepare for emergencies
• Be prepared if a fire starts.
• Keep a first aid kit and fire extinguisher handy.
• Keep a record of emergency numbers for doctors, ambulance, fire service and hospital.
• Attend a first aid course.
Battery safety
A few useful tips about battery safety:
• Caution: battery gas (hydrogen) can explode. Keep sparks and naked flames away from batteries.
• Use a torch to check battery electrolyte level.
• Never check battery charge by placing a metal object (i.e. a spanner) across the posts. Use a voltmeter or hydrometer.
• Always remove grounded (earth) battery clamp first and replace it last.
• Caution: sulphuric acid in battery electrolyte is poisonous. It is strong enough to burn skin, burn holes in clothing, and cause blindness if splashed into eyes.
Avoid the hazards by:
1. Filling batteries in a well-ventilated area.
2. Wearing eye protection and rubber gloves.
3. Avoiding breathing fumes when electrolyte is added.
4. Avoiding spilling or dripping electrolyte.
5. Using proper jump-start procedure.
If you spill acid on yourself, take the following precautions:
1. Flush your skin with water.
2. Apply baking soda to help neutralise the acid.
3. Flush your eyes with water for 15–30 minutes. Get medical attention immediately.
If acid is swallowed:
1. Do not induce vomiting.
2. Drink large amounts of water or milk, but do not exceed two litres.
3. Get medical attention immediately.
Warning: Battery posts, terminals and related accessories contain lead and lead compounds and chemicals; therefore, wash hands after handling or wear protective gloves.
High-pressure fluids
Escaping fluid under pressure can penetrate the skin causing serious injury. Avoid the hazard by relieving pressure before disconnecting hydraulic or fuel lines. Tighten all connections before applying pressure. Search for leaks with a piece of cardboard. Protect hands and body from high-pressure fluids. If an accident occurs, see a doctor immediately. Any fluid injected into the skin must be surgically removed.
Wear protective clothing
• Wear close-fitting clothing and safety equipment appropriate to the job. Strong boots or steel toe-capped boots are preferable.
• Prolonged exposure to loud noise can cause impairment or loss of hearing. Wear a suitable hearing protection device such as earmuffs or earplugs to protect against objectionable or uncomfortable loud noises.
• Operating equipment safely requires the full attention of the operator. Do not wear radio or music headphones while operating machinery.
Machine safety
Tie long hair behind your head. Do not wear a necktie, scarf, loose clothing or necklace when you work near machine tools or moving parts. If these items were to get caught, severe injury could result. Remove rings, watches and other jewellery to prevent electrical shorts and entanglement in moving parts.
Work in a ventilated area
Engine exhaust fumes can cause sickness or death. If it is necessary to run an engine in an enclosed area, remove the exhaust fumes from the area with an exhaust pipe extension. If you do not have an exhaust pipe extension, open the doors and get outside air into the area.
Work in clean area
Before starting a job:
• Clean work area and machine.
• Make sure you have all necessary tools and parts for the job.
• Read all instructions thoroughly; do not attempt shortcuts.
Remove paint before welding or heating
• Avoid potentially toxic fumes and dust. Hazardous fumes can be generated when paint is heated by welding, soldering or by using a gas torch.
• Do all work outside or inside a well-ventilated area and properly dispose of paints and solvents.
• Make sure to remove paint before welding or heating. If you sand or grind paint, avoid breathing in the dust by wearing an approved respirator.
• If you use solvent or paint stripper, remove stripper with soap and water before welding. Remove solvent or paint stripper containers and other flammable material from the intended work area. Allow fumes to disperse for at least 20 minutes before welding or heating.
Avoid heating near pressurised fluid lines
Flammable spray can be generated by heating near pressurised fluid lines, resulting in severe burns to yourself and bystanders. Do not heat by welding, soldering, or using a gas torch near pressurised fluid lines or other flammable materials. Pressurised lines can be accidentally cut when heat goes beyond the immediate flame area.
Illuminate work area safely
Illuminate your work area adequately but safely. Use a portable safety light for working inside or under the machine. LED torches produce a safe level of illumination with long life.
Lifting equipment
Lifting heavy components incorrectly can cause severe injury or machine damage. Make sure to follow the recommended procedure for removal and installation of components. Use specific lifting chains or straps and not home-made ones.
Construct dealer-made tools safely
Faulty or broken tools can result in serious injury. When constructing tools, use proper, quality materials and good workmanship. Do not weld tools unless you have the proper equipment and experience to perform the job.
Practise safe maintenance
• Keep your area clean. It is also important that it is dry.
• Understand the service procedure before doing the work.
• Never lubricate, service, or adjust a machine while it is moving. Keep hands, feet and clothing from power-driven parts. Disengage all power and operate controls to relieve pressure. Lower the equipment to the ground. Stop the engine. Remove the key. Allow the machine to cool.
• Securely support axle stands and any machine elements that must be raised for service work.
• Keep all parts in good condition and properly installed. Fix damage immediately.
• Replace worn or broken parts.
• Install all guards and shields after any repairs.
• Remove any build-up of grease, oil, or debris.
• On tractors, disconnect battery ground cable (earth) before making adjustments on electrical systems or welding on the machine.
Use proper tools
• Use tools appropriate to the work. Makeshift tools and procedures can create safety hazards.
• Use power tools only to loosen threaded parts and fasteners.
• For loosening and tightening nuts and bolts, use the correct size tools to avoid injury caused by slipping.
Properly dispose of waste
• Improperly disposing of waste can threaten the environment. Potentially harmful waste used with equipment includes oil, fuel, coolant, brake fluid, filters and batteries.
• Use leak-proof containers when draining fluids. Do not use food or drink containers that may mislead someone into drinking from them.
• Do not pour waste onto the ground, down a drain or into any water source. Contact local environment agency or recycling centre for advice on the proper way to recycle or dispose of waste.
Chapter 2 Weekly Checks
Whether you are rushing around to shows, road runs, ploughing matches or just simply using your tractor for trailer or three-point-linkage work it is advisable to carry out basic checks on the tractor each time it is used. This routine will not only maintain the reliability of the tractor but also provide time to note problems early, which can save expense or further damage.
These ‘weekly checks’ can be carried out in a short amount of time. The under-bonnet checks will vary slightly because of the three engine options fitted to the Massey Ferguson 35 tractor, but the gearbox, rear axle, steering, hydraulics and brakes are all virtually the same.
The fuel sediment bowl is usually of glass construction so any sediment and water will be visible at the bottom of the bowl. If necessary, remove the bowl and wash out.
When checking the engine coolant level, ensure the engine is cold otherwise scalding hot coolant will blow out of the radiator when the cap is removed. The level should be just below the lip on the radiator. If topping up, use a 50% mixture of antifreeze and water to maintain frost protection (-34 ºCelsius). Never use just water as this will dilute the antifreeze.
If you are using the tractor on the road then visibility for you and other road users is important, so check that all the lights and wipers (if fitted) are working efficiently and that screens are clean and grease free.
Keep the diesel tank filled to the brim to prevent condensation building up inside. Ideally, petrol fuel tanks should not be kept too full as the petrol will evaporate quickly. If the tractor is not going to be used for longer than a week running the tractor until the engine stops helps to prevent the possibility of leaving a gummy petrol substance behind which can block the carburettor jets. This will remove any petrol residue from the carburettor.
Tools required for checks:
Range of metric/imperial spanners and socket sets
Flat blade screwdrivers Battery hydrometer
Copper grease
Grease gun
Antifreeze tester
Torque wrench
Dust masks
Protective gloves
Note: if using a Petrol/TVO engine tractor always switch over from TVO to petrol a few minutes before stopping the engine as the engine will not restart with TVO fuel in the carburettor.
2.01. Leaks
2.01. Check the tractor for signs of fluid leaks daily. The abbreviations give the type of leak expected for each area on the tractor. (MF 35 3-cylinder diesel version shown.)
2.02. Dipstick marks
2.02. To check the amount of oil in the engine sump make sure the tractor is on level ground, then remove the dipstick from the engine ensuring the tractor engine has been stopped for at least 20 minutes. The oil level mark should always be maintained between the middle and up to ‘full’ line on the dipstick. Do not operate the tractor with the oil at the low mark as this could cause engine damage.
2.03. Air cleaner
2.03.


