Erhalten Sie Zugang zu diesem und mehr als 300000 Büchern ab EUR 5,99 monatlich.
- Herausgeber: Fox Chapel Publishing
- Kategorie: Lebensstil
- Sprache: Englisch
A best-seller! Renowned pyrographer Sue Walters teaches you everything you need to know to create stunning pyrography artwork with three step-by-step projects, original patterns, and an inspiring gallery of work. Includes information on equipment, safety, materials, pattern preparation, techniques and 3 projects; a beginner, an intermediate, and an advanced.
Sie lesen das E-Book in den Legimi-Apps auf:
Seitenzahl: 201
Veröffentlichungsjahr: 2019
Das E-Book (TTS) können Sie hören im Abo „Legimi Premium” in Legimi-Apps auf:
Ähnliche


PYROGRAPHYWorkbook
BY SUE WALTERS
Acknowledgements:
Special thanks to Gayle and Barb for their help in proofreading.
Special thanks to Razertip Industries Inc. for providing the chart information on page 42.
© 2005 by Sue Walters and Fox Chapel Publishing Company, Inc., East Petersburg, PA.
Pyrography Workbook is an original work, first published in 2005 by Fox Chapel Publishing Company, Inc.
The patterns contained herein are copyrighted by the author. Readers may make copies of these patterns for personal use. The patterns themselves, however, are not to be duplicated for resale or distribution under any circumstances. Any such copying is a violation of copyright law.
ISBN 978-1-56523-258-7
Publisher’s Cataloging-in-Publication Data
Walters, Sue.
Pyrography workbook / by Sue Walters. -- East Petersburg, PA : Fox Chapel Publishing, Inc., 2005.
p. ; cm.
ISBN: 978-1-56523-258-7
1. Pyrography. 2. Etching. 3. Woodwork. I. Title.
TT199.8 .W35 2005
745.51/4--dc22
0505
To learn more about the other great books from Fox Chapel Publishing, or to find a retailer near you, call toll-free 800-457-9112 or visit us at www.FoxChapelPublishing.com.
Note to Authors: We are always looking for talented authors to write new books. Please send a brief letter describing your idea to Acquisition Editor, 1970 Broad Street, East Petersburg, PA 17520.
Printed in Singapore
Fifteenth printing
Because burning wood and other materials inherently includes the risk of injury and damage, this book cannot guarantee that creating the projects in this book is safe for everyone. For this reason, this book is sold without warranties or guarantees of any kind, expressed or implied, and the publisher and the author disclaim any liability for any injuries, losses, or damages caused in any way by the content of this book or the reader’s use of the tools needed to complete the projects presented here. The publisher and the author urge all woodburners to thoroughly review each project and to understand the use of all tools before beginning any project.
Dedication
This book is dedicated with love, thanks, and deep appreciation to the following people:
My Mother, Alison Walters
Gayle Martin
Barb Kaminski
You make the impossible seem possible.Thank you for your help, support, belief, and love.
And to The Boys, who look out for me.I love you both.
TABLE OF CONTENTS
About the Author
Introduction
Gallery
Chapter 1: Equipment, Work Area, and Safety
Chapter 2: Preparation and Transfer
Chapter 3: Materials for Pyrography
Chapter 4: Varieties of Pyrography
Chapter 5: Nib Use and Care
Chapter 6: The Three Basic Nibs
Chapter 7: Texturing
Chapter 8: Ducks and Bulrushes: A Beginner’s Project
Chapter 9: Golden Eagle: An Intermediate Project
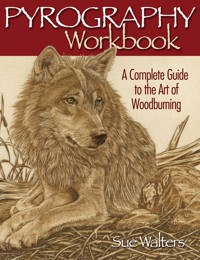
Chapter 10: Wolf: An Advanced Project
Chapter 11: Animal Coat Techniques
Chapter 12: Color
Chapter 13: Troubleshooting
Chapter 14: Patterns
Index
Resources
ABOUT THE AUTHOR
SUE WALTERS
is a self-taught, internationally renowned, and award-winning pyrographic artist. After a career in horticulture, Sue began her pyrographic journey after receiving a burner as a present. She soon started designing and burning souvenirs for the Australian tourist industry. Her focus then shifted to extensively experimenting with various types of pyrographic techniques, eventually specializing in the areas of high realism, wildlife, and miniature burning.
Sue’s passion for pursuing all that pyrography has to offer continues to this day, and she remains dedicated to passing on her knowledge to other aspiring burners.
A fifth-generation Aussie, Sue was born in 1962 and still calls Australia home.
Introduction
Pyrography, meaning to draw with fire, was fashionable in the Victorian and the Art Deco periods and is now experiencing an exciting new wave of popularity and innovation. Whether this is due to the development of modern burning tools or simply because its time has come again is hard to tell. One thing is certain: Pyrography fascinates people.
In its most basic form, the appeal of pyrography lies in its rustic and natural beauty. In its most complex form, the combination of texture and drawing can create pictures that appear almost lifelike. Add the use of color and the wide varieties of wood and materials that can be used, and you begin to see that the possibilities for burning are almost endless, no matter what direction you choose to take.
For some people, the thought of a large horizon of possibilities is exciting; others find that prospect more than a little daunting, and rather than flying blind, they would prefer someone to help show them the way. That’s where I come in. My aim is to help both the beginner and advanced burner make the most of pyrography, to demystify burning, and to make it a more enjoyable experience.
Whether you want to take up pyrography as a hobby, use it as part of your craft, or simply get more use of your burner than signing your name, it is my hope that this book not only teaches you sound practical advice but also inspires you and opens your eyes to new and exciting possibilities.
Together we’ll explore special nib techniques and learn how to apply them in a series of step-by-step projects. We’ll also look at textures and patterns, unusual pyrographical variations, and how to burn on leather and other materials. Color can accent and complement pyrographic work, so I’ve dedicated a chapter to this subject also.
This book wouldn’t be complete without covering the practical and necessary aspects of safety and work area setup. Timber selection, preparation, and pattern transfer will be discussed along with a look at the various types of burning tools that are available in today’s market. Finally, a selection of patterns is provided to help inspire future burning.
Pyrography is a wonderful craft. There are few art forms in this world that offer the unique combination of being able to see what you draw as well as feel it. There are few craft tools that are so versatile as to be able to move from decorating furniture, to texturing a carved duck, to making a decorative piece of wall art. Pyrography can do all that and more. It has given me endless hours of enjoyment, and I hope it will give you the same.
—Sue Walters
Gallery
© Sue Walters
Here’s Looking at You, pyrography and acrylic paint on mallee. To enable pyrography to stand out on dark wood, color can be used to accent the burning. In this case, acrylic paint has been used on top of the pyrography to accent the owl’s face. (See Chapter 12: Color, page 102.) 10 inches by 12 inches.
© Sue Walters
Koala, monochrome pyrography on basswood. To create the soft appearance of Koala fur, this piece was made up of thousands of burnt dots. (See the Fluffy Fur section, page 98.) 12 inches by 9 inches.
© Sue Walters
Platypus Diving, monochrome pyrography on silky oak. Bark-edged slabs of timber can give a natural frame and an interesting platform for some pyrography. This large piece was relief carved before burning to help create an illusion of realism. (See the Relief Carving section, page 34.) Note that the shape of the wood has been carefully considered when choosing the subject matter. 39 inches by 20 inches.
© Sue Walters
Charging Elephant, monochrome pyrography on cowhide. Leather burning requires a cooler heat than timber pyrography. The smell can be a little strong for some people, but the ease of burning more than makes up for this small shortcoming. (See the Leather section, page 26.) 11 inches by 8 inches.
© Sue Walters
Wedge Tail Eagle, pyrography and oil paint wash on cowhide. Many types of pigment can be combined with leather pyrography to great effect. In this case, a thin wash of artist oil paint, suspended in mineral spirits, was applied to the piece after it was burned. (See the Leather section, page 26.) 13 inches by 9 inches.
© Sue Walters
Eagle Owl, monochrome pyrography on rag paper. Burning on paper is much easier than most people think. Because paper is always available and provides a white platform, this kind of pyrography is a viable and effective alternative to timber burning. (See the Paper section, page 27.) 8 inches by 5 inches.
© Sue Walters
Gum Leaves, monochrome pyrography on basswood round. Burning a dark background around a design provides a strong contrast, allowing the picture to stand out. (See the Negative Pyrography section, page 33.) 12 inches by 9 inches.
© Sue Walters
Turtle Rising, monochrome pyrography on silky oak. Just as in Platypus Diving, this piece was relief carved before pyrography commenced. A heavy-duty skew was used to create all of the stop cuts before the excess timber was carved away with a chisel. (See the Relief Carving section, page 34.) 22 inches by 19 inches.
© Sue Walters
Grazing Deer, pyrography, watercolor wash, and gouache on rag paper. Color, combined with paper burning, can look very effective. In this case, watercolor paint was used on the background while acrylic paint was used on the deer. The grass was textured with a rotary tool and burr. 10 inches by 8 inches.
© Sue Walters
Elephant Eye, monochrome pyrography on birch plywood. As in Koala (on page 2), this piece was almost entirely created with thousands of burnt dots. Here, the many layers of dots helped to create a leathery and rough effect. (See the Leathery Skin section, page 99.) 11 inches by 8 inches.
CHAPTER 1
Equipment, Work Area, and Safety
Woodburning Machines
A woodburner, of course, is a critical piece of equipment for pyrographic work. (See Figure 1A.) Like all woodworking tools, however, the choice of which woodburner to use is a personal one that depends on a variety of factors. In this chapter, you will learn about the various types of pyrographic machines, their features, and what might be suitable for you. We will also look at a typical work area setup, explore the additional equipment needed, and consider safe pyrographic practices.
Locating a Pyrographic Machine
Selecting a woodburner should be as simple as choosing the best tool that suits your particular needs. I wish it were that straightforward, but in fact, your location may actually limit your choice before you even start looking at the pros and cons of each individual machine.
I am often contacted by people who are eager to start burning but are finding it difficult to find a machine—any machine, let alone the one that might suit them best. The truth is that pyrography is a minority craft. Our equipment is sparse compared to other woodworking and craft products. That doesn’t mean it’s not out there and that excellent tools aren’t available, it just means that you need to know where to look and accept that certain limitations might govern your decision making.
Woodburning has developed quite differently in North America compared to British, Australian, and European areas. This means that the general design of handles and nibs can vary in each region.
Pyrography in North America has mainly grown up in the woodcarving fraternity as a means of texturing decoys and other wildlife carvings. This has led manufacturers to create burners with small handles and a vast array of nibs capable of burning a myriad of textures in confined spaces.
The roots of pyrography in Europe and Australia were, and still are, much more focused on flat artwork and on the decoration of furniture and turnings. It is seen more as an aesthetic pastime, a way of burning pictures with fire rather than texturing wood. Designed to keep the hand cool while burning for long periods of time on hard surfaces, handles in these areas tend to be larger than their North American counterparts. The nibs have not developed past their intended drawing purpose, so they lack the variety of those found in North America.
© Sue Walters
Figure 1A: A typical variable-temperature pyrographic machine comes with an on/off switch and a dial to adjust nib temperature. “Dual Units,” as illustrated above, have the option of using two pens on the one machine. A toggle switch controls which pen is in use.
But all is not lost. If you really want a burner from another country that has all the features you want, it may be made available to you. Some manufacturers are now catering to international customers by providing units that can be used in other countries. Of course, imported tools will invariably cost you more than those locally made. If you want an imported burner, contact the manufacturer or distributor directly and organize shipment by mail or you might be able to find a local company that stocks that brand. In any event, the manufacturer will be able to advise you of availability. (See the Resources section on page 138 for a list of manufacturers.)
TIP
Voltage and plug points between geographic locations vary. A North American burner cannot be used in Australia or Britain, and vice versa.
If you don’t have access to the Internet or if you don’t wish to go to too much trouble, the most likely place to find woodburning equipment is at specialist woodworking or woodcarving supply shops. Most will usually stock a limited selection of one or two brands of variable-temperature burners and associated products, and some will even let you try before you buy. Some of these stores will also stock the basic set-temperature burners.
Other places you can find pyrography tools and products include craft supply outlets and major retail chains. The units sold there usually fall under the solid point category. They look like soldering irons, are cheaper than variable-temperature burners, are usually set to one temperature, and are generally directed toward the hobbyist. Some of these irons are of a quality and temperature that allow very decent pyrography to be done. There are, however, some extremely cheap irons that flood the market now and then. They are usually poor quality, and the nib temperature is so low that effective burning is either almost impossible or painfully slow.
More than anything, the Internet has opened up the world of pyrography. Not only has it allowed people to see other pyrographic art, but it has also opened their eyes to the features available on other pyrographic machines. With this has come a demand for manufacturers to begin offering these features as options to their standard machines. For instance, many British and Australian-style machines only have a few writing nibs available. People in these areas are now asking that the manufacturer provide a larger range of nib designs because, after viewing North American systems, they would like this option rather than having to make their own nibs or purchase different burners.
Conversely, some North American manufacturers are now supplying pens that take plain nichrome (nickel/chromium) wire so that their customers can fashion their own nibs at a fraction of the cost they normally pay.
General Considerations
Generally speaking, pyrography machines fall into two categories: solid point, set-temperature machines and wire nib, variable-temperature machines. Even though both types are designed to do the same thing, they are very different. Before you buy a burner, I advise you to consider the following three points:
1)Cost: How much do you want to spend?
2)Time: What and how much you intend to burn?
3)Features: What features would you like the burner to have?
Solid Point Burners
At around a third or less of the cost of a wire burner, solid point burners are far less expensive to buy. Solid point burners look much like a soldering iron but are specially designed for woodburning. (See Figure 1B.) There is a temptation for some people to buy a soldering iron, but be prepared for disappointment if you go this route, as they rarely burn hot enough to be effective nor do they have the correct nib shapes. The nibs of solid point burners are larger than those of wire burners and are often shaped from rods of copper or brass. They either slide or screw into the heating element. The handles tend to be larger than those of wire burners, and your hand is held further back from your work.
A decent quality solid point burner will burn most woods except those that are very hard. Because most are set on one temperature only, you need to adjust your hand speed to alter the darkness of your work. The faster you move the burner, the lighter the mark, and the slower you move the burner, the darker the mark.
Generally speaking, solid point burners aren’t as capable of doing the detailed work of a wire nib. They are especially good for broad, large-scale work, but I’ve also seen some excellent examples of small to medium-scale work.
There are a couple of solid point burners available that feature variable heat adjustment, but they also take minutes to warm up and are much more expensive than irons with set temperatures.
Wire Nib Burners
Wire nib burners generally fall into two categories: the factory-made nib style of North America and the hot-wire style of Britain/Europe and Australia. Both types have a power box that has an on/off switch and a dial that allows you to change the temperature of the nib. Nibs are heated when electricity is passed through a wire and can usually be red-hot within seconds. Cool down time is nearly as fast. A handle or pyrographic pen is connected to the power box via a cord, and the nib is located at the end. This is where the two types start to differ.
Figure 1B: A solid point, set-temperature pyrographic burner looks somewhat like a soldering iron. A solid nib is heated by an element, and the temperature can’t be adjusted.
Figure 1C: The nichrome wire nibs of the European-style pyrographic pen are usually held in place by two screws.
European-Style Burners
European-style handles tend to be connected to the power source by a solder joint, and the nibs are held in place on the handle by two screws. (See Figure 1C.) Nibs can be changed by loosening the connection screws, swapping the nib, then re-tightening. The screws provide a snug contact for smooth conduction.
The range of nibs made by each manufacturer can be limited; however, the nib wire for these units is cheap to buy and can be made into various shapes by the owner. This can be a deterrent for people who require specialized nibs to achieve lifelike textures on their wildlife carvings, but for most flat and decorative burners, a basic set of skew, shader, and writing nibs is all that is needed to achieve what they want. Even the humble nib of bent hot wire can produce remarkable results!
North-American-Style Burners
North American pyrography pens come in two styles: interchangeable nib and fixed nib. Regardless of the pen style, connection to the power base is also by cord, but generally the cords aren’t soldered in place; instead they are attached by either jacks or screws.
Figure 1D: The North-American-style pyrographic pens tend to come with a large variety of factory made nibs. The nibs are either slotted or soldered in place.
Most North American interchangeable nibs are simply slotted into place on two posts at the end of the handle. Because it’s not necessary to buy a new handle when you want a new nib, they are far less expensive than fixed nibs, but the poor performance of most interchangeable nibs negates the financial benefit. Because there is less efficient conduction with the connection of the interchangeable nibs, the heat can fluctuate and the handle can get quite hot. A slotted interchangeable-nib system might be better suited to someone who is intending to burn only in very short spells or to sign their name. For the keen pyrographer, solder or screw connections produce far better, more consistent results.
Some North American companies now manufacture a pen that has screw contacts to allow people to interchange homemade and factory nibs. Changing over screw nibs might take a little longer than the slotted variety but the improved conduction may well make it worth the effort.
The burning tip of a fixed-nib pen is soldered in place, providing a better electrical connection than the previous types. (See Figure 1D.) Fixed nibs are, by far, more reliable than interchangeable nibs, but they are also more expensive. Each time you want a new style of nib you will have to buy a whole new pen.
Features to Consider
Once you’ve decided on the type of pyrographic tool you want, you might want to consider some features before you make your final purchase.
Solid point, set-temperature burners are pretty straightforward with only a few variations. Some companies offer burners in a range of wattage, and obviously, the higher the wattage, the hotter it burns. (Anything below 20 watts can be quite slow.) Also, make sure the burners come with a decent variety of nib shapes and that you can buy replacements or perhaps different designs if you need to.
Wire nib, variable-temperature machines offer a lot more variety. It can be a little daunting to know what to ask about or consider when comparing features, so I’ve prepared a small guideline to help you find your way.
Power: Have enough power for your needs. If you plan to do a lot of burning on extremely hard wood, you will need a machine with plenty of grunt. There should be no fluctuation in burning temperature once the nib is on the surface. It is natural for the nib to be slightly hotter on first contact with the surface, but the burn should be consistent once the nib is down and traveling. When the nib is again lifted, the heat should recover to the nib almost immediately.
Handle: The handle must be as comfortable and as cool as possible. A hot handle simply distracts you from what should be an enjoyable experience. As a personal preference, I find foam grips make long burning sessions more comfortable. Some companies supply extra foam grips or vented covers for their handles.
Dual handle: Some machines are capable of having two handles plugged in at once. Usually, only one pen at a time can be used (toggled by a switch), but it’s a handy feature to have and saves you the time and the wear and tear of swapping out pens when you want to change a nib.
Warranty and service: Naturally, make sure there is adequate warranty and service covering your burner. Ask about machine repair should there be a problem. A lot of companies will have a pen repair service at minimal cost and can also make a nib from your own design.
Heavy-duty and standard pens: Some companies offer heavy-duty pens as well as standard pens. Standard pens are for delicate to normal burning; heavy-duty pens can take extra punishment and require 16-gauge cord, which is usually supplied.
Temperature dial: Some units come with lowend temperature adjustment. This allows you to turn the heat down farther if the first setting is still too hot. This feature is a nice addition if you are using your burner to sculpt wax, but is not necessary for general woodburning.
On/off indicator: A light indicator is essential to avoid leaving your burner on by mistake.
Adaptors: Pen and jack adaptors that allow you to use other brands of pens are available for some North American machines. This can be a handy feature if you want to change power bases without wasting your old pens or if you want to buy a style of nib not available in your own brand.
Solid Point and Wire Nib Burners Pros and Cons
Solid Point Burner Pros
Inexpensive to buy
More readily available
Nibs are not easily damaged
Nibs can be easily made
Good for medium to large-scale work
Branding stamps can be an optional extra for some burners
Wire Nib Pros
Capable of very delicate work
Capable of burning the hardest of woods
Nibs cool rapidly and take a matter of seconds to heat
Most units can dial a range from cool to red-hot
Includes on/off switch
Burns wood more quickly; is less time consuming to burn with
Easy nib changes
Owners of European-style machines can make their own inexpensive nibs from Nichrome wire
Owners of North-American-style machines can choose from a huge range of factory-made nibs
Solid Point Burner Cons
Nibs are slow to heat up and cool down (up to 5 minutes)
Large handle


