Erhalten Sie Zugang zu diesem und mehr als 300000 Büchern ab EUR 5,99 monatlich.
- Herausgeber: Fox Chapel Publishing
- Kategorie: Lebensstil
- Sprache: Englisch
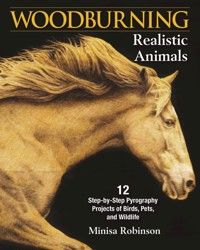
Discover how to create amazingly lifelike portraits of animals and wildlife in Woodburning Realistic Animals. Award-winning artist Minisa Robinson challenges the reader to rethink the possibilities of woodburning with her techniques for creating highly realistic art. Pyrographers who love animals and portraits will find 12 step-by-step projects here for North American and African wildlife, animals, and birds. From zebras and butterflies to lions and owls, each project includes hand-drawn patterns, photo references, and step-by-step instructions. Minisa covers all the woodburning basics, from supplies and surface preparation to protecting and sealing the finished piece. She provides essential skill-building tutorials for creating realistic eyes, noses, short fur, long fur, manes, and whiskers. Tips and advice on working with photos, turning photos into patterns, and transferring photos to wood are also included.
Sie lesen das E-Book in den Legimi-Apps auf:
Seitenzahl: 100
Veröffentlichungsjahr: 2021
Das E-Book (TTS) können Sie hören im Abo „Legimi Premium” in Legimi-Apps auf:
Ähnliche


© 2019 by Minisa Robinson and Fox Chapel Publishing Company, Inc., 903 Square Street, Mount Joy, PA 17552.
Woodburning Realistic Animals is an original work, first published in 2019 by Fox Chapel Publishing Company, Inc. The patterns contained herein are copyrighted by the author. Readers may make copies of these patterns for personal use. The patterns themselves, however, are not to be duplicated for resale or distribution under any circumstances. Any such copying is a violation of copyright law.
Print ISBN 9781565239852
eISBN 9781607656425
Library of Congress Cataloging-in-Publication Data
Names: Robinson, Minisa, author.
Title: Woodburning Realistic Animals / Minisa Robinson.
Description: Mount Joy, PA : Fox Chapel Publishing Company, Inc., [2019] |Includes index.
Identifiers: LCCN 2019007888 (print) | LCCN 2019009808 (ebook) | ISBN9781607656425 (ebook) | ISBN 9781565239852 (pbk.)
Subjects: LCSH: Pyrography. | Animals in art.
Classification: LCC TT199.8 (ebook) | LCC TT199.8 .R63 2019 (print) | DDC745.51/4--dc23
LC record available at https://lccn.loc.gov
To learn more about the other great books from Fox Chapel Publishing, or to find a retailer near you, call toll-free 800-457-9112 or visit us at www.FoxChapelPublishing.com.
We are always looking for talented authors. To submit an idea, please send a brief inquiry to [email protected]
For a printable PDF of the patterns used in this book, please contact Fox Chapel Publishing at [email protected], with 9781565239852 and Woodburning Realistic Animals in the subject line.
CONTENTS
Introduction
CHAPTER 1: GALLERY
CHAPTER 2: GETTING STARTED
Safety
Tools
Wood Types
Preparing the Surface
CHAPTER 3: WORKING FROM PHOTOGRAPHS
Where to Find Inspiration
How to Choose a Design
How to Adjust a Photograph
How to Transfer a Photograph onto Wood
CHAPTER 4: WOODBURNING BASICS
Startup Time
The Ever-Frustrating “Stop Spot”
Controlling Temperatures
Clean Up the Carbon
The Fundamentals of Shading
Burning a Black Background
CHAPTER 5: FEATURE STUDIES
Eyes
Fur
Whiskers
CHAPTER 6: ADDING COLOR AND FINISHING
Colored Pencils
Acrylic Paint
Watercolors
Alcohol Inks
Protect and Seal Your Work
CHAPTER 7: PROJECTS
Acknowledgments
Meet the Author
INTRODUCTION
I stumbled into woodburning by accident many years ago. Wood has always been a source of comfort for me, whether taking a peaceful stroll through the pines or tossing logs onto a crackling fire. During a difficult economic time, I gazed out the window at the surrounding forest and decided to try woodworking for extra income. I quickly realized that building furniture was out of the question due to my lacking mathematical skills, so I tried my hand at carving. My first carving turned out horrible, so I purchased a simple woodburning kit to “improve” the carving by burning accents. My woodcarving still looked awful, but I immediately fell in love with woodburning.
Thus began my career in pyrography. I began practicing on pieces of wood from the surrounding forest, then I made woodburned art as Christmas gifts. Since then I’ve taught myself the art of pyrography by constantly experimenting with new ideas, techniques, and subjects. I love learning new things and sought to challenge myself.
Five years after my first woodburning, I left my part-time job as a publisher and devoted my time to homeschooling and pyrography. I’ve since created several instructional DVDs for woodburning.
This book will focus on how to use simple and affordable tools to create realistic wildlife pyrography, but will also take you by the hand to learn the setup and basics as well. Whether you are a beginner or a more advanced artist this guide will help you on your own journey in pyrography.
MINISA'S TIPS
Want to be an artist but don’t know where to start? Start with art! You don’t need a big studio. You don’t need expensive supplies. You don’t even need experience or “talent.” All you need is the desire to create art.
The art of pyrography has been around for thousands of years. However, recent advances in technology have made it easier than ever for artists and hobbyists alike to create fun and fantastic woodburned art. Whether you want to make simple plaques and signs or realistic pet portraits, woodburning can be a rewarding pastime.
As with all good things, pyrography takes time. In this fast-paced world, it’s satisfying and enlightening to watch a piece of art slowly blossom before you. Many artists, myself included, find woodburning to be very calming; it can help bring a sense of peace into our hectic lives.
Whenever you learn any new artform, be patient with yourself. Don’t be afraid of the learning curve, but rather embrace the joy and discovery of acquiring new knowledge.
Mountain Lion. My first woodburning project
CHAPTER 1: GALLERY
Bald Eagle. Basswood, colored pencils; H. 6″ W. 5″ (from photo by Chris Allesbrook)
Standing Grizzly Bear. Basswood, colored pencils; H. 11″ W. 9″ (from photo by Diana Grant)
Butterfly. Basswood, acrylics; H. 5 1/4″ W. 4″ (from photo by Karen Broemmelsick)
Kingfisher. Basswood, colored pencils; H. 11″ W. 14″ (from photo by Gary Jones)
MINISA'S TIPS
I love the challenge of burning large pieces. Adding small details to a large piece is the fun part... However, the tough part is staying motivated when burning that much surface area. It’s easy to become overwhelmed!
I try to focus on completing one area at a time, instead of bouncing around from one place to another. It allows me to see more progress, more quickly. But there are times when I get “burned out” on a particular area and will switch to a different part of the piece for a rejuvenating change of pace.
Horse Portrait. Basswood, colored pencils; H. 7″ W. 5″ (from photo by Ainslie Gilles-Patel)
Bighorn Sheep. Basswood, colored pencils; H. 9″ W. 10″ (from photo by Lorraine Logan)
White Wolf. Basswood, colored pencils; H. 10″ W. 8″ (from photo by Edwin Butter)
Colorful Barn Owl. Basswood, colored pencils, watercolors; H. 7″ W. 5″ (from photo by Chris Allsebrook)
Buck. Basswood, colored pencils; H. 16″ W. 12″ (from photo by Nelson Kenter)
Tiger Portrait. Basswood, colored pencils; H. 3 1/2″ W. 3 1/2″ (from photo by Chris Allsebrook)
Thirsty Tiger. Basswood, colored pencils; H. 10″ W. 8″ (from photo by Emmanuel Keller)
Rooster. Birch, colored pencils; H. 4″ W. 4″ (from photo by Danny Brannigan)
Mama Bear. Butternut, colored pencils, acrylics; H. 26″ W. 8 1/2″ (from photo by Lorraine Logan)
Massive. Basswood, colored pencils; H. 11″ W. 19″ (from photo by Diana Grant)
Bighorn at Clements Mountain. Basswood, colored pencils, acrylics; H. 8″ W. 10″
Owl on a Log. Basswood, colored pencils; H. 10″ W. 8″ (from photo by Sue Dudley)
CHAPTER 2: GETTING STARTED
Woodburning is a delightful artform full of many possibilities. Because of its versatile nature, it’s a good idea to learn more about the safety aspects of the art. Some woodburning tools can easily reach over 1,000°F therefore they present a possible danger of fire and personal burns. These tips can help you enjoy the art of woodburning safely.
Keep the woodburning tool secure at all times.
Safety
To Reduce the Risks of Fire
• Never leave a woodburner unattended.
• Keep combustible materials away from the hot tool.
• Keep pets and children away from the unit.
• Secure the hot burner with a stand or holder.
• Keep cords out from underfoot.
• Use common sense when handling the hot tool.
Never leave a woodburning tool unattended, and always keep items a safe distance away from a hot tool. I once placed my phone on the desk near my burner then left my studio for a moment while my burner was warming up. While I was gone, my burner shifted and I returned to find a cloud of dangerous smoke and a melted phone case.
For Personal Safety
• Burn in a well-ventilated area.
• Give yourself plenty of room to work.
• Wear a glove while burning to help protect your fingers.
• Never change out points with your hand; instead use needle-nosed pliers.
• Don’t burn near water or liquids.
• Work on an incline to allow heat to rise up and away from your hand. An inclined surface can also help your back and neck (see here).
• Never use a woodburning tool during an electrical or thunderstorm.
Wearing a glove can protect against accidental burns. I use a simple gardening glove from my local store, but it has saved my fingers from excessive heat and unintentional burns.
Wear a respirator when applying clear-coats or burning dark backgrounds, which can produce more smoke.
To Protect Your Lungs
• Burn on unfinished wood only.
• Never burn over wood with a clear-coat, varnish, paint, etc. Doing so could produce toxic fumes.
• Only add color after the burning is complete. Burning over pigments can also create toxic fumes.
• Never burn on plastic, medium-density fiberboard (MDF), particleboards or any wood that is bound together with glues.
• Always wear a dust mask when sanding.
• Use a respirator for applying clear-coats.
• If you burn on leather, choose vegetable-tanned leather only.
• Do your research before attempting to burn on a new wood species. Most woods are safe, but a few can produce toxins when burned. There are some resourceful websites on wood safety, however if you’re unsure then consult a wood specialist.
To Protect the Woodburner
Bent point due to excessive pressure
• Never change out points when a burner is on. You can damage the threads and/or shear the point off completely. Always wait until the woodburner has completely cooled before replacing points.
• Use light pressure when burning. Pressing down firmly can bend or damage the points or burner.
A PERSONAL NOTE
Years ago, I was filming a snowmobile hillcross event and I was involved in an unpredictable and freak accident where I was struck in the face with a runaway snowmobile. The event left me with a serious concussion, memory loss, seven broken teeth, many facial stitches and, worst of all, permanent neck damage. I was 19 at the time and ever since, looking up or down for even a short time causes me severe pain.
Of course, this can make woodburning a literal pain in the neck. So when I started doing pyrography a lot I was thrilled to find a desk that was adjustable and created an inclined surface. This has been so helpful in alleviating my neck pain while burning.
I’m sharing this in case anyone else has back or neck troubles that prevent or hinder their ability to create art. You certainly don’t need to buy a desk, but you can use a tabletop easel or even prop your art up against some books. Working on an incline can also help to keep your hand cooler. I hope this small tip can help out.
When I’m not working, I still enjoy backcountry snowmobiling.
Tools
It takes very few supplies to get started in pyrography, most of which are quite affordable. This makes it an appealing hobby or craft to people of all ages and backgrounds.
Woodburning Units
There are two main types of woodburners: soldering-iron type burners with interchangeable solid points, and units with interchangeable wire pens and nibs. There are many popular woodburners within each group, which allows artists to make their selection based on personal preference. People often ask me what is the “best” woodburning tool on the market and I encourage them to find the one that best suits their style of burning. What works best for me may not work well for others, and likewise, other artists’ preferences don’t always work with my style. Sometimes it can take trial and error to see what works best for you.


