Erhalten Sie Zugang zu diesem und mehr als 300000 Büchern ab EUR 5,99 monatlich.
- Herausgeber: Fox Chapel Publishing
- Kategorie: Lebensstil
- Sprache: Englisch
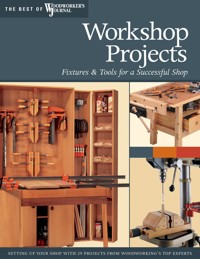
Want the hardest-working shop on the block? The secret lies in streamlining the woodworking process by maximizing your space and organizing your work area. Now, Workshop Projects, Fixtures and Tools for a Successful Shop brings you more than two dozen ingenious projects for setting up your shop to save time, money, and frustration. 29 ingenious projects that will enhance woodworking tools, and maximize your workshop space. Guarantees a more productive woodworking experience.
Sie lesen das E-Book in den Legimi-Apps auf:
Seitenzahl: 256
Veröffentlichungsjahr: 2007
Das E-Book (TTS) können Sie hören im Abo „Legimi Premium” in Legimi-Apps auf:
Ähnliche


Compilation Copyright © 2007 by Fox Chapel Publishing Company, Inc.
Text and Illustration Copyright © 2007 by Woodworker’s Journal. Woodworker’s Journal is a publication of Rockler Press.
Workshop Projects: Fixtures & Tools for a Successful Shop is a compilation first published in 2007 by Fox Chapel Publishing Company, Inc. The patterns contained herein are copyrighted by Woodworker’s Journal.
Our friends at Rockler Woodworking and Hardware supplied us with most of the hardware used in this book.
Visit rockler.com. For subscription information to Woodworker’s Journal magazine, call toll-free 1-800-765-4119 or visit www.woodworkersjournal.com.
Fox Chapel Publishing Company, Inc.
President: Alan Giagnocavo
Publisher: J. McCrary
Acquisition Editor: Peg Couch
Editor: Gretchen Bacon
Associate Editor: Patty Sinnott
Series Editor: John Kelsey
Creative Direction: Troy Thorne
Cover Design: Lindsay Hess
Woodworker’s Journal
Publisher: Ann Rockler Jackson
Editor-in-Chief: Larry N. Stoiaken
Editor: Rob Johnstone
Art Director: Jeff Jacobson
Senior Editor: Joanna Werch Takes
Field Editor: Chris Marshall
Illustrators: Jeff Jacobson, John Kelliher
Print ISBN 978-1-56523-345-4
eISBN 978-1-60765-043-0
Publisher’s Cataloging-in-Publication Data
Workshop projects : fixtures & tools for a successful shop / from the editors of Woodworker's journal. -- East Petersburg, PA : Fox Chapel Publishing, c2007.
p. ; cm.
(The best of Woodworker's journal)
ISBN: 978-1-56523-345-4
1. Workshops. 2. Workshops--Equipment and supplies.
3. Workbenches. 4. Woodwork. I. Woodworker's journal.
TT152 .W67 2007684/.08--dc22
0710
To learn more about the other great books from Fox Chapel Publishing, or to find a retailer near you, call toll-free 1-800-457-9112 or visit us at www.FoxChapelPublishing.com.
Note to Authors: We are always looking for talented authors to write new books in our area of woodworking, design, and related crafts. Please send a brief letter describing your idea to Peg Couch, Acquisition Editor, Fox Chapel Publishing, 1970 Broad Street, East Petersburg, PA 17520.
Introduction
The best shops I’ve seen are filled with more things built than bought. Even if you enjoy designing shop accessories, proven plans can be golden, too. That’s where this book comes in. Here are more than two dozen of the best workshop projects we’ve published over the years to save you time, frustration, and even some sweat equity.
A workbench is the heart and soul of any workshop, so we’re offering two classics to get things started. Rick White’s budget bench was extremely well received by our readers, and John English’s no-nonsense maple offering will last for many generations. Further into this book, you’ll find another offering from Rick that combines a solid bench with dust collection (the “Downdraft Workbench”).
Storage is a common shop conundrum, but a sturdy lumber and sheet goods rack can keep your floor from becoming a maze. John English shares some stationary options, or you could build Chris Marshall’s clever rolling rack. If you have too many clamps and no good way to stow them, our mobile clamping cart or Rick White’s clamping station may be just the fix.
Dedicated workstations improve efficiency, and we have some dandies to share. Rick White’s sharpening station and Peter Walsh’s portable lathe station will keep your turning tools both sharp and easy to reach. If a disc sander is what you need, try making your own with a design from our own art director, Jeff Jacobson. And let’s not forget, no shop is complete without a router table. Bruce Kieffer’s version in this book is, hands down, the best I’ve ever seen.
But big shop projects are just the tip of the iceberg. This book is also packed with sensible, affordable jigs, caddies, and tools you can build—from Kerry Pierce’s custom bench plane to John Premo’s circle-cutting band saw jig…and nearly everything in between.
So, consider yourself fully loaded for weekends of satisfying workshop projects. You want the hardest-working shop on the block, and this book will help you make it a reality.
Larry N. Stoiaken, Editor-in-Chief
Acknowledgments
Woodworker’s Journal recently celebrated its 30th anniversary—a benchmark few magazines ever reach. I would like to acknowledge both the 300,000 woodworkers who make up our readership and Rockler Woodworking and Hardware (rockler.com), which provided most of the hardware, wood, and other products used to build the projects in this book. Our publishing partner, Fox Chapel, did a terrific job re-presenting our material, and I am especially grateful to Alan Giagnocavo, Gretchen Bacon, John Kelsey, and Troy Thorne for their commitment to our content.
Larry N. Stoiaken, Editor-in-Chief
CONTENTS
Building a Workbench on a Budget
by Rick White
With its tough top, sturdy base, and end vise, this bench will work just as hard as a European one—but for a lot less money.
Workshop Classic: A Bench You Can Rely On
by John English
A family tradition of matching the workbench to the worker continues with this no-nonsense maple bench.
Lumber and Plywood Storage
by John English
Here are two good plans for full-duty lumber racks, plus a couple of options for simpler bracket systems.
Rolling Lumber Cart
by Chris Marshall
No space for a wall-mounted lumber rack in your shop? This cart—with its 70 square feet of shelf space—may be for you.
Easy-Access Storage Bins
by Barry Chatell
Here’s an easy-to-build wall system that keeps your fasteners and other small items organized, visible, and at the ready.
Battery Charger Cabinet
by Sandor Nagyszalanczy
Keep those multiple chargers organized, plugged in, and safely stowed with this compact tambour-door cabinet.
Simple Veneer Press
by Tom Caspar
When it comes to flattening veneer, a veneer press is the best way to go. Here’s a simple design that’s easy and cheap to build.
Handcrafted Joiner’s Mallet
by Chris Inman
Make a mallet designed especially for you—one with a handle that fits your palm like a glove—and enjoy it for years to come.
Plane Making 101
by Kerry Pierce
With this project, you’ll do more than just gain a plane. You’ll also learn a great deal about this fundamental tool.
Trapped-Wedge Layout Gauge
by Tom Caspar
Precise layout is a snap with this marking tool that features a knife cutter and allows for one-handed adjustments.
Tabletop Downdraft Jig
by Rick White
For day-to-day sanding, this jig will handle the lion’s share of the dust—and it comes together in just one afternoon.
Downdraft Workbench
by Rick White
This big project will give you a large work center and the huge benefit of removing the last of the dust from your workshop.
All-Purpose Shop Table
by Keith Hettinger
Just one sheet of plywood and a handful of screws build this rugged table that’s perfect for assembly and finishing work.
All-Purpose Accessories Cart
by Brad Becker
This little cart, like a kid brother, will follow you all around the shop, carrying those all-important shop supplies for you.
Mobile Clamping Cart for the Small Shop
from the Woodworker’s Journal Shop
Get rolling toward organizing your limited workspace by building this cart to eliminate clamping clutter.
Ultimate Clamping Station
by Rick White
Centralize all your clamping work with this cabinet that features plenty of storage and a fold-down table.
Ultimate Sharpening Station
by Rick White
Stop searching for those scattered sharpening tools and supplies, and start building them this perfect home.
Rolling Router Table
by Bruce Kieffer
This hardworking table features two lifts: One raises and lowers the router, while the other makes the cabinet mobile.
Deluxe Drum Sander
by Dick Dorn
Here’s a jig that solves two problems with drum sanding on the drill press—dust control and frequent clogging.
Drum Sanding Station
by Chris Marshall
Take the chore out of sanding curves—and give your drill press a facelift—with this versatile sanding station.
Shop-Built Disc Sander
by Jeff Jacobson
Turn an ordinary bench grinder into a disc sander—and then build this super platform and sanding table for your new tool.
Sanding Disc Caddy
by Len Urban
You can bring order to the chaos of organizing and storing those various sanding discs. All you need is this handy caddy.
Quick and Easy Band Saw Fence
by Dave Olson
Whether you’re ripping or resawing, your band saw results will be on the straight and narrow with the help of this accessory.
Scroll Saw Blade Caddy
by John English
Put an end to damaged and disorganized scroll saw blades by building this simple storage caddy.
Sliding, Circle-Cutting Band Saw Jig
by John G. Premo
With the clever use of drawer slides, you can soup up the standard circle-cutting jig and make it infinitely adjustable.
Magnetic Drill Press Vise
by Dick Dorn
Need to clamp a round or odd-shaped piece? Don’t reach for a metalworker’s vise—choose this gentle, wood-jawed one instead.
Adjustable Dado Jig
by Ralph Bagnall
Mill snug-fitting dadoes every time—and in just two passes—with this adjustable auxiliary router base.
Veneer Jointing Jig
by Bruce Kieffer
Get a dramatic book-matched look for your veneered panel doors and tabletops with this easy-to-make jig.
Customized Portable Lathe Station
by Peter Walsh
Here’s an easy way to add portability, stability, storage, lighting, and sharpening capability to your lathe.
Lathe Attachment for Sanding
by Dick Dorn
Lathe turning and sanding go hand in hand—even more so with a sander/grinder mounted directly to your lathe.
Building a Workbench on a Budget
There are a number of woodworking fixtures you can get by without for a long while, but a sturdy workbench isn’t one of them. The trouble is, those solid-hardwood benches we all lust after can completely blow a modest woodworking budget. Here’s a bench that splits the difference. You’ll get a top that can stand up to significant abuse, a sturdy, heavy base that keeps the bench planted where you put it, and an end vise and T-track system for holding workpieces and a variety of unique jigs. It may not look quite like a European bench, but it works just as hard as one for a lot less money.
by Rick White
Every woodworker dreams of owning a classic European workbench. The beautiful maple top and elaborate shoulder vise symbolize the essence of fine craftsmanship. But how many of us look at these benches and end up saying, “It’s just too nice to use in my shop”? And when we see the cost of building such a bench, we pass on the project altogether.
On the other hand, settling for a barely adequate bench is frustrating. Without a vise, you can’t hold your workpiece, and without a heavy, solid surface, you can’t expect to strike a chisel without having it bounce around and damage your wood.
Being caught between a rock and a hard place over a workbench is no fun. The workbench is, after all, the heart and soul of a shop. With this dilemma in mind, I set out to build a completely functional workstation for about $300. About half of that cost was for two essential products: The first is a Veritas vise with two screws connected by a bicycle chain that overcomes the racking problem commonly experienced with traditional vises. The chain drive can be quickly released to operate the screws independently, making it possible to cant the jaws a little when holding stock out near the edge of the bench. The second must-have is a T-slot system (see Figure 1). It offers great flexibility and, as you’ll see, lends itself to dozens of homemade accessories.
The first thing a bench should offer is a sturdy surface, and this one fills the bill. You can surface an oak board with a hand plane, and the bench won’t budge an inch. The hardboard top makes a sound work surface, and since it’s screwed down, it’s easy to replace when it becomes worn or damaged. There’s plenty of room for handling large panels, and you can clamp wood for sanding, surface and edge planing, edge and panel routing, joint cutting, and up to this point, any operation you can think of. The completed bench is heavy, which is perfect for deadening the blows of a pounding mallet.
Figure 1:The basic T-slot system opens up all sorts of jig possibilities for holding a project while drilling, routing, planing, sanding, or cutting at the workbench.
In addition to the basic bench design, you may also want to add a cabinet to the leg structure. Although this isn’t part of the original project, spending an additional $50 for one more sheet of plywood and three pairs of drawer slides makes better use of this otherwise empty space. The exploded view on page 7 will guide you through this addition.
Building the Base
The base of the workbench is made with standard 2" x 4" stock, and most of the joints are made with lap joints and screws. All the cutting was done with a table saw, and for this phase of the project, the only other tool you’ll need quite a bit is a drill.
Begin by gluing up 2" x 4" stock for the legs (pieces 1), after cutting the pieces a couple inches longer than the lengths given in the Material List on page 4. Use two pieces of lumber for each leg, spreading yellow glue on both mating surfaces to get a perfect bond, and then clamp the pieces together. Clean off the excess glue from each lamination before it hardens.
Once the legs are removed from the clamps, go ahead and cut all the base pieces to length. The side aprons (pieces 2) and top supports (pieces 3) give the top much of its rigidity and help keep the base from racking. The side stretchers (pieces 4), end aprons (pieces 5), and end stretchers (pieces 6) complete the base, creating great stability and adding substantial weight to the bench.
Lay out the lap joint locations on the legs, as shown above and in the lap joint detail on page 5. Keep in mind that all the leg joint positions are essentially the same, but as with all table legs, each one has to mirror the leg across from it. To cut the laps, install a ¾" dado blade in your table saw, raise the blade 1½", and then, with the aid of your miter gauge, take several passes to remove the wood in each joint area.
Now, lower the dado blade to ¾", and lay out the dadoes on the side aprons for joining with the top supports. Cut each dado with a couple of passes over the blade. Next, cut a ¾"-wide x ½"-deep rabbet along the top inside edge of each side stretcher. Stop the rabbets 1" from each end of the pieces. To protect your fence during these rabbeting cuts, be sure to clamp on a wood face.
T-Slot Jigs
The clamp-holding jig steadies bar clamps on the bench top while you adjust boards in a panel assembly. That way, you can work at a comfortable height without tipping clamps over during an assembly.
This T-square jig is a sweet invention. When routing multiple dadoes across a panel, it is unsurpassed for speed, and since everything references off the edge of the bench, it’s super-accurate.
A pair of toggle clamps makes a nice combination for clamping: One set clamps in line with the T-slots, and the other set is at right angles to the slots. Between them, you can hold projects across or parallel to the bench length.
When sanding panels, you’ll probably find that regular clamps often get in the way. To avoid this problem, make a set of cam dogs and a T-slot bar. Since the bar is adjustable, it can fill in between the dog holes for a midbench anchoring point.
Before assembling the base, take care of two more small details that are easy to do now while other frame parts aren’t in the way. First, drill ½" counterbores with 3/16" pilot holes in the bottom edge of the four aprons and two top supports (see the technical drawings on page 2). These holes will be used later for screwing down the bench top. The second detail is trimming the angles on the ends of the side aprons. The best tool for cutting the angles is a handheld circular saw, but a jigsaw with a stiff blade will work almost as well. After making the cuts, belt sand the edges smooth.
Assemble the workbench base in two stages. First, glue and screw the side aprons and stretchers to the legs, and then join these structures with the end aprons, end stretchers, and top supports. Make sure that the two side stretcher rabbets face each other on the base assembly. Clean up any glue squeeze-out, and sand the base to remove the sharp edges.
If your shop floor is anything but level, add a leveling glide (pieces 7) to the bottom of each leg. To install these optional glides, flip the base upside down, and drill a ½"-diameter x 2"-deep hole in the center of each leg bottom. Then, secure the threaded plates included in the package, and screw in the levelers.
Moving Up to the Top
The top is basically a three-layer sandwich that’s banded with thick maple rails. First, two panels of fir plywood (pieces 8 and 9) are laminated together to make the top stable and heavy, and then, above the plywood, a layer of removable hardboard (piece 10) is added to take the dings and dents suffered by any workbench. When the hardboard becomes too scarred from working at the bench, remove it and use it as a template for making a new one. To complete the top assembly, maple rails (pieces 11) are attached to the plywood, giving the top an attractive edge and a durable surface for anchoring the T-slot tracks (pieces 15).
Figure 2:Batten boards, which have a curve of about ⅛" on the bottom edge, are used to apply pressure at the middle of a wide panel assembly.
Start building your top by cutting the two plywood panels to size and gluing them together. Use a brush or roller to spread yellow glue over both mating surfaces, and then center the smaller panel on top of the larger one. Next, to keep the panels from slipping out of position, drive a brad into the assembly at each corner of the smaller panel. Clamping the plywood requires consistent pressure throughout the lamination, so make sure you’ve precut a bunch of curved batten boards to apply pressure in the middle of the panels (see Figure 2).
Rip and crosscut your maple to size for the rails, and then drill 1½"-deep holes in one edge of each piece, as shown in the dog hole locations drawing on page 2. After drilling the 1" holes, install a ¾" dado blade in your table saw to cut a 1"-deep x 2"-wide rabbet in the other edge of each rail (see the drawing at right). Make several passes to complete each rabbet, making sure to clamp your protective wood face to the saw fence.
The maple rails should now be glued and screwed to the upper plywood panel. I recommend first clamping the rails without glue to the plywood and then drilling countersunk pilot holes through the plywood into the rail (drill seven evenly spaced holes along each rail). When you’ve finished drilling, release the clamps, spread glue in the rail rabbets, and reclamp the assembly. With everything in place, drive the screws, and then clean up any glue squeeze-out, especially along the inside edge of the rail.
The final piece to fit into the top is the tempered hardboard. Cut the sheet to fit between the rails as snugly as possible, and then drill countersunk pilot holes along its edges for the screws that will secure it to the plywood. Fasten it down.
Material List – Workbench
T x W x L
1
Legs (4)
3" x 3½" x 32¼"
2
Side Aprons (2)
1½" x 3½" x 76"
3
Top Supports (2)
1½" x 3½" x 22½"
4
Side Stretchers (2)
1½" x 3½" x 54"
5
End Aprons (2)
1½" x 3½" x 21"
6
End Stretchers (2)
1½" x 3½" x 21"
7
Leveling Glides (1 Set)
Heavy Duty
8
Top Panel (1)
¾" x 22" x 80"
9
Bottom Panel (1)
¾" x 18" x 80"
10
Hardboard (1)
¼" x 22" x 80"
11
Maple Rails (2)
1¾" x 6" x 80"
12
Endcap (1)
1¾" x 1¾" x 30"
13
Inside Vise Jaw (1)
1¾" x 5¾" x 30"
14
Outside Vise Jaw (1)
2" x 5¾" x 30"
15
T-Slot Tracks (4)
13/32" x 13/16" x 40"
16
Screws (30)
#6-1" Panhead
17
Lag Bolts/Washers (3)
3/8" x 2½"
18
Screws (15)
#12-2½"
19
Dog Heads (4)
½" x 2" x 2"
20
Dog Dowels (4)
1" Dia. x 1½" Long
Now, for the T-slot system. The efficient use of this bench really revolves around jigs made with a T-bolt and a knob clamp. The T-bolt slides in a metal track that’s secured to the bench with screws, and then the knob on the bolt is tightened to hold the jig in place. The track will last through a lifetime of use.
Installing the metal track requires a simple 13/16"-wide x 3/8"-deep groove. Make sure the groove depth is accurate: If it’s too shallow, the track will stick up into the work surface, and if it’s too deep, the accessories will pull the track out of the groove. Lay out the track grooves on the maple rails, as shown in the end view detail on page 4. Then, chuck a ½" straight bit in your router, and attach a straightedge guide. Now, rout one 3/8"-deep pass for each track, and then reset the edge guide to make a second pass, widening the grooves to 13/16".
Since the track comes in 40" lengths, this bench requires four pieces to make up the two parallel slots. To secure the tracks, set them into the grooves, and drill 5/32"-diameter holes every 6". Next, drive a #6-1" panhead screw (pieces 16) into each hole. If the track overhangs the end of the bench, cut the excess off with a hacksaw.
Figure 3:A drilling jig ensures accurate dog holes; just be sure to switch the fence for each row.
Bench Top Details
Drilling dog holes in the bench top requires a great deal of accuracy, so it helps to use a jig for this operation (see Figure 3). The idea behind the jig is to use one dog hole to establish the position of the next hole. To ensure accuracy, I incorporated a portable drilling guide into my jig. Since the jig is guided by the maple rails, you’ll have two fence positions: one for the right-hand row of holes and one for the left-hand row.
Build the jig, and then set it against the bench top to drill the first hole, referring to the dog hole locations drawing on page 2. Drill the hole, and then use a center punch and the forward hole on the jig to locate the next hole. Now, move the jig forward until you can slip a 1" dowel through the rear jig hole and into the first bench hole. Lower the drill bit to the second hole location to make sure the bit spur goes right into the punch mark. Drill the second hole, and use the center punch to mark the third hole. Continue this procedure for the rest of the dog holes. When you’re done with the right-hand row, switch the fence, and then drill the left-hand row of holes. The more accurate your dog holes are, the better off you’ll be when using your bench jigs.
On the back end of the bench top, the T-slots are left exposed so you can slip your fixtures and jigs in and out. On the front end, however, you must install an endcap. Cut the endcap (piece 12) and the vise jaws (pieces 13 and 14) to size, and then follow the exploded view detail on page 5 to drill their mounting and vise screw holes. Clamp the endcap into position against the bench top, and extend the pilot holes into the maple rails and the plywood lamination. Now, secure the endcap to the bench with glue and screws (pieces 18), extend the pilot holes for the inside vise jaw, and secure it with lag bolts and washers (pieces 17).
At this point, the bench top and the base are ready for assembly. Square the top on the base, and then clamp the two together. Now, reach under the bench to extend the pilot holes in the aprons and supports. Use #12-2½" screws (pieces 18) to secure the assembly.
QuickTip
Flip Boards in a Panel Glue-Up for Tighter Joints
You can significantly improve the quality of a rubbed glue joint (two boards joined on edge) by putting a pencil mark on the top of each board and then running them through the jointer. Keep one board’s mark against the fence and the other’s mark away from it. Then, if the jointer is even the tiniest bit out of alignment, the two cuts will compensate each other. Turn one board end-for-end, apply glue, and press them together—this will spread the glue more evenly. Then, realign the boards correctly before clamping.
Material List – Workbench Cabinet
T x W x L
1
Sides (2)
¾" x 8¾" x 21⅝"
2
Top (1)
¾" x 22⅜" x 47"
3
Bottom (1)
¾" x 22⅜" x 47"
4
Back (1)
¾" x 8¾" x 47"
5
Dividers (2)
¾" x 8¾" x 21⅝"
6
Drawer Sides (6)
¾" x 7" x 21¼"
7
Drawer Backs (3)
¾" x 7" x 12⅞"
8
Drawer Fronts (3)
¾" x 7" x 12⅞"
9
Drawer Faces (3)
¾" x 8¼" x 15⅛"
10
Drawer Bottoms (3)
¼" x 12¾" x 20¼"
11
Slides (3 Sets)
20" Blum Side Mount
12
Knobs (3)
1½" Dia.
Some Final Thoughts
Next, make the bench dogs (pieces 19 and 20), as shown in the dog detail drawing on page 5. If you don’t plan to build the drawer cabinet, cut a plywood panel to fit between the side stretchers in the base for a storage shelf. If you plan to build the drawer cabinet, follow the drawings shown above.
The vise comes with instructions, so follow them for installation. However, you do need to make handles for the vise. Make them from a length of dowel. Then, flatten one side on four 1½"-diameter wood balls, and secure them to both ends of the dowels with dowel screws.
The jigs I developed for the T-slot system are shown in T-Slot Jigs on page 3. These are a small sampling of what’s possible with this system, and with time, you’ll probably invent many more.
I sprayed my bench with lacquer to protect it from spills and then put the bench to good use. At the end of this project, you, too, will have a sturdy bench, a checkbook that isn’t as light as it would have been if you had built a European-type bench, and a lot more flexibility for holding your work.
Workshop Classic: A Bench You Can Rely On
A family tradition of matching the workbench to the worker continues with this no-nonsense maple workbench. Granddad would likely have approved.
by John English
The worktop on my grandfather’s bench consisted of a pair of railroad ties with an 8" gap down the middle. Granddad, who lived in Ireland, was a skilled artisan who built coaches and wagons.
My father is pretty good with his hands, too. The bench in his Dublin workshop is better suited to the work he does—refinishing antique furniture and tuning small engines—than Granddad’s would have been. The 3"-thick hardwood top rests on an iron frame, but the vise is a metalworker’s, and the top shows scars of butane torches, solder, and even a few hammer blows.
The point is that a workbench is personal—it must match both the work and the worker. Neither of the benches described above would be suitable for fine woodworking, but the model shown here is ideal for building furniture and casework. And it’s easily modified to suit an individual craftsman’s needs.
Design Basics
I built this workbench to fit my 6'-tall body. The rule of thumb is to locate the worktop at half the height of the user (in this case, 353/8"). If you need to build it higher or lower, simply adjust the length of the legs (see the leg subassembly drawings on page 14).
The top of the bench features two parallel rows of bench dog holes. The front row is close to the edge, but the back row is set in a few inches to help support wide subassemblies such as drawers or cabinet doors. The top is large enough to clamp a standard 5'-long kitchen base cabinet, with a few inches left to set down tools or hardware.
Four Bench-Building Basics
1. If you regularly build furniture or cabinets, the space between the last bench dog and the wide-open vise jaw should accommodate a standard 5' base cabinet.
2. A good rule of thumb is to size your bench so that the top is half as tall as the primary user.
3. To ensure stability when lateral force is exerted on it, a bench should outweigh the user by about 50%.
4. One row of bench dog holes should be set in a few extra inches. This makes it a little easier to support doors, drawers, and other large parts during clamping.
Material List
T x W x L
1
Worktop (1)
1½" x 24⅛" x 60"
2
Inside Liners (2)
¾" x 4" x 60"
3
First Spacers (2)
¾" x 4" x 6"
4
Common Spacers (14)
¾" x 4" x 6¼"
5
Last Spacers (2)
¾" x 4" x 5½"
6
Outside Liners (2)
¾" x 4" x 60"
7
Worktop Sides (2)
¾" x 4" x 60"
8
Endcaps (2)
1" x 4" x 30"
9
Spline (1)
½" x 1" x 30"
10
Lag Screws (14)
3/8" Dia. x 3½" Long
11
Washers (14)
3/8" I.D.
12
Leg Cleats (4)
¾" x ¾" x 20"
13
Large End Vise (1)
14
Vise Support Endcap Cleat (1)
¾" x 1¾" x 12"
15
Vise Support Leg Cleat (1)
¾" x 1" x 12"
16
Vise Support (1)
¾" x 10" x 9"
17
Laminated Jaw (1)
2" x 73/8" x 30"
18
Round Dogs (2)
Brass
19
Round Dog Button (1)
3½" Brass Hinge Pin
20
Square Dogs (2)
Steel


