Erhalten Sie Zugang zu diesem und mehr als 300000 Büchern ab EUR 5,99 monatlich.
- Herausgeber: Fox Chapel Publishing
- Kategorie: Lebensstil
- Sprache: Englisch
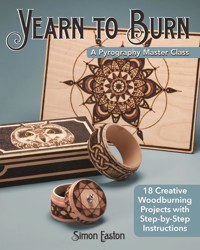
Take your woodburning art to the next level by taking a masterclass with award-winning pyrographer Simon Easton! This inspired sequel to the popular book for beginners, Learn to Burn, offers the opportunity to advance your skills with guidance from a master craftsman. Yearn to Burn features 19 projects designed to build your skills while you create an array of handsome household items, gifts, home décor, and more. Eighteen new projects with clear instructions and step-by-step photographs fit a wide variety of occasions and decors. Burn beautiful and memorable items like Christmas tree decorations, mirrored box frames, a child's wood pencil case, a hanging leather map, and more.
Sie lesen das E-Book in den Legimi-Apps auf:
Seitenzahl: 225
Veröffentlichungsjahr: 2021
Das E-Book (TTS) können Sie hören im Abo „Legimi Premium” in Legimi-Apps auf:
Ähnliche


© 2019 by Simon Easton and Fox Chapel Publishing Company, Inc., 903 Square Street, Mount Joy, PA 17552.
Yearn to Burn: A Pyrography Master Class is an original work, first published in 2019 by Fox Chapel Publishing Company, Inc. The patterns contained herein are copyrighted by the author. Readers may make copies of these patterns for personal use. The patterns themselves, however, are not to be duplicated for resale or distribution under any circumstances. Any such copying is a violation of copyright law.
Finished project glamour photography by Mike Mihalo. Avebury (here) and owl (pages 105 and 162) photos are courtesy of Angela Norman. The “Eric” logo doodle on the Children’s Reward Bank with Tokens project (pages 121–129) and the pattern (here) is courtesy of The Idol Dead.
Print ISBN 978-1-56523-986-9eISBN 978-1-60765-643-2
Library of Congress Cataloging-in-Publication Data
Names: Easton, Simon, author.
Title: Yearn to burn : a pyrography master class / Simon Easton.
Description: Mount Joy : Fox Chapel Publishing, [2019] | Includes index. | Identifiers: LCCN 2019000161 (print) | LCCN 2019003548 (ebook) | ISBN 9781607656432 (ebook) | ISBN 9781565239869
Subjects: LCSH: Pyrography.
Classification: LCC TT199.8 (ebook) | LCC TT199.8 .E285 2019 (print) | DDC 745.51/4--dc23
LC record available at https://lccn.loc.gov/2019000161
To learn more about the other great books from Fox Chapel Publishing, or to find a retailer near you, call toll-free 800-457-9112 or visit us at www.FoxChapelPublishing.com.
We are always looking for talented authors. To submit an idea, please send a brief inquiry to [email protected].
For a printable PDF of the patterns used in this book, please contact Fox Chapel Publishing at [email protected], with 9781565239869 and Yearn to Burn: A Pyrography Master in the subject line.
Dedication
This book is dedicated with my sincere appreciation to the following people:
To my gorgeous wife, Jane, for her ongoing love and support.
To my beautiful daughter, Bethan, and my stepsons, Howell, Harry, and Freddie.
I will not be allowed to forget the pets . . . so thanks also to our Jack Russell, Pickle, and the gerbils, Luna and Fleur.
To the true friends out there who stand by me through thick and thin (some of whom also stand by me at the barrier of various rock concerts), and a special mention must go out to the following people: Rhys Miles, Jez Long, Tam Gale, Tim Emery, Jason Murphy, Barry Walker, Sarah Preston, Steve Pengilly, Sara Sayers, Will Smith, Nigel and Angela Norman, Chailey and Hayley Illman, Jon Chandler, Kim Pringle, Wayne Harvey, Gavin Johnson, Krishan Singh, Steve Dudden, Jason Soper, Adrian Hextall, John Elsdon, and Kay Dickinson.
From a crafting and creative perspective, a huge thank you to Bud Sperry, Katie Ocasio, and the crew behind the scenes at Fox Chapel Publishing; Pete Moncrieff-Jury at Bodrighy Wood; Lindsey White at Splatt Art; Colin Ellis at Dalescraft; Steve Jardine at Craftshapes; David Mounstephen and the team at Yandles & Sons Ltd; Ian Lockhart at Antex; Tony Kwasniak at GMC Publications; Terry Smart at Chestnut Products; Andrea Cooke at Picture It, Thatcham; Milan Bharadia of Kitty’s Kombucha; Tim and Rachel Buxton, for the work space; plus Roger Mortimer and all of the guys at Sound Knowledge, Marlborough.
And I could not have tackled this book without the inspiration provided to me by numerous musicians and bands that display a truly independent spirit to keep fighting for the principles of creativity in the face of soulless industry adversity . . . so a massive shout-out to Ginger Wildheart, James, Frank Turner and the Sleeping Souls, Eureka Machines, Ryan Hamilton and the Harlequin Ghosts, The Idol Dead (especially to Polly and KC for allowing me to use your Eric logo!), CJ Wildheart, Massive Wagons, The Urban Voodoo Machine, Therapy?, Scott Sorry, Role Models, The Main Grains, The Scaramanga Six, Boss Caine, Chris Catalyst, The Slow Readers Club, Paul Miro, William the Conqueror, Terrorvision, Tax The Heat, Baby Chaos, The Dowling Poole, Tony Wright, Case Hardin, The Levellers, Exit_International, The Twilight Sad, The Spangles, Ferocious Dog, She Makes War, PowderKeg, and finally (“Never Outdrunk, Never Outsung”) . . . The Wildhearts. Look them all up and have a listen; you won’t regret it.
Massive kudos and respect also to Alastair Hercalees Duncan, who keeps many of the above bands going while they perform onstage. Cheers for the set lists, Dunc!
About the Author
Simon Easton studied a BA (Hons) Three-Dimensional Design degree at Manchester Metropolitan University, where he focused on woodturning, silversmithing, and pewterware. His pewter napkin ring set was one of the MMU winners of the Pewter Live 1999 competition and was displayed at Pewterers’ Hall in London. He won a Precious Metals Bursary and a Grant from the Worshipful Company of Goldsmiths to produce design concepts that he had developed. The common theme in Simon’s work at university was a decorative and textural feel, often rich in embellishment or pattern.
Before graduating in 2000, Simon’s design for a decorative turned wooden bowl was selected for inclusion in the onetree project. This project, which toured the UK as an exhibition, stemmed from the use of one single ailing oak tree distributed to a range of artists, designers, manufacturers, and craftspeople. Every single part of the tree (from the leaves to roots) was used to create a stirring and diverse display of talent, which was also featured in a book published to accompany the tour. For the onetree exhibition, Simon created a decorative turned wooden bowl with a spun pewter insert, entitled “Wish, Hope, Dream, Everything.”
Simon’s crafting focus and love of wood led him to the art of pyrography, which he uses with a contemporary twist to create richly decorative items and gifts. The result is a diverse and exciting body of work released since 2007 under his business name of Wood Tattoos. He has created a varied range of works and commissions, regularly selling at craft fairs and galleries and accepting custom orders at www.WoodTattoos.com. He has also actively sought to help up-and-coming newcomers to the craft through demonstration events and online forums.
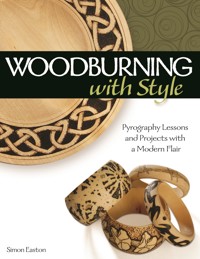
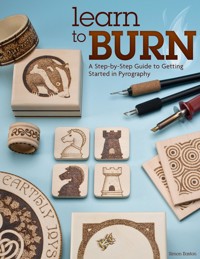
Simon is the author of Woodburning with Style (2010) and Learn to Burn (2013). The former is a comprehensive guide to the art of pyrography from start to finish, while the latter is a book of projects designed to help beginners build their confidence and abilities. Both books have received positive feedback from readers around the world. In February 2018, Simon also appeared live on UK television to spread awareness of pyrography as a craft, demonstrating during a feature and interview on Channel 4’s Sunday Brunch.
You can keep up to date with his latest designs through his regular social media updates at www.facebook.com/woodtattoos or www.instagram.com/wood_tattoos.
Foreword
As I write this introductory section to my third book on the craft of pyrography, I’m approaching the tenth anniversary of my “Wood Tattoos” business. What started as a creative hobby intended solely to help me relax and kick back from the pressures of my day job obtained a momentum of its own right: before I knew it, I was creating a website, booking tables at craft fairs, taking commissions online, and registering myself as a crafts business. I’d only been burning “professionally” for around a year when Fox Chapel Publishing made contact out of the blue, asking me to write a book on my “style” of pyrography and contributing immensely to where I stand today.
I still get the same thrill out of starting work on a new commission for a customer. The excitement of developing a design to satisfy the needs of that individual, to make real the intangible idea in their head of a piece that they are envisaging, is an honor and a pleasure. I always try to involve the client in my creative processes by showing them the ideas as they progress, as this helps to reinforce the belief that the design would not be complete without them. They’re not buying an anonymous mass-produced item from a generic store, they are a crucial part of creating something unique, something individual, something that will be cherished by the recipient for years to come. The item we create together is an original piece of inspired consequences, a project that has only come into fruition because of the personality, ideas, preferences, and history of both craftsperson and consumer.
My aim in this book, Yearn to Burn: A Pyrography Master Class, is to demonstrate ways to approach several projects through the use of woodburning, with my ideas and approaches only intended as a starting point for you, the avid reader and budding pyrographer. You can follow the guidance contained within these pages rigidly and recreate the designs that I’ve made, as these will help you to hone your pyrography skills and confidence if the craft is still new to you. As you become more comfortable and proficient, you can tinker with the suggested projects, adding your own take on them or adapting them into a style of your own choice. Ultimately, once you get to the point where your head is brimming with visions of your own invention, you can take elements from my work that you find useful or helpful as a starting point to enable you to develop your own design vocabulary.
I want you to appreciate that you are potentially in the same position as I was only a mere ten years ago. You’ve been bitten by the woodburning bug and are exploring what other makers have done before you, so that you can take your first tentative steps into the crafting world. You’ll learn the techniques, experiment with ideas, and develop your own style through personal trial and error. Before you know it, people will be looking at what you can make and declaring that they trust you to make something special and meaningful for them, whether they are a family member, a friend, or a potential paying customer. Enjoy and treasure those moments, as they are a measure of your own abilities demonstrated through the faith that these people place in you to create something magical from just a quantity of raw materials, your trusted pyrography machine, and a sprinkling of imagination.
Keep on burning!
Contents
Chapter 1: Tools, Hints, and Tips
Chapter 2: Pyrography Projects
Herb Garden Label Set
Engagement Ring Box
Texture Print Key Fobs
Mandala-esque Table Set
Celtic Knotwork Bangle
Art Nouveau Wall Organizer
Dream Catcher Clock
Stained Glass Wall Sconce
Mirrored 3D Layer Picture Frame
Zodiac Solitaire Game Board
Dragon Table Catchall Bowl
Castle Kitchen Container
Owl Keepsake Box
Set List Text Art Frame
Children’s Reward Bank with Tokens
Christmas Eve Platter for Santa
Reversi Game Board and Counters
Halloween 3D Platter
Chapter 3: Patterns
Resources
Chapter 1: Tools, Hints, and Tips
Pyrography as a Craft
You would probably struggle to find a craft with a more dramatic name than pyrography, which literally translates to “writing with fire.” No matter what surface you choose to work on creatively, the same principle and process applies, namely the application of heat to a surface to make a range of decorative marks. Irrespective of the origin of the name, this is not a craft for fireworks, explosions, and drama. Pyrography is a hobby that requires patience, skill, and a steady hand in order to master the techniques and become confidently proficient in your own ability.
Pyrography Machines
The most important decision you will make when starting out in pyrography is which machine to purchase. Pyrography equipment falls into two general categories: “solid point” or “hot wire” machines. In terms of price and flexibility, solid point machines are often regarded as entry-level kits, as they are cheaper and slightly less versatile than hot wire machines. Many budding crafters start with a less expensive kit in order to see if pyrography is the right craft for them, before moving onto a more advanced machine at a higher price once “bitten by the woodburning bug.” Pyrography machines are durable, reliable, and well built, as they are relatively simple tools, so they also hold their value well, which means you can often find secondhand kits for sale.
Solid Point Machines
The solid point machine resembles a traditional soldering iron in terms of physical appearance, with the name deriving from the solid brass nibs that it uses. These kits are usually chunky in terms of their physical structure, as the heating element is contained within the pen handle itself; this can make them a little trickier to hold or work with, particularly when trying to create finely detailed drawings or over longer periods of use. The nibs are available in a range of shapes and sizes to create different marks and often feature shaped nibs that can be used as decorative stamps. These machines generally have no more than two heat setting options at the most, with many only having a simple “on/off” switch and no further adjustability.
Hot Wire Machines
Hot wire machines are named after the finer metal nibs that they utilize. As these pen tips are formed from finely shaped wire forms, they can be used for detailed work much more readily than a solid point machine. Hot wire machines typically consist of a base unit with a power switch and an adjustable temperature setting so that the heat of the pen can be increased or decreased to suit the user’s needs. They have a separate pen that is attached by an electrical cord. Since the heating element is held within the base unit rather than the pen itself, the pens are usually smaller in size and, therefore, easier to hold and maneuver during use. Some manufacturers make “fixed” pens with a specific nib permanently fitted to its own handle, but most machines are also supplied with a pen with a range of different wire nibs that can be swapped as needed. These pens have a pair of holding posts at the tip with a screw mechanism or similar to secure the wire nibs in place and complete the circuit necessary to allow the heat to pass through.
The Pyrography Pen
As well as the type of pyrography machine that you elect to buy, it is also vital to consider your choice in terms of handling. Each unit (and most importantly the pen itself) has its own size, shape, and weight that must be kept in mind before you make a purchase. If you are going to be working on a design for a sustained period, the pen must be easy for you to hold in a comfortable yet relaxed grip. A pen that is too heavy or too awkward for you to hold will not be easy or enjoyable to work with, resulting in poor finished results and, ultimately, a lack of pleasure in what you are doing. If you can do so, visit a crafts supplier where you can handle a range of different machines first before spending your hard-earned money; you will not regret it in the long run!
I strongly believe that holding a pyrography pen should be as comfortable as holding a regular pen or pencil. You should be able to hold the pen in a natural, relaxed grip without any effort or strain. Most pyrography pens are designed to protect the user from any excess heat through insulated grip sections or guards to keep stray fingertips away from the business end; you must, therefore, bear this in mind when using the pen. Ultimately the pyrography pen needs more care and consideration than normal writing implements when it is being used due to the added risk of the generated heat.
General Safety Tips
Always take care with the nib of a pyrography pen. Metal can retain a residual heat for a long period of time even after the machine has been switched off. It is often easy to tell when nibs are hot while in operation, but you must be mindful to allow enough time for them to cool after use before you handle them again. If in doubt, use a pair of pliers to move them or test the nib against a piece of paper to see if it is still hot enough to make a burn mark on the surface. This is particularly important if you are planning on changing nibs regularly during a crafting session.
Make sure that your pen is secure when you place it down between uses. Some pyrography kits have a hook or holder on the side of the machine for this purpose; you can also get free-standing pen holders for some brands that allow you to rest it safely in place between sessions. For maximum safety, it is always best to turn the machine off when not in use, since it is easy for a pen to be accidently touched or to catch the cord on something.
Ventilation is also an important consideration when working, particularly when doing so for longer periods of time. Smoke and fumes can be harmful if inhaled, so consider using a mask and goggles
if you feel this is necessary; this may be especially beneficial if you are doing large areas of sustained heavy shading or similar. There are specialty extractor fan units available in the market that are targeted specifically for use by pyrographers. Alternatively, a small desk fan or something similar can assist in achieving the same result. Point the fan away from your work so that the smoke is drawn away from you as you burn. If the fan is used facing your working area, the breeze will cool the nib and may make it harder or slower for you as you try to create your design.
Keep your workspace tidy and free of clutter to reduce the chance of any accidents or problems. A protective heat-resistant mat is essential for protecting your table or desk; pieces of scrap wood, hardboard, or thick cardboard can be used as a low-cost alternative solution. Dispose of litter or waste from your workspace promptly, and ensure that you do not store any hazardous chemicals or substances near the area where your pyrography machine will be in use.
Take care to maintain your pyrography equipment during and between each use. Ensure that you take regular breaks when working for longer periods of time so that your hands do not become tired or painful through excessive effort. Do not work with a tangled cord, as this can lead to accidents if your movement becomes impeded. Do not use your machine if you believe it to be faulty or damaged in any way; get the kit checked by a qualified technician or the manufacturer if necessary.
Nib Choice
Nibs for pyrography machines are available in a range of sizes and shapes in order to allow you to make different lines and marks on your surface of choice. The principle is the same whether your machine is a solid point or hot wire; each shaped nib lends itself to a specific quality of line, pattern, or texture. Most pyrography machines have the capacity for the nibs to be changed in some way, whether this is through swapping a new nib into the holding posts of the pen unit or by using a range of different pens that all have a different nib fixed to them.
The range of shaped nibs available is vast, but you will need to consider the limitations of your chosen machine. Some pens will only fit nibs that are specifically made by the same manufacturing company, so make sure you do not make a wasted purchase by buying incompatible accessories. This principle applies to most solid point machines because of the to the methods of fitting the metal nibs into the pen, which is usually through a screw thread technique or some similar method.
Basic shaped wire nibs are not generally subject to such restrictions and can be used between a range of pyrography machine brands due to the generic structure of a pen with holding posts. This makes them a very affordable option, as you can shop around for the supplier or manufacturer offering the best prices and value for money without being tied to one company’s products. Wire nibs are often available in packs containing an assortment of different sizes or shapes, so you can also search for the brand that supplies the option most suited to your own individual preference.
When speaking to people interested in taking up pyrography as a hobby, I am regularly asked about nibs and which ones I would recommend as being essential to own. I always explain that pyrography is like many other arts or crafts—such as painting or woodturning, for example—in that there are an almost infinite range of brushes or tools available, but you do not need to own every single one in order to achieve the best results. In my view and from my own experience, I always state that there are four main types of pyrography nib that I would describe as essential for any crafter. I believe that you can create a wide range of marks and effects with just those four nib types alone. My basic pyrography nib palette would include the following four types of nibs described below and here.
• A writing nib creates a broad range of lines and marks smoothly over various surfaces. This can include a basic single wire loop nib (shaped in a “U”) or a more specialty option such as a ballpoint nib.
• A fine or bladed nib is used to burn crisp, sharp lines or for work that requires fine detail. The nib can be drawn easily over the surface for linear marks, or the sharp point can be used to create precise features of a design. This type includes the skew- or spear-point nib.
• A spoon point nib was named for its distinctive spoon-shaped profile. This nib is possibly one of the most versatile forms available and is one of my personal favorites (as described on here).
• A broad shading nib is used to fill in larger areas of tone more efficiently due to the increased size of the surface area that is in contact with the material to be burned. These nibs are available in a range of different shapes and forms.
If you were restricted to working with just a single pyrography nib, my recommendation would always be to choose the spoon point nib due to its adaptability over a wide range of effects. The lip of the nib can be used to create fine lines and sharper marks. The nib itself can be rotated so that the bowl of the spoon point is brought in contact with the surface, creating a softer and broader mark that is suited to shading or similar effects. With just this single nib, I could happily work on and complete a wide range of pyrography designs and would not feel restricted or limited in any way through only having a single “weapon” in my arsenal. The spoon point is my nib of choice for versatility and flexibility.
With hot wire machines, you also have the option to buy a quantity of NichromeTM pyrography wire that you can then cut to length and use to make your own wire nibs. These can be shaped into any form that you like in order to make them just right for a mark that you need to incorporate in your chosen project. You can coil the wire to increase the surface area for a broader shading effect, or you can consider filing or shaping the wire loop into a finer point or edge for more detailed linear work; the options are endless.
Creating Marks
The marks that you create with your pyrography machines are affected by a range of factors. These include the temperature setting that you have chosen, the shape or type of nib, the pressure that you use to apply the nib to the surface, and the duration of time that you leave the nib in contact. Adjusting any one of these variables will enable you to change the sort of mark, line, or shade that you create. Higher temperatures, increased pressure, or longer contact will result in darker or more distinct marks, while the opposite approach will create lighter and more delicate effects.
Take care to practice your mark-making techniques on scrap wood before you move onto a final piece. I always recommend that new crafters build up a library or scrapbook of mark-making results so that you can learn what you can achieve with different nibs and techniques. You can then retain these for future reference. This will help you have something to look back through when you are trying to achieve a certain line, texture, or pattern in a project. It will also help you to learn how to use your pyrography machine to the best of your ability without ruining a potential finished piece. The use of heat to create marks on a surface can be quite unforgiving, so it is always best to practice your techniques as much as possible before translating them into something you are creating for a purpose.
Use your pyrography pen in the same way that you would use a regular pen or pencil to draw with. Make sure that your grip is comfortable yet relaxed and try to work in the direction that your hand and wrist naturally want to move; attempting to go against that in a forced manner can result in lines that are uneven or of a poor quality. It is common to move the piece of material that you are working on numerous times as you burn a design, so that it is positioned in a way that you can make the marks naturally and without any unnecessary strain or discomfort.
Shading Techniques
Shading helps to create a sensation of form, depth, and texture in your pyrography designs. As with basic mark making, it is another technique that requires practice to become adept and confident. Broader shading nibs are extremely useful for creating areas of tone without looking scratchy or uneven. I recommend starting any shading at the lighter end of the tonal spectrum; if you shade too darkly at the beginning of a design, it can be very hard to amend the error. Starting with lighter tones and gradually building up to the darker shades through careful application or “layers” reduces the prospect of ending up with something that you cannot correct. Start with a lower temperature and don’t press too hard on the surface. Try to keep the motion of your nib across the surface as smooth as possible, gliding lightly to build up the tone gradually.


