Erhalten Sie Zugang zu diesem und mehr als 300000 Büchern ab EUR 5,99 monatlich.
- Herausgeber: Fox Chapel Publishing
- Kategorie: Lebensstil
- Sprache: Englisch
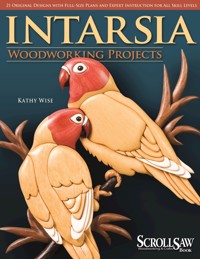
Intarsia enthusiasts can get right to work with this array of 21 full-size intarsia patterns suitable for a wide range of skill levels. Displaying an artistic style of woodworking that focuses on nature, the outdoors, and nostalgic scenes, these full-size patterns – bound into a pocket at the back of the book, no photocopy scaling necessary – include whimsical holiday animals, a classic rose, colorful lovebirds, a lighthouse scene, and a farm scene. A brief, getting-started section provides hints on which types of wood and blades to select as well as how to shape pieces, guiding those new to intarsia or serving as a quick refresher for more seasoned crafters.
Sie lesen das E-Book in den Legimi-Apps auf:
Seitenzahl: 77
Veröffentlichungsjahr: 2007
Das E-Book (TTS) können Sie hören im Abo „Legimi Premium” in Legimi-Apps auf:
Ähnliche


© 2007 by Fox Chapel Publishing Company, Inc.
Intarsia Woodworking Projects is an original work, first published in 2007 by Fox Chapel Publishing Company, Inc. The patterns contained herein are copyrighted by Kathy Wise. Readers may make copies of these patterns for personal use. The patterns themselves, however, are not to be duplicated for resale or distribution under any circumstances. Any such copying is a violation of copyright law.
For a printable PDF of the patterns used in this book, please contact Fox Chapel Publishing at [email protected], quoting the ISBN and title of this book, as well as the pattern or patterns required.
Print ISBN 978-1-56523-339-3eISBN: 978-1-60765-907-5
Publisher’s Cataloging-in-Publication Data
Wise, Kathy.
Intarsia woodworking projects: 21 original designs with full-size plans and expert instruction for all skill levels / Kathy Wise. -- East Petersburg, PA: Fox Chapel Publishing, c2007.
p. ; cm.
1. Marquetry. 2.Wood-carving--Patterns. 3. Wildlife woodcarving--Patterns. I. Title. II. Woodworking projects.
TT192 .W57 2007
745.51/2--dc22
0711
A Scroll Saw Woodworking & Crafts magazine publication.
To learn more about the other great books from Fox Chapel Publishing, or to find a retailer near you, call toll-free 800-457-9112 or visit us at www.FoxChapelPublishing.com.
Note to Authors: We are always looking for talented authors to write new books in our area of woodworking, design, and related crafts. Please send a brief letter describing your idea to Acquisition Editor, 1970 Broad Street, East Petersburg, PA 17520.
Because scrolling wood inherently includes the risk of injury and damage, this book cannot guarantee that creating the projects in this book is safe for everyone. For this reason, this book is sold without warranties or guarantees of any kind, expressed or implied, and the publisher and the author disclaim any liability for any injuries, losses, or damages caused in any way by the content of this book or the reader’s use of the tools needed to complete the projects presented here. The publisher and the author urge all scrollers to thoroughly review each project and to understand the use of all tools before beginning any project.
Table of Contents
Getting Started
Beginner Projects
Rose Demonstration
Ornaments
Penguin & Chick
Fox
Intermediate Projects
Mallard Demonstration
Love Birds
Piano Girls
Pool Balls
Lighthouse
Sailboat
Advanced Projects
Lion Demonstration
Rattlesnake
Barn Scene
Calf Roper
Clydesdale and Colt
Eagle
GETTING STARTED
INTRODUCTION
INTARSIA: THE WISE WAY
Intarsia is an early Italian art, a form of wood inlay. Over time, it evolved into a more sculptural style of wood art. Each intarsia artist has his or her own technique and approach to the art.
I believe there is no wrong way to create intarsia, just different styles. Don’t be hampered by the “rules” of intarsia. There are none. Feel free to change the patterns. Add exotic woods or other materials such as glass, stone, or plastic. Use stains, paints, oils, or dyes to enhance the colors and achieve the look you want. Add as much depth as possible to your project; make it jump out at you.
I have seen some wonderful versions of my designs embellished with feathers, glass, and color dyes. In other words, the pattern is just a starting point, a guide for your own special brand of artistic creativity. Make it into your own masterpiece.
Having sculpted animals and dogs for more than 30 years, I like to add as much 3D-effect to my intarsia as possible. The color of the wood is important, as well as the light and dark values used in the design.
Whether you are an old pro or a beginning intarsia artist, this book has something for everyone. It will help you to learn the basics or improve your skills. Patterns range from beginner to intermediate to advanced, along with some step-by-step photos and instructions mixed in with helpful advice.
Some projects, such as Pool Balls, require the use of paints or dyes to achieve the correct colors.
With careful selection, you can create beautiful contrasts using only natural wood colors.
NATURAL WOOD VS. STAIN/PAINT
I prefer to use the natural wood colors in most of my projects, but sometimes a project requires an unavailable or impossible-to-find color. For example: the head of my turkey needed to be blue to really look like a turkey, so I applied a light wash of acrylic paint to the bird’s-eye maple, which gave me the light blue color.
There is some debate as to whether you should alter the wood with stains, dyes, or paint. Think of the finished artwork—will using stains, paints, or dyes enhance your piece? Using white gel stain on white wood is widely accepted by intarsia artists. I fail to see any difference in using washes or dyes on your pieces, as long as you allow the wood grain to show through as much as possible. Using stains and washes allows you to use available woods without the expense of the exotic woods.
It often depends upon the effect you are looking to achieve. I used acrylic paint washes on the Pool Ball project featured in the intermediate section. You will notice that the wood grain still shows through. The pool balls would not have been realistic enough for me if they were the natural color of the wood. That particular project would also be an ideal situation to experiment with colored plastics.
Some woods can darken or lighten with age. To keep black walnut very dark, I use a dark walnut oil on it to preserve and enrich the deep brown color. I use white gel stain on my white pieces in order to keep the wood from turning brown with age. See the section on finishing for more details on applying white gel stain.
EQUIPMENT
Some artists cut their work entirely with a hand fret saw. An investment in a few basic tools will really increase the efficiency of your work and your enjoyment.
There are many brands of scroll saws available. If you plan to spend a lot of time scrolling, I recommend you invest in a higher-end saw.
THE SCROLL SAW
The thin blades of a scroll saw allow you to make straight and curved cuts and even 180º turns with no difficulty. If you do not already own a scroll saw and plan on doing large projects, pick a saw that has a large throat depth and a large table. Variable speed is also useful. As with any tool, buy the best that you can afford. If possible, visit a store or woodworking show where you can actually try out the different brands before making a purchase. Ask other woodworkers for their input, but be aware that opinions on saws vary as greatly as opinions on the make and model of automobiles. Being able to “test-drive” the saw is always your best option.
When you get the saw set up, position a chair at a comfortable height and get familiar with the saw. Check to see how the blades are clamped in the machine and check to make sure the blade is square to the table. You can tilt the table of your saw to cut the wood at an angle, which can produce some interesting results. However, for intarsia, you almost always want the blade to be square to the table. Otherwise, your pieces will not fit together properly. Check that the blade is square to the table both front to back and side to side. Then figure out how to tension your blade; in most cases, the blade should be tight enough that it moves less than ⅛" side-to-side when you press on it.
Next, check your scrolling environment. Make sure you have adequate light, and have some method of cleaning the air (a dust mask at the very least). Make some marks on a piece of scrap wood and try cutting. If you want to jump right into a project, mark the outside edges of the design with a highlighter; you do not need to be quite as careful when cutting those lines. Cut slowly, and stay on your lines. Most of all practice, practice, practice; your skills will improve with each cut.
BASIC TOOLS
To create intarsia, it is best to have access to the following tools. While they are not all absolutely necessary, having them will speed up the process and make the process more enjoyable.
▪ Scroll saw
▪ Pneumatic drum sander
▪ Small die grinder or rotary power carver such as a Dremel with a ½"-diameter sanding drum
▪ Air cleaner
▪ Drill press
▪ Sanding mop
▪ Band saw
▪ Woodburner
▪ Clamps and/or sand bags
OTHER TOOLS
While you won’t get quite as much use out of the following tools, you will find them very helpful. If you plan to undertake intarsia on a serious level, I strongly advise you to invest in these items.
▪ Dust collection system
▪ Table saw
▪ Router & assorted bits
▪ Belt sander
▪ Oscillating sander
▪ Planer
▪ Finishing sander
▪ Circular saw
SUPPLIES
These relatively inexpensive items are available at most craft or hardware stores and will be essential additions to your shop.
▪ Carving knife or hobby knife
▪ Sandpaper
▪ Needle nose pliers/forceps
▪ Gel varnish/spray varnish
▪ Dust mask
▪ Contact paper
▪ Spray adhesive
▪ Double-stick carpet tape
▪ Clear packing tape
▪ Glue stick
Use a small square to make sure your blade is square to the table.


