Erhalten Sie Zugang zu diesem und mehr als 300000 Büchern ab EUR 5,99 monatlich.
- Herausgeber: IMM Lifestyle Books
- Kategorie: Lebensstil
- Sprache: Englisch
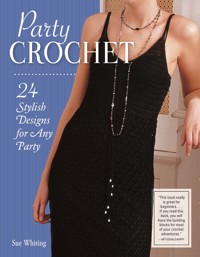
Get noticed at your next party with an incredible crochet creation that you made yourself! Party Crochet offers 24 fun and fabulous designs for party wear, each perfect for that special occasion. Try the camisole top and matching skirt in silver and gold, the fuchsia/pink fur jacket, the strappy evening dress, the sequined bolero or the mini poncho—any of these terrific patterns will make your party style. Crocheted accessories include a corsage, a cuff bracelet and a stunning evening bag. Accompanied by gorgeous color photographs, these irresistible projects are perfect for beginners and veteran crocheters alike. Each design is worked using simple stitches, clearly explained with step-by-step patterns and diagrams. A comprehensive how-to section covers all the basics of crocheting, along with essential advice on yarns, hooks, and techniques.
Sie lesen das E-Book in den Legimi-Apps auf:
Seitenzahl: 234
Veröffentlichungsjahr: 2018
Das E-Book (TTS) können Sie hören im Abo „Legimi Premium” in Legimi-Apps auf:
Ähnliche


Published 2018—IMM Lifestyle Books
www.IMMLifestyleBooks.com
IMM Lifestyle Books are distributed in the UK by Grantham Book Service, Trent Road, Grantham, Lincolnshire, NG31 7XQ.
In North America, IMM Lifestyle Books are distributed by Fox Chapel Publishing, 903 Square Street, Mount Joy, PA 17552, www.FoxChapelPublishing.com.
© 2018 by IMM Lifestyle Books
Produced under license.
The patterns contained herein are copyrighted by the author. Readers may make copies of these patterns for personal use. The patterns themselves, however, are not to be duplicated for resale or distribution under any circumstances. Any such copying is a violation of copyright law.
Print ISBN 978-1-5048-0102-7
eISBN 978-1-6076-5560-2
Party Crochet is a collection of new and previously published material. Portions of this book have been reproduced from Party Crochet (978-1-84537-626-0).
The Cataloging-in-Publication Data is on file with the Library of Congress.
We are always looking for talented authors. To submit an idea, please send a brief inquiry to [email protected].
Shutterstock photo credits: Binh Thanh Bui (1); Jenn Huls (2–3); Pam Walker (6); Africa Studio (9); Melica (13); ppl (21); Yana Radaeva (23); and Melinda Gyorgy (143).
Contents
Introduction
Basic Information
BRIGHT LIGHTS
“Fur” Jacket
Shoulder Shrug
Lacy Poncho
Tie-Front Cardigan
Sleeveless Top
Mini Shawl
Skinny Scarf and Hat
Bracelet and Necklace
Oversized Wrap
Cuff Bracelet and Sash Belt
Beaded Vest
GLITTER
Sequin Halter Neck
Kimono Top
Beaded Cardigan
Motif Skirt and Wrap
Shimmering Bolero
GIRLS’ NIGHT OUT
Evening Dress
Flower Motif Belt
Chevron Capelet
Fuzzy Shrug
Beaded Evening Bag
Pearl Evening Bag
Slip Dress
Multicolored Corsage
Suppliers
Introduction
Luscious lurex, marvelous mohair, cuddly chenille, romantic ribbons, and sparkling speciality yarns are easily transformed into perfect party wear with a little help from a crochet hook!
Crochet is easy—take a ball of yarn, a crochet hook, and a little inspiration and you are ready to go. And here you should find more than enough inspiration to help you create that perfect party outfit—with surprisingly little effort. Whether you are looking for glamorous and elegant evening wear or a funky little number to pop on with jeans and a T-shirt to visit friends, there’s something here for everyone. It doesn’t matter if you are a total novice crocheter or not, that shouldn’t stop you—there’s just as many quick and easy makes here as there are projects that might challenge you!
Crochet is growing in popularity—both as a craft and as a fashion statement. Nearly every big name now includes a little crochet somewhere in their collection—from high street stores to the biggest couture houses. And now you can be up there, too. Once you’ve got the hang of the few basic stitches you are ready to start to create your very own “designer original.”
Almost all the hand knitting yarns that are available now in yarn stores can be used for crochet—and here you’ll find some of the best and most exciting yarns around turned into stunning garments you’ll love to wear.
With crochet, there’s only ever one stitch on your hook at any time so there’s very little chance of dropping stitches and making mistakes. All the different crochet stitches are based on one simple principle—insert the hook into the work, wrap the yarn around the hook, and pull a loop through. That’s all there is to it! It’s just the way the hook is inserted and how the yarn is wrapped around it that creates the stunning effects it’s easy to achieve in crochet. And here you’ll find all the techniques you need to help you on your way as well as the patterns you’ll need to create your very own masterpiece.
And why not try adding beads and sequins to your crochet to add even more impact? Here there’s lots of designs to make that use these to great effect, whether you want to just add a few beads to try a new technique or masses of sequins to make a dramatic statement. And the selection of beads and sequins around is vast, too—from subtle seed beads to glamorous crystals, from pearls to paillette sequins. So long as you can thread it onto your yarn, you can use it!
Crochet is fun—so it’s the ideal way to make fun party wear. So what’s stopping you? Start flicking through now, choose your design, and get the party started!
Basic Information
What You Will Need
All that is really needed to crochet an item is a crochet hook, some yarn, and a pattern.
CROCHET HOOKS
Crochet hooks, like knitting needles, come in lots of different sizes and are often made of different materials. Larger hooks are usually plastic but it is possible to buy ones made from bamboo—many people find this type particularly easy and comfortable to work with. Smaller hooks are usually metal, although some may consist of a metal hook and shank encased in a plastic handle.
The size of the hook used determines the size of the stitches being made, and it is also usually governed by the thickness of the yarn. Thick yarns are usually worked using a chunky hook, while fine yarns generally require a small hook.
Nowadays crochet hook sizes are generally given in a metric size—but if you have old hooks, carrying an older imperial measurement, you need to know what the metric equivalent is.
CROCHET HOOK CONVERSION CHART
Metric
Old UK
USA
2.00 mm
14
B/1
2.25 mm
13
B/1
2.50 mm
12
C/2
3.00 mm
11
D/3
3.25 mm
10
D/3
3.50 mm
9
E/4
3.75 mm
–
F/5
4.00 mm
8
G/6
4.50 mm
7
7
5.00 mm
6
H/8
5.50 mm
5
I/9
6.00 mm
4
J/10
6.50 mm
3
K/10½
7.00 mm
2
–
8.00 mm
0
L/11
9.00 mm
00
M/13
10.00 mm
000
N/15
º If more than one hook size is used for the item, it is important to adjust the size of these other hooks accordingly, too.
º When making the slip knot, ensure that the end of the yarn that tightens the loop is the cut end of yarn, not the end leading to the ball—this will mean that the slip knot can be pulled up tighter later to neaten the work.
º When working any crochet stitch, the yarn should always be wrapped around the hook in the same way—over, around, and under.
YARNS
Almost any yarn sold for hand knitting can be used for crochet—but some are easier to use than others! Beginners will find smooth yarns far easier to work with than textured ones. A fancy yarn that has a fluffy or boucle surface can easily catch on the crochet hook, making it difficult to pull the yarn through when working the stitches, and tricky to find exactly where to insert the hook. The yarns used in this book are varied—some are fine smooth yarns, either plain or sparkly, and some are heavily textured—but all are ideally suited to making stylish party wear. (Note: Some brands may be difficult to locate in stores or online. You may either substitute it with a different brand similar in fiber content, or do an online search; Ebay is an excellent source for such instances.)
• Colinette Giotto: 50% cotton, 40% rayon, 10% nylon, 157½ yds. (144 m) per 3½ oz. (100 g) hank.
• Lion Brand Incredible: 100% nylon, 110 yds. (100 m) per 1¾ oz. (50 g) ball.
• Rowan Cotton Glace: 100% cotton, 137 yds. (115 m) per 1¾ oz. (50 g) ball.
• Rowan Kidsilk Haze: 70% super kid mohair, 30% silk, 229 yds. (210 m) per 1 oz. (25 g) ball.
• Rowan Kidsilk Night: 67% super kid mohair, 18% silk, 10% polyester, 5% nylon, 227 yds. (208 m) per 1 oz. (25 g) ball.
• Rowan Lurex Shimmer: 80% viscose, 20% polyester, 104 yds. (95 m) per 1 oz. (25 g) ball.
• Rowan RYC Soft Lux: 64% extra fine merino wool, 10% angora, 24% nylon, 2% metallic fiber, 137 yds. (125 m) per 1¾ oz. (50 g) ball.
• Sirdar Frenzy: 66% polyester, 34% nylon, 47 yds. (43 m) per 1¾ oz. (50 g) ball.
• Sirdar Wow!: 100% polyester, 64 yds. (58 m) per 3½ oz. (100 g) ball.
• Twilleys Goldfingering: 80% viscose, 20% metallized polyester, 219 yds. (200 m) per 1¾ oz. (50 g) ball.
• Twilleys Silky: 100% viscose, 219 yds (200 m) per 1¾ oz. (50 g) ball.
• Wendy Chic: 60% nylon, 30% polyester, 10% metallized polyester, 87½ yds. (80 m) per 1¾ oz. (50 g) ball.
EXTRAS
Apart from the yarn, hook, and pattern there are very few extra items needed to complete a crochet project. Scissors will be needed to cut the yarn, and a tape measure is required to check the tension and that the work is the correct length. A blunt-pointed sewing needle—like the sort used for cross stitch or tapestry—will be needed to sew up the pieces. Everything else that may be required—such as beads or buttons—will be detailed with the pattern instructions.
The Importance of Tension
If many hours are to be spent making a crochet item, it’s a good idea to make sure it’s going to be the correct size! It is vitally important to the success of a project that the tension achieved matches that stated within the pattern, as the tension governs the final size of the crocheted pieces. If the tension is not correct, not only will the pieces not fit together as they should, but the finished item will not be the correct size and it may also mean that extra yarn will be required, or some may be left over.
CHECKING THE TENSION
Before beginning the actual item, a tension swatch should be worked. Crochet has a tendency to pull in slightly as the work grows so this tension swatch must be quite large—ideally 6 in. (15 cm) square. Work this tension swatch in the stitch pattern given within the “Tension” section and using the hook size stated and the correct yarn. Once the swatch is complete, lay it flat and mark out 4 in. (10 cm) both across and along the rows with pins.
Count the number of stitches and rows (or pattern repeats if this is how the tension is given) between these marked points and check that it matches the tension stated on the pattern. If there are more stitches or rows than stated within the pattern, the work is too tight and another swatch should be worked using a size larger hook. If there are too few stitches or rows, the work is too loose and a smaller size hook will be needed. Once the correct tension has been obtained, the size of hook required to achieve this tension is the size that should be used for the item.
The Basic Stitches
Crochet is very simple as it basically consists of just a few different stitches, all of which are worked in a very similar way—it is their heights that vary. There is only ever one stitch on the hook at any one time and the new stitches are worked by inserting the hook through the work, wrapping the yarn around the hook, and pulling these loops of yarn through the stitch on the hook.
SLIP KNOT
To start the work there needs to be the first original stitch on the hook! This is formed by making a slip knot and slipping this knot over the hook.
Make the slip knot by forming the yarn end into a loop. Insert the hook through this loop and pull another loop of yarn through the first loop. Gently pull on the yarn end to tighten this second loop around the body of the hook, and the first stitch has been created.
CHAIN STITCH
This is the basic starting point for almost all crochet projects.
To make a chain stitch, wind the yarn around the hook by passing it over, round and under the hook. Now gently ease this new loop of yarn through the loop on the hook to complete the chain stitch.
SLIP STITCH
A slip stitch adds virtually no extra height to the work and is often used to join stitches together.
To work a slip stitch, insert the hook into the work as detailed in the pattern and take the yarn around the hook in the same way as for a chain stitch. Now bring this new loop of yarn through both the work and the stitch on the hook.
DOUBLE CROCHET
One of the most basic and frequently used crochet stitches, a double crochet is a short neat stitch.
Start the double crochet stitch by inserting the hook into the work, taking the yarn around the hook and pulling this new loop of yarn through the work—there are now 2 loops of yarn on the hook. Take the yarn around the hook again and bring this new loop of yarn through both the loops on the hook to complete the stitch.
TREBLE
Another commonly used crochet stitch is the treble stitch—quite a tall, upright stitch.
Make a treble by wrapping the yarn around the hook before inserting it into the work. Insert the hook into the work and wrap the yarn around the hook again. Bring this loop of yarn through the work so that there are 3 loops of yarn on the hook. Wrap the yarn around the hook and pull this new loop through just 2 of the loops on the hook—there are now 2 loops on the hook. Again, wrap the yarn around the hook and pull this loop through both the loops already on the hook to finish the stitch.
TREBLE VARIATIONS
A treble stitch is created by wrapping the yarn around the hook once before inserting it into the work, drawing through a new loop and then pulling more loops of yarn through pairs of loops on the hook to complete the stitch. Taller treble-like stitches can be created by wrapping the yarn around the hook more times before it is inserted into the work.
º Taller treble-like stitches can be made in exactly the same way as double and triple trebles—check the pattern abbreviations to find out how many times the yarn should be wrapped around the hook for the type of stitch being worked.
º Leave quite a long end before the initial slip knot and when fastening off so that this length of yarn can be used to sew up the seams, avoiding the need to join in more lengths of yarn.
º If you are unsure as to what size to make, measure a similar garment from your wardrobe and make the size garment that has this “actual size” stated.
º When working into a chain stitch, it is easier and neater to insert the hook between the 2 strands making up the “V” of the chain—but remember to also pick up the strand lying underneath these 2 strands, so that 2 of the 3 strands that form the chain are enclosed in the new stitch.
Double treble: Wrap the yarn around the hook twice before inserting it into the work. Wrap the yarn round the hook and draw the new loop through the work, leaving 4 loops on the yarn. Wrap the yarn around the hook again and pull this loop through 2 of the 4 loops on the hook—3 loops now on the hook. Continue wrapping the yarn around the hook and bringing this new loop through pairs of loops already on the hook until there is just one loop left on the hook. For a double treble, this will be done a total of 3 times.
Triple treble: Wrap the yarn around the hook 3 times before inserting it and repeat the (yarn around hook and draw new loop through 2 existing loops) process a total of 4 times.
Quadruple treble: Wrap the yarn around the hook 4 times before it is inserted into the work and repeat the (yarn around hook and draw new loop through 2 existing loops) process a total of 5 times.
HALF TREBLE
This stitch is a combination of a double crochet and a treble stitch and makes a stitch roughly midway between these two in height.
Start the half treble in the same way as for a treble—wrap the yarn around the hook and insert the hook into the work. Take the yarn around the hook and draw this new loop through the work so that there are 3 loops on the hook. Now complete the half treble as though it were a double crochet stitch by wrapping the yarn around the hook again and drawing this new loop through all the loops on the hook.
Placing the Stitches
Varying effects can be created with the same basic crochet stitch by inserting the hook through the work in different ways.
THROUGH THE TOP OF A STITCH
This is the most common placement for the new stitch and is the way the hook should be inserted into the work unless the pattern states otherwise. Across the top of stitches there will nearly always be a “V” shape formed by 2 strands of yarn. Insert the hook through the work, from front to back, under both of these strands to make the new stitch.
THROUGH ONE LOOP ONLY
Special effects can be created on the surface of the work by just picking up one of the 2 strands that form the “V” sitting on top of a stitch when working the new one. Check the pattern to see which of the 2 strands it should be, and insert the hook under this strand only, inserting it from front to back, instead of under both. If all the strands along one side of the previous row are left unworked, a “bar” of yarn will be left sitting across the work and the work will have a tendency to fold along this line.
BETWEEN THE STITCHES
Inserting the hook between 2 stitches will create a fabric that is a little more open than if the stitches were placed on top of the previous ones. But, if the yarn is heavily textured, it will be much easier to work out exactly where to insert the hook! To work a stitch placed in this way, simply slide the hook through the work, from front to back, between the 2 stitches specified in the pattern.
INTO CHAIN SPACES
Lacy stitch patterns and motifs often place stitches into a “hole,” or chain space, created in the work. When working into a chain space, insert the hook through this “hole,” from front to back, and work the stitch so that the entire chain is enclosed by the new stitch.
Creating a Fabric
Strings of crochet stitches need to be placed one on top of the other in order to create a fabric, and these strings can either be worked backward and forward in rows, or round and round to form rounds.
TURNING CHAINS
However the stitches are positioned to form the fabric, the working loop used for the new stitches is generally on the top of a stitch. So, at the end of one row or round, this working loop needs to be raised up to the top of the stitches that will form the new row or round—and this is done by working a few chain stitches, known as a “turning chain.”
The number of chain stitches that need to be worked will vary according to the type of stitches being worked—for example, a treble stitch is roughly equal in height to 3 chain stitches, but a double crochet to just one chain stitch. Throughout this book, the pattern states exactly what is needed to be worked at the beginning and end of each row or round to bring the working loop to the required position for the next set of stitches.
WORKING IN ROWS
The simplest way to form a crochet fabric is by working backward and forward in rows of stitches, with a turning chain at the beginning of each row. The work should be turned at the end of each row, working one row with the right side of the work facing and the following row with the wrong side of the work facing.
WORKING IN ROUNDS
Crochet can also be worked to form circular tubes of crochet, starting with a length of chain that is joined to form a loop, or flat disks, formed by ever-growing rounds worked into a tiny ring of chain stitches.
Each round of crochet is worked in a similar way to a row but the ends of the rounds are joined, usually by working a slip stitch into the top of the first stitch. Crochet stitches appear different when viewed from the right side to when viewed from the wrong side, so it is advisable to check whether the pattern being followed requires the work to be turned or not at the end of each round. If the item being crocheted combines sections worked in rounds and rows, it is advisable to turn the work at the end of each round to create a fabric that looks the same as when worked in rows.
FASTENING OFF
Once each crochet section has been completed there will still be one stitch on the hook. This stitch should be fastened off by cutting the yarn and drawing this yarn end through the final stitch. Pull gently on the end to secure it.
Following a Crochet Pattern
A crochet pattern should give all the information needed to make the item. Before beginning it is a good idea to read through the whole pattern to understand exactly how the item will be constructed.
MEASUREMENTS
This section gives details of what size the item will be when completed and, in the case of a garment, what size body it should fit. Garments normally have a little “ease” added and will measure more than the body they are designed to fit.
MATERIALS
This section of the pattern will list everything needed to make the item—the amount and type of yarn required, the size of crochet hook to use and anything else that may be needed to complete the item, such as beads or buttons.
The amounts of yarn stated are based on average requirements and are therefore approximate. If a garment is lengthened or shortened more or less yarn will needed. Even with modern technology, batches of yarn dyed at separate times can vary very slightly in color and, while not apparent in the ball, this variation can often become very clear once the item is made. It is therefore advisable to buy all the yarn needed to complete the item at the same time, ensuring each ball carries the same “dye lot” number.
ABBREVIATIONS
Crochet uses a “shorthand” system to save writing out in full each and every stitch to be worked, abbreviating each stitch type down to just a few letters. Many abbreviations are common to all crochet patterns and these frequently-used abbreviations are all listed on here. Sometimes a pattern will use a stitch that is specific to just this one design and a special abbreviation will be given.
TENSION
The tension section of the design gives the details of the tension needed to recreate the item photographed. Sometimes the tension and the hook size specified will be different than expected for that type of yarn in order to create a particular effect for that item.
MAKING THE ITEM
Many crochet patterns are given in more than one size. The amount of stitches or measurements needed for each size are given as strings of numbers in round brackets ( ). If the second size is being made, then the second set of figures should be used whenever the bracketed figures appear.
If only one number is given, then it should be followed for all sizes. This happens in projects where the exact finished size of the item being made is not crucial, as with the various accessories featured in the book.
When more than one stitch is to be worked into an area, this group of stitches is also shown in round brackets ( ) as a series of stitches. All the stitches in the round brackets should be worked into the place stated after the brackets.
Occasionally a pattern will require a certain group of stitches to be repeated more than once; this group is shown in square brackets [ ]. The instructions contained in these square brackets should be repeated the number of times stated after the closing bracket.
Crochet stitch patterns often require the same group of stitches to be repeated many times across a row or round. A star * appears at the beginning of the section to be repeated. Return to the star to begin the next repeat.
Occasionally there will also be a double star ** appearing within a starred section of repeats. The pattern will state that the last repeat of the section should end at this point, ignoring the remaining instructions that were repeated previously. Instructions will then be given for what to do next.
Most crochet items are made in more than one piece; it’s a good idea to make these sections in the order stated on the pattern, otherwise it may be difficult to complete the garment as the pieces often refer back to previous sections for certain measurements, or require pieces to be complete in order to add another piece.
Once all sections have been made, the written pattern tells how to join the sections to complete the item. It also gives instructions for any edgings or trims to be added. Once again, it is important to follow the order of making up and joining the pieces so that any extra sections, such as collars, cuffs, and bands can be worked along the correct edges.
FOLLOWING CROCHET DIAGRAMS
The stitch pattern used for a crochet item can be shown on a diagram. This diagram provides a visual reference of exactly how the stitches that make up the pattern fit together. The diagram uses a different symbol for each type of stitch worked, using tall symbols for tall stitches and short symbols for short stitches, with these symbols being placed together as they would be on the finished work. As with abbreviations, certain symbols are common to many crochet patterns while some symbols are specific to one particular stitch pattern. Each diagram should be accompanied by a key explaining what each symbol means.
ABBREVIATIONS
beaded ch – slide bead up next to work, yoh and draw loop through leaving bead sitting against RS of work
beaded dc – insert hook as indicated, slide bead upnext to work, yoh and draw loop through leaving bead sitting against RS of work, yoh, and draw through both loops on hook
sequined dc – insert hook as indicated, slide sequin up next to work, yoh and draw loop through leaving sequin sitting against RS of work, yoh and draw through both loops on hook
alt
alternate
beg
beginning
ch
chain
cm
centimetres
cont
continue
dc
double crochet
dec
decreas(e)(ing)
dtr
double treble
foll
following
htr
half treble
in
inches
inc
increas(e)(ing)
mm
millimetres
patt
pattern
rem
remaining
rep(s)
repeat(s)
RS
right side
sp(s)
space(s)
ss
slip stitch
st(s)
stitch(es)
tr(s)
treble(s)
WS
wrong side
yoh
yarn over hook
Shaping within Crochet
Not all crochet items are made from simple tubes or strips of crochet, and stitches will need to be increased or decreased to create the final pieces. The pattern instructions will normally set out exactly what combination of stitches need to be worked to achieve this shaping while still retaining the stitch pattern.
Decreasing is often achieved in crochet by working two stitches so that they join at the top, forming an upside-down “V” shape. Each stitch, or “leg,” forming this “V” shape is worked in the normal way up to the last stage. Once both stiches have been worked to this point, the individual stiches, or “legs,” are joined by taking the yarn over the hook and drawing this new loop of yarn through all the loops on the hook, thereby joining the two stiches at the top.
Working with Beads and Sequins
Many of the items in this book use beads or sequins to create the finished effect, and these are attached while the item is being crocheted.


