Erhalten Sie Zugang zu diesem und mehr als 300000 Büchern ab EUR 5,99 monatlich.
- Herausgeber: IMM Lifestyle Books
- Kategorie: Lebensstil
- Sprache: Englisch
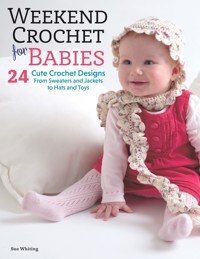
Designed for all skill levels, this crafter's companion features fun and versatile patterns for baby clothes, with simple projects that can be completed in just a weekend. Beginners will appreciate the advice on getting started and essential techniques, while experienced crocheters will enjoy the range of different effects created in these garments, such as chunky textured fabric and delicate lacy patterns. Twenty-four projects make use of a wide selection of available yarns, from pure cotton pastels to soft and colorful wools. Designs include classic sweaters and tops, a duffle coat, a lacy cardigan, a ski-style bobble hat and scarf set, bootees and even some cute toys. Each project has clear instructions and full information on yarns, stitches, and techniques, plus beautiful photographs of the finished garment.
Sie lesen das E-Book in den Legimi-Apps auf:
Seitenzahl: 231
Veröffentlichungsjahr: 2016
Das E-Book (TTS) können Sie hören im Abo „Legimi Premium” in Legimi-Apps auf:
Ähnliche


Weekend Crochet for Babies
Sue Whiting
Weekend Crochet for Babies
24 cute crochet designs,from sweaters and jacketsto hats and toys
Published 2016 — IMM LifestyleBooks www.IMMLifestyleBooks.com
IMM Lifestyle Books are distributed in the UK by Grantham Book Service.
In North America, IMM Lifestyle Books are distributed by
Fox Chapel Publishing
1970 Broad Street
East Petersburg, PA 17520
www.FoxChapelPublishing.com
Copyright © 2008, 2016 text and patterns:Sue Whiting
Copyright © 2008, 2016 photographs:IMM Lifestyle Books
Copyright © 2008, 2016 IMM Lifestyle Books
All rights reserved. No part of this publication may be reproduced, stored in a retrieval system, or transmitted in any form or by any means, electronic, mechanical, photocopying, recording or otherwise, without the prior written permission of the publishers and copyright holders.
Sue Whiting has asserted her moral right to be identified as the author of this work.
ISBN 978 1 5048 0023 5
10 9 8 7 6 5 4 3 2 1
Printed in China
contents
Introduction
How to crochet
Aran-style jacket
Frill-trimmed cardigan
Cosy cardigan
Duffle coat
Pram blanket
Hat, bootees and mitts
Lacy cardigan
Striped hat and scarf
Flared tunic
Furry hat, boots and mitts
Envelope neck sweater
Hat, scarf and bag
Colour block tunic and jacket
Blazer
Striped sweater
Rabbit
Hooded jacket
Wrapover cardigan
Chevron tunic dress
Puppy pram string
All-in-one
Hooded sweater
Gilet (Vest) and hat
Boy and girl dolls
Index
Yarn suppliers
introduction
Making something for a new arrival is both rewarding and fun. And, when you choose to crochet that special item, it can be quick too! Here you will find a lovely collection of quick and easy designs to delight any new baby – or their mother, all of which can be completed in one or two weekends. All the patterns cater for tiny babies up to toddlers so you can make them for their bigger sister or brother too!
How to crochet
It’s not difficult to learn to crochet – especially if you are already a knitter and are familiar with handling yarn and knitting needles. Crochet only uses a hook, not a pair of needles, and there is only ever one stitch on the hook at any time. This makes it much more versatile and greatly reduces the chances of dropping stitches! Crochet has a few stitches to learn but, as these are all variations on a theme, you’ll find it really easy to master them. Once you’ve got the hang of one stitch, you’ll find it really easy to pick up the others.
WHAT YOU NEED
To crochet something you don’t need a lot of equipment. You just need a pattern – you’ve got those in this book – and a few other simple things. And the pattern will tell you exactly what these are.
Your pattern will tell you how much and what type of yarn you need to buy, and what size crochet hook to use. Crochet hooks come in lots of different sizes and there are different ways these sizes are measured– metric, imperial and american. Opposite is a chart that shows you the equivalent sizes in each measurement system.
Your pattern will also tell you if you need anything else – like buttons or ribbon. Apart from these few things, there’s not much else you need! A pair of scissors will obviously be useful for cutting the yarn, and a tape measure will help you check the crocheted pieces are the right size. You will probably have to sew up a few seams, or darn in a few yarn ends – so you’ll need a blunt-pointed needle with a large eye. Like those used for tapestry or sewing up knitted things, this sort of needle is not only easy to thread with a thick yarn but also the blunt ‘point’ slips between the strands of yarn and makes sewing up neat and easy.
SIZING
All the designs in this book can be made for babies from newborn up to 18 months old. Although approximate ages are given, it’s a much better idea to choose the size you want to make by measuring the actual chest size of the child. If you are still unsure what size to choose, compare the actual measurements of the garment – given at the start of the pattern – with those of a something you know fits the child well.
CROCHET HOOK CONVERSION CHART
METRIC
IMPERIAL (OLD UK)
USA
2.00 mm
14
B1
2.25 mm
13
B1
2.50 mm
12
C2
3.00 mm
11
D3
3.25 mm
10
D3
3.50 mm
9
E4
3.75 mm
–
F5
4.00 mm
8
G6
4.50 mm
7
7
5.00 mm
6
H8
5.50 mm
5
I9
6.00 mm
4
J10
6.50 mm
3
K10½
7.00 mm
2
–
8.00 mm
0
L11
9.00 mm
00
M13
10.00 mm
000
N15
YARNS
Almost any knitting yarn can be used for crochet but, when making items for little ones, you need to bear a few things in mind. Children can be very fussy – and messy – things and a baby’s skin is delicate. Because of this, you’ll find that a lot of the yarns featured in this book are machine washable. And they are soft too so they won’t irritate the skin of your little treasure – or monster!
Colinette Jitterbug 100% merino wool, 291 m/318 yd per 110 g (4 oz) hank, machine washable (cold wool cycle), tumble dry (low setting).
Colinette Banyan 49% cotton, 51% viscose, 102 m/112 yd per 50 g (1¾ oz) hank, hand wash.
Colinette Prism 50% wool, 50% cotton, 120 m/131 yd per 100 g (3½ oz) hank, hand wash.
Rowan RYC Cashsoft DK (and Cashsoft Baby DK) 57% extra fine merino, 33% microfibre, 10% cashmere, 130 m/142 yd per 50 g (1¾ oz) ball, machine washable (wool cycle).
Rowan Pure Wool DK 100% superwash wool, 125 m/137 yd per 50 g (1¾ oz) ball, machine washable (wool cycle).
Rowan Wool Cotton 50% merino wool, 50% cotton, 113 m/123 yd per 50 g (1¾ oz) ball, machine washable (wool cycle).
Rowan Tapestry 70% wool, 30% soybean protein fibre, 120 m/131 yd per 50 g (1¾ oz) ball, hand wash.
Rowan Handknit Cotton DK 100% cotton, 85 m/93 yd per 50 g (1¾ oz) ball, machine washable (wool cycle).
Rowan Calmer 75% cotton, 25% acrylic microfibre, 160 m/175 yd per 50 g (1¾ oz) ball, hand wash.
Rowan All Seasons Cotton 60% cotton, 40% acrylic microfibre, 90 m/98 yd per 50 g (1¾ oz) ball, machine washable (wool cycle).
Rowan Kid Classic 70% lambswool, 26% kid mohair, 4% nylon, 140 m/153 yd per 50 g (1¾ oz) ball, hand wash.
Rowan Kidsilk Aura 75% kid mohair, 25% silk, 75 m/82 yd per 25 g (1 oz) ball, hand wash.
Rowan Cocoon 80% merino wool, 20% kid mohair, 115 m/126 yd per 100 g (3½ oz) ball, hand wash.
Rowan Big Wool 100% merino wool, 80 m/87 yd per 100 g (3½ oz) ball, hand wash.
Twilleys Freedom Spirit 100% wool, 120 m/131 yd per 50 g (1¾ oz) ball, hand wash.
ABBREVIATIONS
All crochet patterns are written in a sort of shorthand – all the ‘technical’ terms are shortened, or abbreviated, to just a few letters. These abbreviations are standard to almost all crochet patterns and here you’ve got a full list of all the ones you need for the designs in this book. Sometimes there will be a special stitch, or stitch group, used for one particular design only – if this is the case that special abbreviation will appear with the pattern it’s needed for.
TENSION (GAUGE)
The size of a finished piece of crochet is controlled by how big, or small, the stitches and rows are, and the term used to describe this is the ‘tension’ (‘gauge’ in the US). Because the tension governs the size of the finished item and the amount of yarn you will need, it’s really important you crochet at the correct tension.
To check your tension, make a small square of crochet in the stitch used for the garment, using the yarn and the size of hook given in the pattern. Make sure this tension swatch is at least 15 cm (6 in) square so that you can easily count the number of stitches and rows on it.
Once you’ve completed the crochet square, mark out with pins the number of stitches the tension section of the pattern states there should be to 10 cm (4 in). Measure the distance between the pins – if this measurement is 10 cm (4 in) your tension is correct and you are safe to make the garment using that size crochet hook.
If the distance between the pins is less than 10 cm (4 in), you are crocheting too tight and you need to make another swatch using a bigger crochet hook. And if the measurement is more than it should be, your crochet is too loose and you will need to use a smaller hook.
Check your row tension is correct in the same way. Once you’ve worked out what size hook you need to use, use this size of hook for the garment instead of the size stated in the pattern. If other sizes of hook are needed, you’ll need to adjust the size you use here too – if you’ve used one size smaller hook to get the tension required, use one size smaller hook than stated for all the other hooks you need too.
FOLLOWING A PATTERN
All the garments in this book are in more than one size, and the different figures needed for each size are given as a string of figures inside square brackets [ ]. Where only one set of figures is given, this refers to all sizes.
The information inside the round brackets ( ) should be repeated the number of times given after the brackets.
The amount of yarn the pattern says you will need is based on an average requirement and if you alter the length you may need more or less yarn. Each pattern has been designed to work in the yarn stated – and it may not work correctly if any other yarn is used.
The pattern gives details of the order in which you should crochet the different pieces that go together to make up the completed item. This order should be followed as often a later piece will need you to refer back to the size of a previous section, or some pieces need to have already been completed in order to add an edging or band.
CROCHET ABBREVIATIONS
Conversions
Terminology
UK(US term appears in parentheses)
ch – chain (chain)
ss – slip stitch (slip stitch)
dc – double crochet (single crochet)
htr – half treble (half double)
tr – treble (double)
dtr – double treble (treble)
ttr – triple treble (double treble)
yoh – yarn over hook (yarn over)
skip/miss(skip)
tension(gauge)
alt – alternate
beg – beginning
cont – continue
dc2tog – (insert hook as indicated, yoh and draw loop through) twice, yoh and draw through all 3 loops on hook)
dec – decreas(e)(ing)
foll – following
inc – increas(e)(ing)
patt – pattern
rem – remain(ing)
rep – repeat
RS – right side
sp(s) – space(s)
st(s) – stitch(es)
tr2tog – (yoh and insert hook as indicated, yoh and draw loop through, yoh and draw through 2 loops) twice, yoh and draw through all 3 loops on hook
WS – wrong side
0 – no sts, times or rows to be worked for this size
cm – centimetres
in – inches
mm – millimetres
IMPORTANT NOTE TO US READERS!
All abbreviations in the pattern instructions are UK terms. Be sure to use the handy table on this page to convert UK crochet terms to US crochet terms.
COMPLETING THE GARMENT
Once all the main pieces have been crocheted, the garment can be sewn together. It’s often a good idea to press the sections first. This is much easier to do before they are sewn up – especially with small pieces like those that make up a baby garment. You should find all the information you need to press the pieces on the ball band but, if in any doubt, it is usually safe to press the pieces carefully on the wrong side using a warm iron and covering the work with a damp cloth. However, if you are using a totally synthetic yarn, use a cool iron and a dry cloth! Allow all the pieces to cool down and dry naturally before sewing them together.
With each pattern in this book there is a little diagram that shows you the shape each main crocheted piece should be when it is completed. Use these as a guide to what shape your work should be once pressed.
The crocheted pieces can be joined together in 3 ways – by back stitching the seams, over sewing the seams or by crocheting the edges together. Whatever type of seam you decide to work, use the same yarn for the seam as used for the crochet and, in the case of sewn seams, a blunt-pointed sewing-up needle.
Back stitching a seam
This type of seam gives quite a bulky seam on the inside of the garment but can be useful if the edge isn’t totally straight, or to join shoulder seams.
To back stitch a seam, hold the 2 edges to be joined right sides together and work a line of back stitch as close to the edge as you can, working each stitch through both layers of the crochet.
Over sewing a seam
This gives a totally flat seam and it’s a good idea to use this type of seam to join side and sleeve seams.
To over sew a seam, hold the 2 edges to be joined with their right sides together and simply over sew along the edge, working each stitch through both layers. Once the seam is complete and the sections are opened out, you should find this type of seam is virtually invisible and almost totally flat.
Crocheting a seam
This type of seam is a good choice for seams like shoulder seams as it is as elastic as the crochet is and will not split when the garment is put on or taken off.
To crochet a seam, hold the two edges to be joined with their right sides together and attach the yarn at one end of the seam. Using the same size crochet hook as used for the main sections, work a row of double crochet along the edge, working each stitch through both layers.
If there are any buttons, ribbons or trims to be added to a garment it is very important these are very securely attached so there is no risk of them coming off. Babies and toddlers suck everything, and put anything they can in their mouths, and they could easily choke on a button!
THE CROCHET STITCHES
Crochet is very simple and basically consists of just a few different types of stitch.
Starting the work
Before you start any crochet, you need to make your first stitch.
To make this first stitch, make a slip knot by forming the yarn end into a loop and hooking the ball end of the yarn through this loop (fig. A).
Gently pull on the free end of the yarn (not the end leading to the ball) to tighten this first stitch around the body of the hook. You are now ready to make the next lot of stitches. All the following stitches should be worked using the length of yarn that leads to the ball, leaving the free (cut) end of the yarn to be used to sew a seam later if required (fig. B).
FIGURE A
FIGURE B
Chain (ch)
A crochet chain is often used as the base for all the following stitches but it can also be used within a stitch pattern.
To make a chain stitch, take the yarn end that leads to the ball over the crochet hook, wrapping it over, in front and under the hook. Now draw this loop through the loop on the hook to make the chain stitch (fig. C). Continue in this way until the required number of chain stitches have been completed.
FIGURE C
Double crochet (dc)
This is possibly the most basic of crochet stitches.
To make a double crochet, insert the hook into the work. Wrap the yarn around the hook in the same way as for a chain stitch. Draw this new loop through the work – you should now have 2 loops on the hook (fig. D). Wrap the yarn around the hook again and draw this new loop through both the loops on the hook to complete the stitch (fig. E).
FIGURE D
FIGURE E
Treble (tr)
This is the other most commonly used crochet stitch. It’s taller than a double crochet and therefore the work will grow faster if it’s made up of treble stitches.
To make a treble, start by wrapping the yarn around the hook before inserting it into the work (fig. F). Wrap the yarn around the hook again and draw this new loop through just the work, leaving 3 loops on the hook. Now wrap the yarn around the hook again (fig. G). Draw this new loop through just the first 2 loops on the hook. There are now just 2 loops left on the hook. Wrap the yarn around the hook once more (fig. H). Draw this new loop through both of the loops on the hook to complete the treble (fig. J).
FIGURE F
FIGURE G
FIGURE H
FIGURE J
Half treble (htr)
This type of stitch is taller than a double crochet but shorter than a treble and it’s made in a similar way to a treble.
To make a half treble, wrap the yarn around the hook and insert it into the work. Wrap the yarn around the hook again and draw this new loop through the work, leaving 3 loops on the hook (fig. K). Wrap the yarn around the hook again but this time draw this new loop through all 3 loops on the hook to complete the half treble (fig. L).
FIGURE K
FIGURE L
Double treble (dtr)
This stitch is taller than a treble. To make a double treble, wrap the yarn twice around the hook before inserting it into the work. Wrap the yarn around the hook and draw this new loop through the work, leaving 4 loops on the hook. Wrap the yarn around the hook again. Draw this new loop through just the first 2 loops on the hook. There are now 3 loops left on the hook. Wrap the yarn around the hook once more. Draw this new loop through just the first 2 loops on the hook. There are now 2 loops on the hook. Wrap the yarn around the hook again. Draw this new loop through both of the loops on the hook to complete the double treble.
Taller stitches
Stitches that are taller than a double treble can be worked in a similar way. For a triple treble (ttr), wrap the yarn around the hook 3 times before inserting it into the work. Wrap the yarn around the hook and draw this new loop through the work. *Now wrap the yarn around the hook again and draw the new loop through just the first 2 loops on the hook. Repeat from * until there is only one loop left on the hook – the triple treble is now completed.
Bigger trebles can also be made in this way – for each extra bit of height to the stitch, wrap the yarn around the hook once more before inserting it into the work (4 times for a qtr). Complete each bigger stitch in the same way – by drawing each new loop through just the first 2 loops on the hook until only one loop remains.
Slip stitch (ss)
This stitch is often used to join sections or to move the crochet hook to another point to work the next set of stitches.
FIGURE M
FIGURE N
To make a slip stitch, insert the hook into the work. Wrap the yarn around the hook and draw this new loop through both the work and the loop on the hook to complete the slip stitch (figs. M and N).
PLACING THE STITCHES
Different crochet stitch patterns are often made up of the same sort of stitches but where these stitches are placed can alter the effect they create.
Working into the top of stitches
This is the standard way to place the next set of stitches and, unless a pattern says otherwise, this is how all the stitches should be worked.
Across the top of each crochet stitch is a little ‘V’ formed by the yarn. Insert the hook through the work so that it slides under both of the bars that make up this ‘V’ (fig. O).
FIGURE O
Working into chain stitches
As with all other crochet stitches, a chain stitch has a ‘V’ of yarn on one side, with a third bar of yarn running across the back.
When working into a chain stitch, insert the hook through the centre of the ‘V’, picking up the underneath bar at the same time. This leaves just the front bar of the ‘V’ not enclosed in the stitch (fig. P).
FIGURE P
Working into the front (or back) of a stitch
By picking up just the front (or back) bar of the ‘V’ different effects can be created.
To work into the front loop (or bar) only, insert the hook through the work by sliding it under just the front bar that forms the ‘V’, and thereby picking and enclosing just one strand of yarn in the stitch. The remaining bar of yarn that formed the ‘V’ will sit on the surface of the work, forming a neat line across it (fig. Q).
FIGURE Q
Working into the back loops (or bars) only in the same way will leave a line across the opposite side of the work (fig. R).
FIGURE R
Working between stitches
Rather than working a new stitch into the top of the existing stitches, a new stitch can be worked between the stitches of the previous row. Obviously this is a lot easier to do if the previous stitches were tall stitches and it’s easy to see where one stitch ends and the next stitch begins!
FIGURE S
To work a stitch between the stitches of the previous row, simply insert the hook through the work between the ‘stalks’ that make up the previous stitches. Working stitches in this way means you are not adding as much height to the work as you would if you were working into the top of them, and you are enclosing the strands of yarn that join the two stitches in this new stitch (fig S).
Working into chain spaces
A stitch pattern that is made of up lengths of chain between other crochet stitches will have what is termed a chain space (ch sp) underneath the length of chain stitches. To work into a chain space, simply insert the hook through this ‘hole’ before wrapping the yarn around the hook to make the new stitch (fig. T).
FIGURE T
MAKING FABRICS
Crochet stitches can be joined together to make a crochet fabric in two ways – in rows, or in rounds.
Working in rows
Working backwards and forwards in rows of crochet stitches that all sit neatly on top of each other forms a flat fabric. Each row of new stitches is worked from the right towards the left. At the end of the row, the work is turned and the next row of stitches is again worked from right to left. At the beginning of each row, the working loop, and the hook, needs to be raised up to the height of the stitches that are to be used for this new row. To do this, a short length of chain – known as a turning chain – is made. The length of this chain varies depending on the type of stitch being worked. Sometimes this length of chain will take the place of the first stitch of the new row, sometimes it won’t – but your pattern should tell you whether it does or not. If the turning chain does count as the first stitch of the row, you must work into the top chain stitch when working back across the stitches so that no accidental decreases are made and the number of stitches remains constant (fig. V).
FIGURE V
Working in rounds
As there is only ever one crochet stitch on the hook at any one time, it’s really easy to work circular pieces of crochet by working round and round the work, instead of in rows. These circular pieces of crochet can form flat disks or tubes. Each new round of crochet is worked in the same sort of way as each new row of crochet, and at the beginning of each round there will be the turning chain. But, to join the end of each round to the beginning of it – and thereby form a tube or flat disk – the last stitch needs to be joined to the first stitch. Once all the stitches of the new round are complete, the ends are usually joined by working a slip stitch into the top of the turning chain (fig. W). When working in rounds of crochet there is no real need to turn the work at the end of each round. However, as crochet stitches look different on one side to the other, sometimes a pattern will tell you to turn the work after each round so that the required effect is created. If the pattern says ‘turn’, then you should. If it doesn’t, then don’t!
FIGURE W
FASTENING OFF
Once a crochet section is completed, there will still be the one working loop – or stitch – on the hook.
To permanently fasten off this last stitch, cut the yarn about 10–12 cm (4–5 in) from the work. Take the yarn around the hook in the usual way and draw this cut end of yarn through the last stitch. Pull gently on the cut end to tighten the last stitch. Depending on how the pieces are to be joined together, cut the yarn so that a long end is left as this can be used to sew the seams.
SHAPING IN CROCHET
Obviously not all garments are made up of straight pieces of crochet, or shapeless tubes! So, at some point, you may need to increase or decreases stitches to make the piece the shape it should be.
There are lots of different ways this shaping can be worked and each method is more suited to one stitch pattern or shape than another. The patterns in this book will explain the way each piece should be shaped to achieve the desired end result.
WORKING WITH MORE THAN ONE COLOUR
The loop actually on the hook before a stitch is worked forms part of the new stitch. Therefore, if more than one colour is being used, you need to change to the new colour to complete the last ‘yarn over hook and draw this loop through’ stage. This will avoid messy lines where the 2 colours meet.
FANCY STITCH PATTERNS AND GROUPS
The basic crochet stitches can be grouped together or placed within the work to make a myriad of different effects. Whatever the effect created, each individual stitch will be worked in the way it would be normally – it is how it is placed within the work that creates the stitch pattern.
Sometimes one or more basic stitches are combined to create a special effect or type of stitch. If this is the case, you will find that a special abbreviation is used for this group of stitches, and how this group of stitches should be worked will be explained in the ‘abbreviations’ section of the pattern. Before you start your crochet, it’s a good idea to read this section and practice the stitch group so that you know exactly what you are meant to do.
ADDING EDGINGS AND BANDS
Once the main crocheted pieces have been worked and any seams joined, you’ll often find that edgings or bands are often worked to complete the item.


