Erhalten Sie Zugang zu diesem und mehr als 300000 Büchern ab EUR 5,99 monatlich.
- Herausgeber: Fox Chapel Publishing
- Kategorie: Lebensstil
- Sprache: Englisch
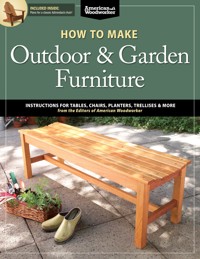
Enjoy outdoor living to the fullest with these 22 functional and decorative furniture projects. Superb step-by-step photographs and excellent working drawings help ensure success. The time to complete each project ranges from a few hours to a couple of weekends, making this book an ideal resource for transforming your backyard or deck. From Adirondack chairs, patio bars, and picnic tables to showcase Victorian trellises and planters, these attractive pieces will beautify your outdoor space.
Sie lesen das E-Book in den Legimi-Apps auf:
Seitenzahl: 224
Veröffentlichungsjahr: 2018
Das E-Book (TTS) können Sie hören im Abo „Legimi Premium” in Legimi-Apps auf:
Ähnliche


HOW TO MAKE
Outdoor & GardenFurniture
HOW TO MAKE
Outdoor & GardenFurniture
INSTRUCTIONS FOR TABLES, CHAIRS, PLANTERS, TRELLISES & MORE
from the Experts at American Woodworker
Introduction by Randy Johnson Editor, American Woodworker magazine
Contents
Introduction
Outdoor Finishes
Crisscross Picnic Table
Tile-Topped Outdoor Table
Café Table
Patio Table
Patio Bar
Patio Chair
Adirondack Chair
Adirondack Love Seat
Craftsman Style Outdoor Chair
Garden Bench
Garden Chair
Outdoor Rietveld Chair
Rustic Chair
Hammock Stand
Handsome Patio Planter
Nine-Pot Plant Stand
Shingled Patio Planter
Vine Trellis
Planter Bench
Cypress Chest
Showcase Victorian Trellis
Garden Arbor
Introduction
Outdoor Living
Whether you’re a summertime or wintertime woodworker, taking a break from your shop to enjoy some time out-of-doors is always worthwhile. It gives you a chance to shake the dust out of your hair and enjoy some time with your family and friends. Your time outside can be made even more enjoyable when it includes a few projects that you’ve built yourself. The outdoor projects in this book include designs for yard, patio and garden. Some of them are easy to build with a minimum amount of time and materials, while others provide a chance for you to build your skills and show off your talent as a woodworker. All of the projects will provide added enjoyment to your time spent out-of-doors.
If you’re new to woodworking, consider building one of the planters on pages 118-134. They use basic home center materials and simple construction techniques, but the end result will still earn you many compliments. If you’re ready for a real challenge and want to tackle a major project, then there’s plenty in this book for you as well. My personal favorite is the Crisscross Picnic Table (page 16), but my close seconds include the oak Patio Table (page 36) and the cedar Patio Bar with woven bamboo panels (page 44). Be prepared to stretch yourself if you tackle one of these larger projects, but you can be sure of one thing: all the projects in this book were designed and build by the editors themselves and will provide years of service if properly maintained.
This brings us to the important topic of finishing. Some woods weather nicely without a finish, but most woods, even those naturally resistant to decay, benefit from the addition of some type of finish. That’s why we’ve dedicated an entire chapter (pages 10-15) to finishing and maintaining outdoor wooden projects. In short, you have three options: exterior oil, exterior varnish, and epoxy sealer. Each is progressively more durable, but also more work to apply. Which one you choose will depend on the project and your budget (time and money). I’ve used all three and found them to perform just as we describe in this book. With all these tools at your disposal, you will soon be building impressive, lasting pieces for your home. You can find additional information on building and finishing outdoor projects at AmericanWoodworker.com.
—Randy Johnson, editor
by BRAD HOLDEN AND RANDY JOHNSON
Outdoor Finishes
SIMPLE TO SUPER DURABLE
Outdoor finishes have one thing in common; they all require maintenance. Of course, paint is unequaled at protecting the wood from its two biggest enemies: moisture and ultraviolet (UV) light. Moisture causes the wood to rot, and sunlight bleaches out its natural color. Still, who wants to cover-up beautiful wood with paint? If you want the wood to show through on your outdoor projects, you need a clear finish.
There are three basic clear finishes for outdoor furniture: exterior oil, exterior varnish, and an epoxy sealer with an exterior varnish topcoat. Application ease and service life are the two major differences between these finishes.
Of the three clear exterior finishes, exterior oil is by far the simplest finish to apply. Just flow it on, let it soak in, and wipe off the excess. Unfortunately, oil offers the least amount of protection and it must be reapplied every season. Exterior varnish, on the other hand, is more difficult to apply: up to 8 coats have to be carefully brushed on. While exterior varnish offers excellent protection from moisture and UV light, it has to be recoated every few years to maintain that protection. An epoxy sealer with an exterior varnish topcoat is the most durable outdoor finish and can last for many, many years. However, the initial application does take longer then exterior varnish.
Exterior Oils
An exterior oil finish is definitely the simplest, quickest way to treat an outdoor project. On the downside, it will only give you about a year of protection from the ravages of outdoor life. Oil finishes don’t provide a protective film that sits on top of the wood like varnish does. Instead oil soaks into the wood fibers and dries. Exterior oils have added trans-oxide pigments for UV protection and mildewcides to protect against mold and mildew. You’ll find colors ranging from dark brown to light amber.
Application is simple: a garden sprayer and a rag are all you need. First, flood the surface of your project with oil. I use an inexpensive hand pump garden sprayer. It’s fast, easy and only costs about $8.00. Let the oil soak in according to the manufacturer’s directions, then wipe it off. That’s it. Done! Depending on local conditions, you’ll have to reapply about once per year. The built-in UV protection should keep your wood looking natural for many years (as long as you keep up with the applications).
Exterior Varnish or Urethane
Exterior varnish or urethane (both finishes are technically “varnishes”) builds a protective layer over the wood. It offers superior protection and durability over an oil finish. Often, the term “Spar” is found in the name, but this does not indicate any additional or special ingredient. The term “Spar” originates with its use as a coating for the spars on sailing ships. All exterior varnishes are formulated to protect against moisture and UV radiation.
Exterior varnish is applied with a natural bristle brush in multiple coats. Manufacturers recommend eight thin coats for maximum protection and a deep lustrous finish. Sand the hardened varnish lightly between each coat.
Exterior varnishes cure to a more flexible film than ordinary varnish. The flexible coat is not as likely to crack from seasonal wood movement caused by humidity extremes in an outdoor environment.
Exterior varnish will usually last 2-3 years before it starts to look chalky. As soon as you see a chalky film start to develop, it’s time to freshen the finish. Simply sand the topcoat smooth, and apply a new coat of varnish. Don’t put this important maintenance step off too long or cracks will develop in the finish allowing moisture to penetrate and degrade the wood. That will necessitate a complete strip and refinish to restore the furniture. You don’t want to go there.
Epoxy with Exterior Varnish
An epoxy sealer with exterior varnish topcoats is the most durable, but also the most labor-intensive finish you can apply to outdoor furniture. This is the finish favored by boat builders so you know it’s going to last a long time. Epoxy and exterior varnish enjoy a symbiotic relationship: The epoxy forms an impenetrable moisture barrier that prevents seasonal swelling and shrinking of the wood. This dimensional stability in turn gives longer life to the exterior varnish because it no longer has to stretch and shrink with the wood The exterior varnish returns the favor by providing UV protection, without which the epoxy would rapidly deteriorate.
Apply three thin coats of epoxy. The best way to get thin, even coats is to use a foam roller cut in half. It works kind of like a squeegee. Epoxy cure times vary depending on their formulation and the ambient temperature. Be sure to use an epoxy with a long enough open time (approximately 30 minutes), so it doesn’t set up before you’re done putting it on. For large projects, mix the epoxy in small batches so you can finish an area before the epoxy sets. Also, for optimal flow out and penetration into the wood fibers, make sure the epoxy you use doesn’t contain any thickeners. Always read and follow the instructions that come with your epoxy. If possible, apply the epoxy undercoat prior to assembling the parts. You can recoat without sanding while the previous coat is still soft but not sticky. If the epoxy seems uneven or bumpy, allow it to harden. Then, sand it smooth and apply the next coat.
Before applying the varnish topcoats, I use a card scraper or sanding block with 100–120 grit sandpaper to level the cured epoxy (see photo below left). The sanded surface also provides some tooth for the spar varnish to adhere to.
Rinse the sanded epoxy with clean water and dry with paper towels. The rinse water should not bead on the surface. Beading indicates that contaminants from the epoxy curing process are still on the surface and could interfere with the varnish bond. To remove the contaminants, wipe down with mineral spirits and dry with paper towels or a rag. Follow this with eight coats of exterior varnish, sanding lightly between coats.
Sand out any unevenness and defects in the cured epoxy before applying the exterior varnish topcoats.
Oil Finish Virtues and Vices
Exterior oil finishes are a good alternative to exterior varnish. Exterior oils are very easy to apply—just brush or spray them on, let them soak into the wood and then wipe off the excess. Unlike varnish, exterior oils don’t form a film on the surface, so there’s nothing to crack or peel. Modern exterior oil finishes provide good water repellency. Most offer resistance to ultraviolet light (UV) and mildew.
On the other hand, exterior oil finishes must be reapplied as often, if not more often, than film finishes. This can range from every couple of months to every couple of years. But since exterior oil finishes are so easy to apply, maintaining them is not difficult. Some exterior oil finishes should not be used on outdoor furniture, because they can rub off on clothing. Before you buy, double-check the product’s label, or ask your paint dealer to make sure it’s appropriate for furniture use.
Finishing your outdoor project with exterior oil has three benefits. First, an exterior oil finish seals the wood so it repels water. Water repellency stabilizes the wood by minimizing the rapid swelling and shrinking that’s caused by the periodic absorption of rainwater. Repeated wood movement inevitably leads to checks and cracks—even in rot-resistant woods such as cedar, white oak and teak. Checks and cracks hasten decay by allowing water to penetrate deep into the wood.
Second, most exterior oil finishes contain an additive to prevent mildew (called “mildewcide;” check the label). Mildew causes unfinished outdoor wood to turn blotchy, especially in humid climates or in shaded, wind-protected areas that are slow to dry out. Mildew is mainly a surface problem, but it makes wood look dirty and it will rub off onto clothing.
Exterior oil finish formulations include clear, toned, semi-transparent and opaque, depending on how much pigment they contain. Clear finishes (which add an amber color to the wood) need to be reapplied every couple of years, because they afford limited resistance to the sun’s ultraviolet light. Opaque finishes last the longest, because they contain the most pigments, but they also obscure most of the grain.
Pigmented exterior oil finishes come in a wide array of colors.
Third, most exterior oil finishes contain additives that keep outdoor wood from turning gray by blocking the sun’s ultraviolet light. The sun’s ultraviolet light is the culprit that grays wood. UV-blocking additives also protect the finish itself from degradation. Generally, UV resistance increases with the amount of pigment an exterior oil finish contains; in other words, the more opaque the finish, the better its UV resistance. That’s why paint is the ultimate in UV protection. Here’s a tip: Who says you can’t have your cake and eat it too? If you like the gray, weathered look, choose a gray-pigmented oil finish. Then you’ll still get the other benefits of having a finish on your outdoor wood.
Show the Grain
You have several choices if you want the wood’s grain to show. Exterior oil finishes are available as clear oil or with pigments added. Clear finishes are actually amber-colored, because of the oil they contain—they give the wood a rich, oiled look. Pigmented oil finishes add color to the wood.
Apply exterior oil finish with a brush or spray. Thoroughly saturate the surface and then brush out or rag off any finish that doesn’t soak in.
Revitalize Gray Weathered Wood
If your furniture has turned gray or dull, you can restore its natural beauty by using a wood cleaner before you stain. Wood cleaners are often called “deck cleaners.” They’re available at most paint stores and home centers. Apply the cleaner with a brush or sprayer and let it soak awhile. Then scrub briskly and hose it off. When the wood is thoroughly dry, it’s ready for a fresh coat of finish.
Weathered and gray, this redwood board has gone through many seasons without being finished.
Cleaned and brightened, this section of the board appears much lighter.
Finished with pigmented exterior oil,this section of the board looks virtually brand-new.
They’re generally available in three formulations: toned (or transparent), semi-transparent or opaque, depending on the amount of pigment they contain.
As you can probably guess, there’s a tradeoff between an exterior oil finish’s clarity and its longevity: longevity increases—and clarity decreases—according to the amount of pigment a stain contains.
Soak, Then Wipe
The best way to apply an exterior oil finish is with a brush; you can also use a hand-pump-style sprayer (available at garden stores and home centers for about $15). Saturate the surface with finish and keep it wet until the oil stops being absorbed. This process can take from five minutes to half an hour, depending on the type of wood and the brand of finish. Some brands recommend two or more coats. Pay special attention to the end grain, as it will absorb more finish than face grain. Brush out or rag off any oil that remains on the surface of the wood to avoid sticky, shiny spots.
An easy test determines the condition of an exterior oil finish. If the water soaks in, it’s time to recoat.
Maintenance is Mandatory
Knowing when to re-apply an exterior oil finish is the key to keeping outdoor wood looking good. If you wait until the finish breaks down, the wood will turn gray, and cracks, checks and mildew may appear. Fortunately, there’s an easy way to tell when it’s time to recoat. It’s called the splash test. You simply splash some water onto your furniture. If it soaks into the wood, it’s time to recoat.
Most clear exterior oil finishes are warranted by the manufacturer to last a couple years. However, a clear oil finish that’s constantly exposed to intense sunlight will likely need to be renewed more often. Semi-transparent oil finishes may be warranted up to 5 years; opaque finishes are usually warranted even longer.
Outdoor furniture will accumulate a layer of dirt and grime over time, so hose it down and scrub it a bit prior to recoating. Let the wood dry thoroughly before applying the fresh coat of finish.
User-Friendly Oil Finishes
New “hybrid” exterior oil finishes last longer than traditional linseed or alkyd oil finishes, according to the manufacturers, and allow soap-and-water cleanup to boot. Instead of simply being dissolved in solvent, the penetrating-oil molecules in these finishes are coated with acrylic resins and are carried in a water-based formulation. As a result, these finishes contain fewer volatile organic compounds (VOC) than traditional oil finishes, and their “acrylic-oil” chemistry provides superior longevity.
by CHAD STANTON
Crisscross Picnic Table
IT SEATS UP TO 8, BUT NO ONE HAS TO STRADDLE A LEG
Every summer, my uncle Bob tends the grill at our family gatherings and is the last one to the picnic table. He always gets stuck with a middle seat. We’d cheer him on as he groaned and struggled to get into it—a lot of fun, but not a pretty sight.
Last fall, at our Labor Day feast, I resolved to build a new picnic table with seats that every person could slip right into. I call it the Crisscross, after the shape of its base. This one’s for you, Bob.
The Wood
I started designing the table for standard 2x6 lumber, but one day a buddy suggested that I use a new material: thermally modified wood. It’s Southern yellow pine that’s been heated to a very high temperature, making it rot-resistant. The process also gives the wood a beautiful chocolate color, inside and out, which nicely complements our home’s cedar shakes and the artificial stone below it. The boards are amazingly flat and stable. I had to try it!
My friend builds decks for a living. He had a bunch of thermally modified wood left over from a job—enough to build this table. I gladly offered to buy it and had a great time working with it, although I did have to alter my plans a bit. The wood I used is thinner and narrower than standard material. (It’s 1-1/4" thick and 5" wide; standard boards are usually 1-3/8" thick and 5-1/4" wide.)
You’ll need about 24 pieces of 8' long 2x6s to build this table. The cutting list will work fine if you’re using standard lumber, but your top will be nine boards wide, rather than ten. Let’s get going!
Build the Cross Stretchers
Begin by making the crisscross stretchers (A). Saw them to length, cutting angles on their ends (Photo 1). Cut dadoes in the middle of each piece using a router or a tablesaw (Fig. B).
Make the pieces that go between the stretchers: the end spacers (B) and middle spacers (C). Using an exterior yellow glue, glue and screw these pieces to two of the stretchers. Sand all the mating surfaces first, so the glue will adhere better. (Note that the middle spacers are aligned with the sides of the dadoes you just cut.) Glue and screw a second stretcher on top of the spacers (Photo 2). You should now have two identical stretcher assemblies.
Cut the four crisscross stretchers of the base to the same length. Miter their ends at 22-1/2°. All miter saws have a detent for this commonly used angle.
Figure A: Exploded View
Figure B: Stretcher Details
Figure C: Stretcher Details
Cutting List
Overall Dimensions: 6' 7" Sq. x 31" H; Top is 49" dia.
Part
Name
Qty.
Th x W x L
A
Cross stretcher
4
1-1/4" x 5" x 76-3/4"
B
End spacer
4
1-1/4" x 2" x 13-1/2"
C
Middle spacer
4
1-1/4" x 5" x 4-1/2"
D
Leg
4
1-1/4" x 5" x 33-7/8"
E
Long brace
2
1-1/4" x 2" x 47-1/4"
F
Short brace
2
1-1/4" x 2" x 27"
G
Top board
6 (a)
1-1/4" x 5" x 49-1/2"
H
Top board
2
1-1/4" x 5" x 45"
J
Top board
2
1-1/4" x 5" x 36"
K
Top cleat
2
1-1/4" x 5" x 45-1/4"
L
Outer seat board
8
1-1/4" x 5" x 40"
M
Middle seat board
4
1-1/4" x 3-1/2" x 40"
N
Seat cleat
8
1-1/4" x 2" x 12"
P
Seat leg
8
1-1/4" x 5" x 16-3/4"
Q
Leg stretcher
4
1-1/4" x 5" x 24"
Notes:a) If you are using 5-1/4" wide material, only 5 boards are needed.
Glue and screw the stretchers together. Note the dadoes in the middle of each stretcher. These cutouts are needed to create a square hole large enough for an umbrella pole.
Cut half-lap notches in the center of each stretcher assembly. It’s best to use a crosscut sled, as shown here, to prevent this large piece from wiggling.
Add two legs to each stretcher assembly. Use spacing pieces to make sure the legs are set at the correct angle and position. Use a long level to make sure the tops of the legs are even.
Fit the stretcher assemblies together. Use handscrews or blocks to hold one assembly upright while you drop the second assembly in place.
These assemblies will nest together with large half-lap joints. Draw these joints in the center of each assembly. When you lay out the joints, be sure that one notch will be on the top of the assembly and the other notch on the bottom. The angled ends are your guide as to which side is top and which is bottom. Cut the notches on the tablesaw (Photo 3). You can use a standard blade or a dado blade. (If you use a dado blade, don’t take off too much in one bite.)
Make the legs (D, Fig. C). Notch the top of each leg as shown. Round over the bottom ends of the legs with a router. To help assemble the legs, make a pair of spacing pieces that are the same width and length as the portion of the leg that extends below the cross stretchers. You can use offcuts from the legs or pieces of plywood to make these pieces. Clamp the spacers to the bottom of the legs and insert the legs through the stretcher assembly (Photo 4).
Fine-tune the position of the legs by lining up their ends with a long level or straightedge. Once the legs are aligned, clamp them in place. Run two lag screws through the stretchers and the legs (Fig. A).
Finish the Base
Join the two stretcher assemblies together (Photo 5). For maximum strength, use glue and screws. If you intend to take the table apart for moving or storage (or just to get it out of the shop!), skip the glue and screws.
Make the long braces (E) and short braces (F). Cut dadoes in the center of the long braces (Fig. A). These dadoes are oversized so you don’t have to be extremely fussy when positioning the braces. Glue and screw all four braces to the legs (Photo 6).
Add braces to the legs for attaching the top. The long braces have dadoes cut in them to accommodate the umbrella pole.
Assemble the top. Place 8d nails between the boards to create equal gaps. Clamp the boards to keep them from shifting, then fasten cleats across the boards.
Fasten the base to the top. It’s easiest to do this on a bench, with the base upside down. Before you begin, though, make sure you can get the table out through your shop’s door—it’s big!
Rout the top into a circle, using a plunge router mounted on a plywood trammel. First, plunge holes on both sides of each board to prevent splintering (see inset). Then rout the full circle.
Make the seats. Fasten three seat boards together with cleats, like the top. Then nail a plywood template to the top of each seat and rout around the template, using a guide bushing in your router.
Fasten the seats to the base. This operation is much easier if the table is upside down, but you’ll definitely need help turning it over!
Add the Top
Cut the top boards (G, H and J) to length. Assemble them in a symmetrical pattern (Fig. D), using 8d nails or 1/8" spacers between the pieces.
Note: If you’re using standard-width lumber to build this table, make the top from nine pieces, not ten pieces as shown.
Clamp the top pieces together (Photo 7). Make the top cleats (K) and glue and screw them to the top boards. Remove the clamps and place the base on the top. Fasten the base to the top (Photo 8). Get some help and turn the table over onto the floor.
You can use a jigsaw to cut the top into a circle, but a plunge router equipped with a long 1/2" dia. straight bit will create a smoother surface. To guide the router, make a plywood trammel (Fig. E). Mark the center of the top and nail the loose square piece to the table. Remove the subbase from your router and fasten the router to the trammel. Place the trammel on the square piece nailed to the table.
Add the legs and a stretcher. Now the seats will support plenty of weight—and even a few rambunctious kids jumping on them.
Rout a hole in the center of the table for an umbrella pole. Make a template with a hole in it to guide your router. Add the umbrella and pour the lemonade!
Set the router to make a plunge cut all the way through the top. To prevent the edges of the boards from splintering as you rout around the circle, make a series of plunge cuts on both sides of each board (Photo 9). Then reset the router to cut one-third of the way through the top and rout a full circle. Reset the router to make deeper cuts and keep routing until you’ve cut all the way through. Use a 1/8" dia. roundover bit to ease the top’s edge.
Add the Seats
Make the seat boards (L and M) and seat cleats (N). Glue and screw the cleats to the boards (Fig. F). Make sure the cleats are parallel to each other—a plywood spacer would help here.
Make a 1/4" plywood template for shaping the seats. Nail the template to a seat assembly (Photo 10). Use a plunge router equipped with a 5/8" o.d. guide bushing and a 1/2" straight bit to rout around the template. Round over the seats’ edges.
Fasten the seats to the base (Photo 11). Make the seat legs (P) and fasten them to the cleats. Make the leg stretchers (Q) and fasten them between the legs (Photo 12).
Drill or rout a hole in the tabletop for the umbrella pole (Photo 13). If you use a router, make a template with a 2-1/8" dia. hole and nail it to the top. Use the same guide bushing and bit as you used for the seat.
Figure D: Top Layout
Figure E: Trammel
Figure F: Seat Pattern


