Erhalten Sie Zugang zu diesem und mehr als 300000 Büchern ab EUR 5,99 monatlich.
- Herausgeber: Fox Chapel Publishing
- Kategorie: Lebensstil
- Sprache: Englisch
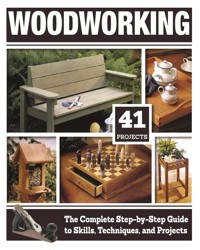
Get the expert guidance you need to become a master woodworker! With 448 pages, more than 1,000 lavish full-color illustrations, easy-to-follow diagrams, and step-by-step instructions to walk you through each and every phase of the process, Woodworking outstrips all competitors in affordability, accessibility, and comprehensiveness. From setting up a workshop to the principles of good design, how to use tools and essential techniques, it's the only reference that aspiring craftsmen need to start creating fantastic woodworking projects right away. This big book covers choosing wood, measuring, marking and layout, cutting, joinery, drilling, shaping, clamping, gluing, fastening, finishing and more. But where a lot of woodworking books only show you some skills, this giant woodworking compendium goes on to give you 41 complete home furnishing project plans so you can put your skills to use.
Sie lesen das E-Book in den Legimi-Apps auf:
Seitenzahl: 637
Veröffentlichungsjahr: 2019
Das E-Book (TTS) können Sie hören im Abo „Legimi Premium” in Legimi-Apps auf:
Ähnliche


© 2005, 2019 by North American Affinity Clubs
Published by Fox Chapel Publishing Company, Inc., 903 Square Street, Mount Joy, PA 17552.
All rights reserved. No part of this publication may be reproduced, stored in a retrieval system or transmitted, in any form or by any means, electronic, mechanical, photocopying, recording or otherwise, without the prior written permission of the copyright holders.
Fox Chapel Publishing Team:
Vice President-Content: Christopher Reggio
Editor: Katie Ocasio
Copy Editor: Jeremy Hauck
Designer: Chris Morrison
Original Publishing Team:
Creative Director: Tom Carpenter
Managing Editor: Heather Koshiol
Senior Book Development Coordinator: Jennifer Weaverling
Book Design and Production: Teresa Marrone
Editor: Mark Johanson
Photo Production Coorinator: Dan Cary
Editorial Coordinator: Chris Marshall
Writers: Steve Anderson, John English, Kam Ghaffari, Bill Hylton, Jeff Jewitt, Mark Johanson, Bruce Keiffer, Chris Marshall, and Richard Steven
Design, Art Direction, and Production: John Drigot, Marti Naughton, and Bill Nelson
Photography: Kim Bailey, Ralph Karlen, Mark Macemon, and Tad Saddoris
Technical Advisors: Tom Deveney, Robert Ginn, and John Nadeau
Contributing Illustrators: Craig Claeys, John Drigot, Bruce Keifer, and Bill Nelson
Project Builders: Tom Deveny, Bob Ginn, Jon Hegge, Rod Mechem, John Nadeau, and Eric Sorensen
Project Designers: Dan Cary, Tom Deveny, John Drigot, Mark Johanson, Bruce Kieffer, Chris Marshall, and Rod Mechem
Production Assistance: Brad Classon, Rod Mechem, and John Nadeau
Special thanks to: Terry Casey and Janice Cauley
Print ISBN 9781497100053
eISBN 9781607656517
Library of Congress Cataloging-in-Publication Data
Names: Fox Chapel Publishing.
Title: Woodworking.
Description: Mount Joy, PA : Fox Chapel Publishing Company, Inc., [2019] |
Includes index.
Identifiers: LCCN 2018053929 (print) | LCCN 2018059641 (ebook) | ISBN
9781607656517 (ebook) | ISBN 9781497100053 (paperback)
Subjects: LCSH: Woodwork.
Classification: LCC TT185 (ebook) | LCC TT185 .W66 2019 (print) | DDC
745.51--dc23
LC record available at https://lccn.loc.gov/2018053929
To learn more about the other great books from Fox Chapel Publishing, or to find a retailer near you, call toll-free 800-457-9112 or visit us at www.FoxChapelPublishing.com.
We are always looking for talented authors. To submit an idea, please send a brief inquiry to [email protected].
For a printable PDF of the patterns used in this book, please contact Fox Chapel Publishing at [email protected], with 9781497100053 and Woodworking in the subject line.
Table of Contents
Welcome to Woodworking
Chapter 1: Workshop Essentials
Setting Up Shop
Safety Equipment
Tips for Dust Collection (and Dust Collection Systems)
Tips for Keeping a Tidy Workshop
General Tips for Shop Tool Maintenance
Hardwood vs. Softwood
Sources for Buying Lumber
Common Hardwoods
Common Softwoods
Sampling of Exotics
Chapter 2: Woodworking Tools & Skills
MEASURING, MARKING & LAYOUT
Tips for Scribing & Laying Out
Tricks for Measuring & Layout
Drawing Curves & Arcs
CUTTING
Choosing & Using Handsaws
Band Saw & Jigsaw Blades
Circular Saw Blades
Cutting with Circular Saws
Tips for Making Curved Cutouts
Tips for Cutting with a Power Miter Box
Tips & Techniques for Using Your Table Saw
Cutting with Wood Chisels
Cutting Project Parts
Tools for Cutting Parts
Making Rip-Cuts
WOOD JOINERY
Casework vs. Furniture Making
Dado & Rabbet Joints
Cutting Dovetail Joints by Hand
Cutting Finger Joints with a Jig
Making Mortise-and-Tenon Joints
Lap Joints & Their Variations
DRILLING
Guide to Common Drill Bits
Helpful Drilling Guides
SHAPING
Follow the Grain as You Plane
Traditional Shaping Tools Have a Place in Any Shop
Working with Routers
CLAMPING, GLUING & FASTENING
Choosing Adhesives
Clamping Tips
Clamping & Gluing Techniques
Gallery of Clamps
Fastening
SANDING & FINISHING
Sanding Strategies
Sanders & Sanding Blocks
Sanding Tips
Cabinet Scrapers
Plugging Screw Counterbores
Paintbrushes & Pads
How to Revitalize Hardened Paintbrushes
Using Chemical Strippers
Chapter 3: Projects
INDOOR FURNISHINGS & ACCESSORIES
Plant Stand
Library Bookends
Oak Cabinets
Butcher-Block Wine Bar
Nightstand
Wall-Hung Coatrack
Colonial Step Stool
Oval Picture Frame
Display Cabinet
Shaker-Style Keepsake Box
Jewelry Box
Inlaid Tea Tray
Spice Shelves
Crosscut Trivets
Knife Storage Block
Display Coffee Table
Treasure Chest
Desktop Bookrack
Mission Table
Magazine Rack
Deluxe Tool Chest
JUST FOR KIDS
Kid’s Wall Clock
Building Blocks
Schoolhouse Desk
Double-Drawer Chessboard
Domino Set
Booster Bench
Rocking Horse
Doll Cradle
Funtime Toy Box
OUTDOOR FURNITURE & ACCESSORIES
Planters
Daytripper Chair
Daytripper Table
Basic Adirondack Chair
Teak Cocktail Table
Porch Glider
Full-Shelter Doghouse
Garden Bench
Potting Bench
Cedar Bird Feeder
Up-and-Away Wind Chime
Dial-a-Bird
Woven Wood Deck Chair
Window Box
Photo Credits
WELCOME TO WOODWORKING
My uncle Darrel has been an avid woodworker since I’ve known him. Whenever my family would drive down for a visit while I was growing up, the first place I wanted to go was always Darrel’s workshop. In preparation for my visit, he’d set aside a few scraps and cutoff pieces for me to experiment with. At first I was only allowed to use a coping saw, a tack hammer, and a few other hand tools that weren’t particularly dangerous. But as I grew older and more experienced, he let me use more powerful tools and build more complex projects.
During my sophomore year of high school, I spent a weekend with Uncle Darrel helping him build a futon frame from a birch tree he’d felled on his land then rough-cut and air-dried in his garage. I almost cried when, at the end of the weekend, he gave it to me. I slept on that futon all throughout college and I thought of it often as I developed my own woodworking skills and finally set up a shop of my own.
Woodworking is like that. In fact, just about anyone who has taken the hobby beyond the obligatory birdhouse in junior high industrial arts class has a story like the one I always tell about the birch futon. When you craft something from wood, the process not only teaches you new skills and provides a creative outlet, it can also generate an heirloom. Or at least an object that’s rich with sentimental value.
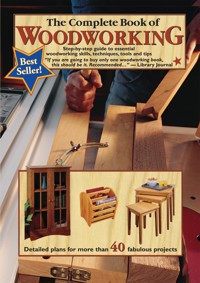
Woodworking: The Complete Step-by-Step Guide to Skills, Techniques, and Projects is both a teacher of skills and a source of ideas: It’s about the process and the project. In this book, you will find all of the information and project plans you need to develop a hobby that will last a lifetime. It contains great advice on setting up your own workshop and some essential background information you’ll need to know about wood. It takes you through all the basic skills in the order you’ll need them, including measuring, marking, and layout, then using cutting and shaping tools to create solid wood joints. With clear color photos, it shows you exactly how to clamp and glue your joints, then offers a complete section on sanding and finishing for professional results.
But where a lot of woodworking books only show you some skills, this new woodworking compendium gives you over 300 pages of complete project plans so you can put your skills to use. Indoor or outdoor, easy or more involved, you’re sure to find projects to match your skills and needs right here. There are even a couple projects for your shop itself.
Woodworking is a never-ending journey. Whether you’ve been doing it for one year or fifty, there are always new skills to master and exciting projects to tackle. Let this book be your companion every step of the way.
And while you’re at it, be sure to pass the passion on to a young person who means something to you. You’ll create memories—and projects—that will last a lifetime.
—Mark Johanson, Editor
CHAPTER 1WORKSHOP ESSENTIALS
The best woodworking takes place in a well-organized, safe, and efficient space that is devoted to (or at least designed for) the task. Couple those factors with a detailed knowledge of the wood you’ll be working with, and you’re well on your way to some very rewarding times—and memorable projects—in your workshop.
That’s what this chapter is all about. See how to set up your workshop for maximum efficiency. Make sure your layout, equipment, and techniques are safe. Maintain everything in good working order. And understand the ins, outs, and intricacies of all the various kinds of lumber you’ll be dealing with.
Woodworking offers two rewards—the process itself and the projects you create. These pages get you ready for the process.
General Workshop
Setting Up Shop
There’s no single best way to set up your workshop. Since every handyman has unique interests, needs, and resources, the trick to constructing a workshop that works for you is to learn to understand your needs and to maximize your resources. Start with your shop space—for most of us, a room in the basement or part of a garage. Draw a sketch of your shop area as it exists. Take measurements and include your main shop tools and work or storage areas. Often, just the simple exercise of sketching will reveal inefficiencies in the layout or suggest better arrangements. Be sure to include power sources, windows, and doors in the drawing, as well as lights and any built-in fixtures, like shelving and wall cabinets.
Once you’ve drawn your existing shop, make a wish list of tools, accessories, and systems you’d like to add over the next few years, including finishing booths, dust collection systems, and lumber storage or drying areas. Compare that list to your current shop space. Can everything fit? If not, you may want to amend your wish list, or look for ways to replace single-purpose tools with multipurpose work areas that conserve space. For example, consider replacing your old radial-arm saw with a sliding compound miter saw, or maybe you might replace one or two of your larger stationary tools with smaller bench top versions. Pay attention to the space around tools as you plan, making sure to allow enough room to use each tool effectively and safely. Refer to your plan on a regular basis, and update it as your needs and circumstances change.
Choosing Your Space
Without a doubt, the best shop is a large, separate building with plumbing and heat. It is divided up to include a storage area adjoining a large door to the outside, a central workspace, and a finishing room that’s walled off from the rest of the shop and ventilated to the outdoors. Obviously, establishing and maintaining such a shop requires money and space that most of us don’t have. So look for realistic alternatives.
The two most common shop locations are the basement and the garage. Shops have been set up in spare rooms, attics, and even in closed-in porches. When assessing potential shop areas, or considering upgrading or remodeling your current shop, keep the following factors in mind:
Space needs. You’ll want to have enough space to maneuver full-size sheet goods and boards that are 96" (2.45cm) or longer. Ideally, this means a large enough area that you can feed large stock into a stationary tool with enough clearance on the infeed and the outfeed sides.
Access. You’ll need a convenient entry/exit point so you can carry materials into the shop and completed projects out of the shop.
Power. You should never run more than one tool at a time (except a tool and a shop vac or dust collector). Nevertheless, you’ll need several accessible outlets.
Light. Adequate light is essential for doing careful, comfortable, accurate, and safe work. You’ll need good overall light (a combination of natural and artificial light sources is best) as well some movable task lighting.
Ventilation/climate control. To help exhaust dust and fumes, you need a source of fresh air and dust collection. Depending on where you live, year-round shop use likely will require a means of heating and/or cooling the shop, as well as controlling humidity.
Isolation. Keep the inevitable intrusions of noise and dirt into the rest of the home to a minimum.
The basement shop: The basement offers many advantages as a shop location. It’s accessible yet set off from the rest of the house, and the essential house systems are right there. Drawbacks tend to be limited headroom, negligible natural light, concrete floors, and overall dampness/poor ventilation.
The garage shop: The garage, especially one attached to the house, offers the convenience of a basement shop with fewer drawbacks. Overhead doors provide excellent access, greater headroom, lower humidity, and better ventilation. The main general drawback is that garages are usually home to one or more vehicles and a host of other outdoor items. A good solution is to mount your stationary tools on casters so they can be wheeled out of the way to make room for other things.
Safety Equipment
The workshop is perhaps the most accident-prone area of your home. Sharp blades, heavy objects, dangerous chemicals, and flammable materials are just a few of the factors that increase the risk of accidents in the shop. While good housekeeping, respect for your tools, and common sense will go a long way toward reducing the risk of accidents, you should still be prepared in the event an accident occurs. Designate part of your shop as an emergency center. Equip it with a fully stocked first aid kit, fire extinguisher, and note with emergency numbers clearly posted.
First-aid kit: A well-equipped first-aid kit should contain (as a minimum) plenty of gauze and bandages, antiseptic first aid ointment, latex gloves, a cold compress, rubbing alcohol swabs, a disinfectant such as iodine, and a first aid guidebook.
Protect against dust and fumes: A particle mask (A) is a disposable item to be worn when doing general shop work. A dust mask (B) has replaceable filters and flexible facepiece to keep out finer particles, like sawdust and insulation fibers. A respirator (C) can be fitted with filters and cartridges to protect against fumes and very fine particles, especially when working with chemicals.
The ABC’s of Fire Extinguishers: Fire extinguishers are rated by their ability to combat fires of varying causes. An extinguisher rated “A” is effective against trash, wood, and paper fires. “B” will extinguish flammable liquid and grease fires. “C” can be used on electrical fires. For the workshop, choose a dry chemical extinguisher with an “ABC” rating.
Protect your eyes: Eye protection should be worn at all times in the workshop. A face shield (A) is worn when doing very hazardous work, such as operating a lathe. Safety goggles (B) and glasses (C) should have shatterproof polycarbonate lenses.
Protect your hearing: Always protect your ears when operating power tools or performing other loud activities. Ear muffs (A) offer the best protection, followed by expandable foam earplugs (B) and corded ear inserts (C).
Workshop First Aid Tips
Note: None of these treatments should be considered a substitute for medical attention. They are intended as guidelines on how to react to workshop mishaps. Whenever anyone is injured, contact a doctor as soon as possible.
Situation
Treatment
Deep gash/excessive bleeding
1. Maintain firm pressure on the wound with a clean cloth.
2. Dress with a gauze bandage.
3. If bleeding persists, and wound is a non-fracture, elevate the affected area so it is above the heart.
Deep puncture wound
1. Clean wound with soap and water.
2. Loosely cover wound with gauze bandage.
3. Apply insulated ice bag or cold compress to reduce swelling, relieve pain, and impair absorption of toxins.
4. Be aware that internal bleeding may occur.
Stab wound/embedded object
1. Leave the embedded object in place. Do NOT remove it.
2. Apply a clean cloth or gauze pad to the area around the wound.
3. Prevent movement of the object by wrapping it with gauze.
Amputation
1. Maintain constant pressure with a clean cloth.
2. Carefully wrap severed item in gauze that has been moistened with either water or saline solution.
3. Place severed item in a sealed plastic bag.
4. Place this bag into a larger bag containing water and ice (never let severed part come in direct contact with ice).
Burn
1. If the bum is more severe than first-degree (skin that is red or slightly swollen) it should not be treated at home. See a doctor immediately.
2. For minor burns, immerse the affected area in cold water for five minutes. Gently apply a cold, wet cloth to areas that are unable to be immersed. Change the cloth frequently.
Electric shock
1. Quickly and safely break victim’s contact with affecting current (disconnect plug or shut off breaker).
2. ALL electrical burns should be considered severe. Internal tissue may be affected more severely than the minor damage appearing on the skin. 9-1-1 should be called immediately if the electrical shock has caused any of the following: erratic heartbeat, severe jolt, abnormal tingling, unconsciousness (momentary or prolonged), muscle spasms or aches, fatigue, headaches, or a visible bum.
Chemicals in eyes
1. Do not rub or irritate the affected eye.
2. Flush with warm water.
Get a Grip on Glove Selection
Always wear the proper glove for the task at hand. Maintain a supply of good-condition gloves of the following types, and add special purpose gloves as needed.
Heavy work gloves for handling building materials and general interior and exterior wear
Jersey or heavy cotton gloves for yard work and general wear
Rubber-dipped masonry gloves for working with concrete and mortar
Disposable plastic gloves for painting and light finishing and for handling hardwoods, like cherry, that are sensitive to oils in skin
Neoprene rubber gloves for working with caustic chemicals, such as chemical paint stripper, and for working around electrical current
Household-type rubber gloves for painting and finishing and for working with cleansers
Remove-to-Lock Keys Protect against Unauthorized or Unsupervised Tool Use
Many power tools, particularly stationary tools, come equipped with a removable lock key that is inserted into the ON/OFF switch of the tool. The tool cannot be turned on if the key is not in place. Store the lock keys in a convenient place that’s out of sight from the tool.
Extension Cord Ratings
To make certain that your power tools run safely and at peak performance, use only extension cords that are rated to handle the amperage of the tool.
Cord Length
Gauge
Maximum Amps
25' (7.6m)
18
10
25' (7.6m)
16
13
25' (7.6m)
14
15
50' (15.2m)
18
5
50' (15.2m)
16
10
50' (15.2m)
14
15
75' (23m)
18
5
75' (23m)
16
10
75' (23m)
14
15
100' (30.5m)
16
5
100' (30.5m)
12
15
125' (38m)
16
5
125' (38m)
12
15
150' (45.7m)
16
5
150' (45.7m)
12
13
Tips for Dust Collection (and Dust Collection Systems)
Dust from workshop activities poses many threats to safety and to producing good results. It is a fire hazard, a health hazard when breathed in, and a general irritant. It is responsible for ruining countless carefully applied finishes, and if uncontrolled it will shorten the life span of your power tools. A good dust collection system is a must in any workshop. It can be as simple as a shop vac with a dust filter used locally, but the best solution is to construct a network of hoses connected permanently to your stationary shop tools and powered by a quality dust collector.
A tool vac is a relatively new entry in the dust collection field. It’s similar to a shop vac in size and power. Tools are connected to the power source through a receptacle mounted on the tool vac. This allows the vac to shut on and off automatically as the tool is used.
The two-stage dust collector in the background of this workshop photo is connected to all of the stationary power tools in the shop with dedicated 4" (10.2cm) or larger hoses mounted to the walls and positioned to be out of the way when work is taking place.
How to ground a dust collection system
Due to the dangers of sparking caused by static electricity, a dust collection system should be electrically grounded so the built-up electricity can escape. Attach a strand of bare copper wire to the metal cabinet of each stationary tool in the dust collection system (assuming that tools are grounded through the power supply system). Drill a small guide hole into the hose port near the tool and feed the wire into the hole.
Drill exit holes at hole connectors and pigtail ground wires together with a wire nut. You may need to caulk around the wire openings to maintain the vacuum seal.
Don’t Ignore the Floor
If you stop and think about it, you have more direct contact with the floor of your shop than any other part. So it only makes sense to make sure your shop floor is safe, clean, and comfortable. Start with the floor finish. If your shop has an unfinished concrete floor, there are several finishes you can apply to make it more attractive and easier to clean (photo, above left). Concrete sealer is a clear product that helps the concrete resist staining and creates a “slick” surface that’s easier to sweep but isn’t slippery; concrete stain is essentially sealer with a coloring agent for visual appeal; concrete paint seals and beautifies the floor, but because the product has more body it will fill small voids and cracks, eliminating areas where dirt, mildew, and even insects can collect; epoxy paint is a two-part finish that prevents moisture see page up through the floor, resists stains and spills, and has a very attractive appearance. Regardless of the floor type or surface treatment, sweep and clean it regularly, and provide a cushion for your feet at work areas in the form of a rubber floor mat or even old carpet scraps.
Tips for Keeping a Tidy Workshop
Pegboard Tool Hangers: A Workshop Standard
Perforated hardboard (pegboard) is the wallpaper of the workshop. In addition to general pegboard hooks, you can purchase whole systems of hanging devices in many sizes and configurations to effectively support and organize specific tools. Use tempered hardboard if available.
An Attractive Cleanup Tool
Screws, washers, drill bits, and other small metal parts have a way of disappearing into the nearest heap of sawdust or shavings as soon as you turn your back. Find and rescue them easily and safely with a shop magnet.
General Tips for Shop Tool Maintenance
Engrave Identification Marks onto Shop Tools
Every handyman knows that borrowed tools often end up on permanent loan. Keep tabs on your shop tools by engraving your name or initials into the tool casing with a rotary tool or carving tool. In addition to reminding your friends and family members where the tool came from, identification marks may also help you recover your tools in the event of a robbery.
Maintain a Well-Dressed Grinding Wheel
The bench grinder is one of the most important tools in any shop for keeping other tools up and running at peak performance levels. But it, too, requires occasional maintenance. Over time, the grinding wheel or wheels build up resins and other gunk that settle into the grit of the wheel, where they harden each time you use the grinder. If you notice that your wheel has a brown, burnished appearance, it’s time to dress the wheel. This procedure can be accomplished with a dressing tool, like the one shown at left, or simply with a stick made of silicone carbide. Simply apply the dressing tool or carbide stick to the spinning grinding wheel and inspect the wheel visually until the surface is clean and fully restored.
Hardwood vs. Softwood
Hardwoods & Softwoods: What’s the Difference for Woodworking?
You’ve probably heard the terms “hardwood” and “softwood” when referring to the two primary categories of lumber, but what do these labels mean? From a botanist’s standpoint, hardwoods come from deciduous trees— those trees like maple, cherry, oak, ash, and walnut that have broad leaf shapes and reproduce with nuts, fruits, or flowers. Deciduous trees have outstretched canopies of leaves. Most species shed leaves in the fall and set buds for the next spring.
Coniferous trees, or conifers, make up the softwoods. They have needle-shaped leaves and reproduce by spreading their seeds through cones instead of nuts, fruits, or flowers. Pines, firs, and spruces as well as redwood, cedar, and cypress are all conifers. These trees keep their needles through the winter. The branch structure is generally compact, and most grow rapidly. Hardwoods, on the other hand, grow slowly. That’s why softwoods are more economically viable for construction lumber and plywood than hardwood lumber.
The usual misnomer about hardwoods and softwoods is that the former is hard and the latter is soft. While there’s some truth here, it isn’t always accurate. For instance, mahogany and walnut are hardwoods, but both are easier to cut, saw, and drive fasteners into than Southern yellow pine, a dense, heavy softwood. So, it’s better to think like a botanist when using “hardwood” and “softwood” terminology as a woodworker.
Using leaves for identification: Hardwoods have broad-shaped leaves that the tree loses in the fall. Pine, a softwood, has needle-shaped leaves that it keeps through the winter. These differences in leaf types are a more accurate way to distinguish hardwoods and softwoods than differences in wood hardness.
Choosing between Hardwoods and Softwoods
Hardwoods are generally preferred over softwoods for building furniture, because they often exhibit more desirable grain patterns and figure as well as color. Hardwoods with particularly tough structure, like ash or oak, also hold up better to the abrasions and abuses of life. But there’s no hard-and-fast rule about hardwoods for furniture. Our forebears used whatever lumber was plentiful to them, including all types of conifers. Much of that antique softwood furniture is still in use today.
If you are planning to build outdoor projects, be sure to select lumber with natural decay resistance. Good options include white oak, mahogany, teak, cedar, redwood, and cypress. Other options will decay more rapidly outside.
Color, Figure & Grain Pattern
Aspects of wood: Dramatic differences in color, figure, and grain pattern are part of what makes woodworking so compelling. Wood color is a product of how its tannins, gums, and resins react to exposure to the air. Often, wood will continue to darken and change color over time, developing a rich patina. Figure—the surface pattern on a board—can be the result of natural causes ranging from drought or freezing to prevailing winds, disease, age, or insect damage. Grain display is dependent on the direction and regularity of the wood fibers relative to the center of the trunk as well as how the lumber is cut from the tree.
Choosing Wood
Choosing the best wood species for your project goes a long way toward ensuring success. Different species naturally lend themselves better to the types of machining required for a project, as well as the overall look. For example, project parts that incorporate decorative edge profiles may be easier to shape using soft wood, but ultimately harder, more straight-grained wood will stand up better over time. Cost and local availability are also important determining factors. If you’re building outdoors, cedar is generally an inexpensive wood choice in the Upper Midwest, but on the West Coast redwood is typically more economical, and in the South you’ll likely save money by building with cypress. When choosing wood, pay particular attention to the tone of the wood when a finish is applied. To get a good idea what the finished color will be, simply dampen a small section of a planed board with mineral spirits or rubbing alcohol.
Walnut has rich, dark tones when top-coated. Grain is relatively straight. Moderately easy to work. Moderate to expensive. Species shown is black walnut.
Maple is a light-colored hardwood with straight, tight grain. Hardness makes it durable, but somewhat difficult to work. Inexpensive to moderate. Species shown is hard maple.
Ash is a readily available, inexpensive hardwood. Its color and grain are not distinguishing, but it can be finished to replicate more expensive hardwoods.
Red oak is one of the more inexpensive and prevalent wood species in today’s marketplace. Has dramatic grain figure and warm red color, and is fairly easy to work.
Cherry has a deep, reddish brown color when finished (color varies greatly between heartwood and sapwood). It is hard and tends to be brittle. Occasionally splotchy when finished. Moderate to expensive. Species shown is black cherry.
Pine is a very general species term used to refer to most coniferous softwood. It ranges from white to yellow according to species. Generally easy to work with strong grain patterns. Inexpensive to moderate. Species shown is ponderosa pine.
White oak is a versatile hardwood with a distinctive appearance. Used extensively in furniture-building, as well as in boat-building. It is moderate in price (quarter-sawn tends to be higher cost). Moderate workability.
Reading Softwood Grade Stamps
All construction lumber sold in the U.S. bears an industry-grading stamp such as the Western Wood Products Association (WWP) stamp shown above. Nominal softwood lumber is graded similarly, but usually the stamp doesn’t show. Here’s how to decipher grade stamps:
12
Identifies the mill. This can be letters or numbers.
I&BTR
This is the grade of lumber, in this case #1 Common and better, an excellent furniture grade.
WWP
The grading association that graded the board, in this case, the Western Wood Products Association.
S-DRY
The condition of seasoning at the time of surfacing, in this case dry, or seasoned lumber below 19% moisture content. If the stamp reads KD-15, it would denote kiln-dried lumber with a maximum of 15% moisture content. Products stamped S-GRN stands for unseasoned (green) lumber containing more than 19% moisture content.
DOUG FIR-L
Indicated the wood species, in this case, Douglas fir.
Softwood Lumber Grades
Grade
Grade Criteria
B Select and BTR
Highest quality lumber with little or no defects or blemishes. Nominal sizes may be limited.
C Select
Some small defects or blemishes permissible, but still largely clear and of high quality.
D Select
One board face usually defect-free.
Superior Finish
Highest grade finish lumber with only minor defects.
Prime Finish
High quality with some defects and blemishes.
No. 1 Common
Highest grade of knotty lumber; usually available by special order.
No. 2 Common
Pronounced knots and larger blemishes permissible.
Softwood Lumber Sizes
Slide your measuring tape across a 2" × 4" (5.1 × 10.2cm) and you’ll discover that it doesn’t actually measure 2" × 4" (5.1 × 10.2cm). In fact, it will be ½" (1.27cm) shy in both directions. In its rough state, when the lumber was originally ripped into studs, this same piece was in fact a true 2" × 4" (5.1 × 10.2cm). But after drying, it shrank a little. Then it was surfaced (planed) on all four faces, and it shrank a little more.
When you buy standard softwood lumber at your home center, surfaced and jointed on all faces and edges, the industry sells it to you in finished dimensions, but still describes it in nominal dimensions—the size it was before milling.
A piece of softwood lumber with a nominal 1" (2.5cm) thickness is generally referred to as a board, while nominal 2" (5.1cm)–thick softwood is called framing stock (as in studs, joists, and rafters), or dimension lumber. The chart below lists nominal and dimension lumber sizes for the stock you’ll find in home centers.
Softwood lumber is graded by strength and appearance as well as moisture content. For woodworking applications, the three common grades to know are Select, Finish, and Common (see the chart, below). While boards in the Common grade categories may contain some blemishes and knots, Select and Finish grades are clear or nearly clear of defects. Be aware, however, that boards within any grade may exhibit some degree of natural distortion (cupping, bowing, twisting), so it’s important to examine each board carefully by sighting along its length and width before you buy.
Nominal vs. Dimension Softwood Lumber Sizes
Nominal
Finished
1" × 2" (2.5 × 5cm)
¾" × 1 ½" (1.9 × 3.8cm)
1" × 3" (2.5 × 7.6cm)
¾" × 2 ½" (1.9 × 6.4cm)
1"x 4" (2.5 × 10.2cm)
¾" × 3 ½" (1.9 × 8.9cm)
1" × 6" (2.5 × 15.2cm)
¾" × 5 ½" (1.9 × 14cm)
1" × 8" (2.5 × 20.3cm)
¾" × 7 ¼" (1.9 × 18.4cm)
1" × 10" (2.5 × 25.4cm)
¾" × 9 ¼" (1.9 × 23.5cm)
1" × 12" (2.5 × 30.5cm)
¾" × 11 ¼" (1.9 × 28.6cm)
Dimension Lumber Sizes
2" × 2" (5.1 × 5.1cm)
1 ½" × 1 ½" (3.8 × 3.8cm)
2" × 3" (5.1 × 7.6cm)
1 ½" × 2 ½" (3.8 × 6.4cm)
2" × 4" (5.1 × 10.2cm)
1 ½" × 3 ½" (3.8 × 8.9cm)
2" × 6" (5.1 × 15.2cm)
1 ½" × 5 ½" (3.8 × 14cm)
2" × 8" (5.1 × 20.3cm)
1 ½" × 7 ¼" (3.8 × 18.4cm)
2" × 10" (5.1 × 25.4cm)
1 ½" × 9 ¼" (3.8 × 23.5cm)
2" × 12" (5.1 × 30.5cm)
1 ½" × 11 ¼" (3.8 × 28.6cm)
Hardwood Lumber Sizes
While nominal dimensions are widely used for selling softwoods, some retailers have extended the practice to hardwood boards as well. Your local home center probably stocks a few species of hardwoods, like oak, maple, and cherry. These boards generally are planed to ¾" (1.9cm)– thick, jointed flat on the edges and cut to standard widths and lengths. Within the lumber industry, lumber of this sort is categorized as “S4S,” which stands for Surfaced Four Sides. All of this surface preparation at the mill translates to higher prices for you, but it may make the most sense to buy S4S lumber if you don’t own a thickness planer or jointer to prepare board surfaces yourself.
To find specialty or thicker hardwoods, you’ll need to shop at a traditional lumberyard. A good lumberyard will offer a wide selection of hardwoods in random widths and in an assortment of thicknesses and grades (see Hardwood Lumber Grades, below). In addition to S4S, you’ll find S2S lumber (planed smooth on two faces but the edges are rough), and roughsawn boards that are simply cut from the log, dried, and shipped to the lumberyard.
Because of their diverse uses, hardwoods are offered in a much larger variety of thicknesses than standard 1x and 2 × softwoods. This has led to the quartering system for determining lumber thickness, which allows you to buy hardwoods in ¼" (0.6cm) thickness increments from ¼" (0.6cm) on up. Most yards offer popular hardwood species in three, four, five, six, eight, ten, and even twelve quarter thicknesses (which read as ¾, 4/4, 5/4, 6/4, 8/4, 10/4, and 12/4 on the label at the rack). These correspond to rough (pre-planed) thicknesses of ¾", 1", 1 ¼", 1 ½", 2", 2 ½", and 3" (2, 2.5, 3.2, 3.8, 5, 6.4, and 7.6cm).
Calculating Board Feet
Hardwood lumber is sold at most lumberyards by the board foot, which can make calculating the amount of lumber you need a little confusing. The three boards below, for instance, all equal 2 board feet, though their physical dimensions are quite different. A board foot is actually 1/12 of a cubic foot of rough lumber, or 144 cubic inches (365.76 cubic centimeters). It is the equivalent of a piece of stock that is 12" wide × 12" long × 1" thick (30.5 × 30.5 × 2.5cm). But any combination of dimensions that multiplies to 144 is equivalent to one board foot.
To calculate the number of board feet a piece of lumber contains, take its thickness times its width times its length (all in inches) then divide by 144. If one dimension is easier to calculate in feet rather than inches, divide by 12 instead. When calculating board feet, don’t forget to build some waste into the project estimate. The pros generally count on close to 30% when they’re buying S2S stock, and 40% with roughsawn lumber (mostly because they can’t see the defects until after planing).
Hardwood surfacing options: If the extent of your hardwood needs amounts to only an occasional project, buy S4S boards at the yard. They’ll come planed on both faces and jointed flat on both edges, ready for cutting into project parts. If you have access to a jointer, consider buying S2S lumber, which still has rough edges but the faces are planed smooth. The most economical hardwood comes roughsawn to the lumberyard and will require you to do all of the surface preparation yourself. Some lumberyards will plane your stock for a nominal fee, if you don’t own a planer.
Hardwood Lumber Grades
Hardwood lumber is graded using a different classification system than softwoods. Grades are based on the percentage of clear face cuts that can be made around a board’s defects (knots, splits, pitch pockets, and so forth). From highest grade (clearest) to lowest (most allowable defects), the grades are:
Grade
Percentage of clear cuts
FAS (Firsts & Seconds)
83 ⅓%
Select
83 ⅓%
No. 1 Common
66 ⅓%
No. 2A & 2B Common
50%
No. 3A Common
33 ⅓%
No. 3B Common
25%
Choose the lumber grade that best suits the needs of your project parts and your budget. It could be that a Common grade will provide all the knot-free lumber you need at a significant savings over FAS.
Sources for Buying Lumber
Depending on where you live, there may only be one or two places to buy wood or many different sources. Metropolitan areas tend to have more specialized lumber outlets in addition to the usual home center and lumberyard options. Here’s a rundown of the various lumber sources to try:
Home centers: These days, there’s probably a Home Depot or Lowe’s store within a short driving distance of where you live. “Big box” home centers will stock a limited selection of hardwood and softwood lumber. Most of it will be surfaced and planed S4S lumber, sold either by the board or by the lineal foot. Expect to find mixed softwoods of spruce/pine/fir and possibly cedar. For hardwoods, the typical home center options are oak, poplar, and occasionally cherry, maple, or a lesser-known bleach-white wood called aspen.
The upside to buying lumber from a home center is convenience, but the downside is limited selection. And despite the volume of sales these stores do, lumber pricing may still be as high or even higher than a lumberyard.
Lumberyards: Here’s where trim carpenters and contractors shop for framing lumber, sheet materials, moldings, and other millwork products like stair treads and balusters. A general-purpose lumberyard may stock a wider range of hardwood and softwood lumber, but that will depend on what its major clientele—contractors— need for their customers. Usually a lumberyard’s inventory will consist of S4S lumber and roughsawn cedar for siding and fencing. Prices will be competitive with a home center but not inexpensive. One advantage to buying from a lumberyard is that you may be able to buy longer or wider lumber than a home center will carry, and the yard may stock more volume.
Buying lumber: Large retail lumber outlets and home centers make shopping for lumber easy. Most of the lumber you’ll find is fully surfaced and ready for building. Some larger home centers even stock lumber inside where it’s kept warm and dry. The downside to all of this convenience is that species options are limited, especially for hardwoods and exotics.
Reclaimed Lumber
In recent years, there has been a lot of talk about reclaimed lumber. Most reclaimed lumber is salvaged from the beams and timbers of old buildings, and some is recovered from the chilly depths of the Great Lakes. Such lumber was culled from virgin forests a century or more ago, and it is generally very straight-grained and true. It is also extremely seasoned; only large swings in temperature or humidity seem to affect it. Reclaimed lumber is generally a great product, and numerous mills advertise on the Internet. The price may be high, however, especially for premium cuts and grades.
Buying reclaimed lumber is by no means your only source for obtaining it. Before you toss an old piece of furniture or dispose of boards and trim from a big remodeling project, consider reusing the lumber for woodworking. Sometimes all it needs is to be stripped, sanded, or run through a planer. Visually inspect any reclaimed lumber carefully or check it with a metal detector before passing it through a saw or router, to be sure there are no hidden metal fasteners present.
Don’t overlook “diamonds in the rough”: These mahogany boards, salvaged from a discarded couch and passed through a planer, will make excellent stock for a woodworking project.
Specialty yards: Many metro areas have specialty yards that sell only hardwoods, veneers, and special-order sheet goods. Their primary customers are commercial cabinetmakers, architectural mill-work shops, and professional woodworkers. Usually these yards will also sell to walk-in customers, but you’ll probably have to open an account. There may also be volume minimums that apply. Be sure to ask before you start searching the racks.
Specialty yards are wonderful places to find a full selection of both native and exotic hardwoods. These yards may carry S4S lumber that’s ready to use, but you’re more likely to find S2S or roughsawn lumber instead. Within a given species, a specialty yard may stock several different cuts of lumber, including quartersawn and riftsawn boards as well as wood with special figure. Unlike home centers or lumberyards, specialty yards will sell their stock almost exclusively by the board foot rather than by lineal dimensions (see here for more on calculating lumber by the board foot.)
The salespeople at a specialty yard are used to dealing with the pros, but most will take a few minutes to offer advice about lumber options or how to buy. However, time is money to these folks, so they won’t appreciate spending too much time on what will amount to a relatively minor sale. And generally, you’ll have to find what you need in their warehouses on your own.
Most specialty yards understand that customers want to hand-select the boards they buy, so it’s acceptable to search through the stacks. But show good etiquette when you’re through by restacking boards neatly. Longer and wider boards belong at the back of the rack. Keep boards from different piles or bins sorted as the yard has them. Individual stacks may constitute specific grades and cuts that need to be kept separate from others.
Local sawmills: If you live in a rural or wooded area, there’s probably a family-owned sawmill still around. Sometimes, a particularly ambitious woodworker or cabinet builder will have a portable sawmill to saw his or her own stock from local forests or storm-fallen trees. Talk with these folks and you may be able to nab an excellent price on quality, air-dried lumber. You’ll also have the satisfaction of knowing the boards you use have come from nearby trees and that you are supporting local business. Volume will probably be limited, but the selection of species could be quite interesting, depending on what grows in your area. The mill may even deliver to your home for minimal cost.
Mail-Order Lumber
Lumber by mail: If you don’t have a specialty lumberyard nearby or need a more unusual species for your project, consider ordering lumber by mail. The range of species offered is usually quite broad, and the prices are competitive. Thumb through the back of most woodworking magazines and you’ll see numerous mail-order suppliers to choose from. One drawback to buying by mail is that you’ll be ordering lumber sight unseen. As a safeguard, make your first order small, so you can inspect the quality. Ask about moisture levels, too, so you can use what you order right away without needing to let it dry first.
Buying by mail or the Internet: Look in the back of woodworking magazines and you’ll find ads for specialty lumber suppliers all over the country. They can send you a catalog of their inventory, or check their web sites to buy lumber you can’t find locally. Another option is to bid on lumber using eBay and other Internet auction sites. But be aware that the seller usually offers no guarantees on quality—and you’re buying sight unseen. Find out what shipping charges apply. They can turn a seemingly great deal into an expensive purchase.
Plywood is manufactured in several thicknesses, using a variety of wood species to create the core, but ¾" (1.9cm)–thick laminated veneer-core plywood with smooth hardwood veneer faces is the type used most frequently for built-in projects.
Particleboard is used almost exclusively as a substrate for plastic laminate or veneer, especially for countertops. It is inexpensive but lacks sufficient strength to be used for shelving or structural members.
Medium-density fiberboard (MDF) is growing in popularity as a veneer substrate, paintable surface, and as a raw material for moldings.
Melamine is faced at the factory with melamine laminate. The thermofusing process used to apply the melamine creates a much stronger bond than you can achieve by applying plastic laminate yourself.
Sheet Goods
The basic structural component of cabinetry is some form of sheet goods, most frequently plywood. Other commonly used sheet goods are particleboard, fiberboard, melamine panels, and hardboard. These materials come in handy when you need to cover a broad project area without including seams. Sheet goods are dimensionally stable (there is no substantive wood grain to contend with) and relatively inexpensive, when compared to the price of solid lumber. You’ll turn to them time and time again for different woodworking applications. Here is an overview of the options you’ll find at most home centers and lumberyards:
Plywood. Plywood is fashioned from sheets of wood veneer, primarily pine and fir. By orienting the wood grain of each laminated sheet so adjacent sheets are perpendicular, the product is able to withstand greater stress than construction lumber of the same thickness. In addition, it is more dimensionally stable.
Most lumberyards stock furniture-grade plywood in several thicknesses and face veneer options (pine, red oak, birch, and maple are the most common face veneers). Lumberyards can order plywood with dozens of additional veneer options.
Choosing the right plywood for your woodworking project is an important task. In addition to the various core, thickness, and face veneer options, you’ll also need to make a decision on the plywood grade. Basically, there are two grading systems in use today. The one most people are familiar with is administered by the APA (Engineered Wood Association, formerly the American Plywood Association). The APA grade stamps (see illustration, here) are found on sanded plywood, sheathing, and structural (called performance-rated) panels. Along with grading each face of the plywood by letter (A to D) or purpose, the APA performance-rated stamp lists other information such as exposure rating, maximum allowable span, type of wood used to make the plies and the identification number of the mill where the panel was manufactured. Many hardwood-veneer sanded plywood panels are graded by the Hardwood Plywood and Veneer Association (HPVA). The HPVA grading numbers are similar to those employed by APA: they refer to a face grade (from A to E) and a back grade (from 1 to 4). Thus, a sheet of plywood that has a premium face (A) and a so-so back (3) would be referred to as A-3 by HPVA (and AC by APA).
Notice
Particleboard and MDF usually contain urea formaldehyde resins that continue to emit low levels of formaldehyde gas for at least six months as they cure. People with high sensitivity to chemical vapors should limit the number of composite panels added to a room at one time. Always wear a particle mask or respirator as required and provide adequate dust collection and ventilation when cutting or shaping these products.
Particleboard . Particleboard possesses several unique qualities that might make it a good choice for your next built-in project—particularly if the project includes a counter or tabletop. Particleboard is very dimensionally stable (it isn’t likely to expand, contract, or warp); it has a relatively smooth surface that provides a suitable substrate for laminate; it comes in a very wide range of thicknesses and panel dimensions; and it is inexpensive. But particleboard does have some drawbacks: it lacks stiffness and shear strength; it has poor screw-holding ability; it degrades when exposed to moisture; it’s too coarse in the core to be shaped effectively; and it’s heavy.
Medium-density fiberboard (MDF). MDF is similar to particleboard in constitution, but is denser and heavier. The smoothness and density of MDF make it a good substrate choice for veneered projects; the rougher surface of particleboard and most plywoods do not bond as cleanly with thin wood veneer. You can even laminate layers of MDF to create structural components that can be veneered or painted. MDF is also increasing in popularity as a trim molding material.
Understanding sanded plywood grade stamps
Plywood stamps: Every sheet of plywood is stamped with grading information. On lower-grade panels, such as exterior sheathing, the stamp can be found in multiple locations on both faces. Panels with one better-grade face are stamped only on the back, and panels with two better-grade faces are stamped on the edges.
Melamine board. Melamine is fashioned with a particleboard core with one or two plastic laminate faces. Thicknesses range from ¼" to ¾" (0.6 to 1.9cm). Stock colors at most lumber yards and building centers generally are limited to white, gray, almond, and sometimes black. The panels are oversized by 1" (2.5cm)—a 48" × 96" (121.9 × 243.8cm) sheet is actually 49" × 97" (124.5 × 246.4cm)— because the brittle melamine has a tendency to chip at the edges during transport. Plan to trim fresh edges.
Plywood Veneer Grain Patterns
Rotary Cut
Sliced (plain-sawn)
Sliced (quarter-sawn)
Face Grade Descriptions
N
Smooth surface “natural finish" veneer. Select, all heartwood, or all sapwood. Free of open defects. Allows not more than six repairs, wood only, per 48" × 96" (121.9 × 243.8cm) panel, made parallel to grain and well-matched for grain and color.
A
Smooth, paintable. Not more than 18 neatly made repairs, boat, sled, or router type, and parallel to grain, permitted. May be used for natural finish in less demanding applications. Synthetic repairs permitted.
B
Solid surface. Shims, circular repair plugs, and tight knots to 1" (2.5cm) across grain permitted. Some minor splits permitted. Synthetic repairs permitted.
C plugged
Improved C veneer with splits limited to ⅛" (0.3cm) width and knotholes and borer holes limited to ¼" × ½" (0.6 × 1.3cm). Admits some broken grain. Synthetic repairs permitted.
C
Tight knots to 1 ½" (3.8cm). Knotholes to 1" (2.5cm) across grain and some 1 ½" (3.8cm) if total width of knots and C knotholes is within specified limits. Synthetic or wood repairs. Discoloration and sanding defects that do not impair strength permitted. Limited splits allowed. Stitching permitted.
D
Knots and knotholes to 2 ½" (6.4cm) across grain and ½" (1.3cm) larger within specified limits. Limited splits are permitted. Stitching permitted. Limited to Interior and Exposure 1 or 2 panels.
Source: Engineered Wood Association
Common Hardwoods
A. Red Oak
Uses: Indoor furniture, trim, flooring, plywood, and veneers
Sources: United States and Canada
Characteristics: Straight, wide grain pattern with larger pores. Tan to reddish pink in color. Quartersawing reveals narrow medullary rays.
Workability: Machines easily with sharp steel or carbide blades and bits. Not prone to burning when machined. Drill pilot holes first for nails or screws.
Finishing: Takes stains and clear finishes well, but pores will show through if painted unless they are filled.
Price: Moderate
B. White Oak
Uses: Indoor and outdoor furniture, trim, flooring, plywood, and veneers
Sources: United States and Canada
Characteristics: Straight, wide grain pattern, tan with yellow to cream tints. Quartersawing reveals wide medullary rays. Naturally resistant to deterioration from UV sunlight, insects, and moisture.
Workability: Machines easily with sharp steel or carbide blades and bits. Not prone to burning when machined. Drill pilot holes first for nails or screws.
Finishing: Takes stains and clear finishes like red oak, but narrower pores reduce the need for filling.
Price: Moderate to expensive
C. Hard Maple
Uses: Indoor furniture, trim, flooring, butcher block countertops, instruments, plywood, and veneers
Sources: United States and Canada
Characteristics: Straight, wide grain with occasional bird’s eye or fiddleback figure. Blonde heartwood.
Workability: Difficult to machine without carbide blades and bits. Dull blades will leave burns.
Finishing: Takes clear finishes well, but staining may produce blotches.
Price: Moderate to expensive, depending on figure
D. Cherry
Uses: Indoor furniture, cabinetry, carving, turning, plywood, and veneers
Sources: United States and Canada
Characteristics: Fine grain pattern with smooth texture. Wood continues to darken as it ages and is exposed to sunlight.
Workability: Machines easily with sharp steel or carbide blades but is more prone to machine burns.
Finishing: Takes stains and clear finishes well.
Price: Moderate
E. Walnut
Uses: Indoor furniture, cabinets, musical instruments, clocks, boat-building, and carving
Sources: Eastern United States and Canada
Characteristics: Straight, fine grain. Moderately heavy. Color ranges from dark brown to purple or black.
Workability: Cuts and drills easily with sharp tools without burning.
Finishing: Takes natural finishes beautifully.
Price: Moderate
F. Birch
Uses: Kitchen utensils, toys, dowels, trim, plywood, and veneers
Sources: United States and Canada
Characteristics: Straight grain with fine texture and tight pores.
Workability: Machines easily with sharp steel or carbide blades and bits. Good bending properties. Drill pilot holes first for nails or screws.
Finishing: Takes finishes well, but penetrating wood stains may produce blotching.
Price: Inexpensive to moderate
G. Hickory
Uses: Sporting equipment, handles for striking tools, furniture, plywood, and veneers
Sources: Southeastern United States
Characteristics: Straight to wavy grained with coarse texture. Excellent shock-resistance.
Workability: Bends well, but lumber hardness will dull steel blades and bits quickly. Resists machine burning.
Finishing: Takes stains and clear finishes well.
Price: Inexpensive where regionally available
H. Aspen
Uses: A secondary wood used for drawer boxes, cleats, runners, and other hidden structural furniture components. This type is also great for crafts.
Sources: United States and Canada
Characteristics: Indistinguishable, tight grain pattern.
Workability: Machines easily with sharp steel or carbide blades and bits.
Finishing: Better suited for painting than staining. Tight grain provides smooth, paintable surface.
Price: Inexpensive
I. White Ash
Uses: Furniture, boat oars, baseball bats, handles for striking tools, pool cues, and veneers
Sources: United States and Canada
Characteristics: Straight, wide grain pattern with coarse texture. Hard and dense with excellent shock-resistance.
Workability: Machines easily with sharp steel or carbide blades and bits. Drill pilot holes first for nails or screws. “Green” ash often used for steam bending.
Finishing: Takes stains and clear finishes well.
Price: Inexpensive
J. Poplar
Uses: Secondary wood for furniture and cabinetry, similar to aspen. Carving, veneers, and pulp for paper.
Sources: United States
Characteristics: Fine-textured with straight, wide grain pattern. Tan to gray or green in color.
Workability: Machines easily with sharp steel or carbide blades and bits. Not prone to burning when machined. Drill pilot holes first for nails or screws.
Finishing: Better suited for painting than staining. Tight grain provides smooth, paintable surface.
Price: Inexpensive
Common Softwoods
A. White Pine
Uses: Indoor furniture, plywood, veneers and trim, and construction lumber
Sources: United States and Canada
Characteristics: Straight grain with even texture and tight pores.
Workability: Machines easily with sharp steel or carbide blades and bits. Not prone to burning when machined. Lower resin content than other pines, so cutting edges stay cleaner longer.
Finishing: Stains may blotch without using a stain controller first. Takes clear finishes and paints well.
Price: Inexpensive
B. Western Red Cedar
Uses: Outdoor furniture, exterior millwork, and interior and exterior siding
Sources: United States and Canada
Characteristics: Straight, variable grain pattern with coarse texture. Lower density and fairly light-weight. Saw- and sanding dust can be a respiratory irritant. Naturally resistant to deterioration from UV sunlight, insects, and moisture.
Workability: Soft composition machines easily but end grain is prone to splintering and tear-out.
Finishing: Takes stains and clear finishes well, but oils in wood can bleed through painted finishes unless primer is applied first.
Price: Inexpensive to moderate where regionally available
C. Aromatic Cedar (Tennessee)
Uses: Naturally occurring oils seem to repel moths, making this wood a common closet and chest lining. Also used for veneers and outdoor furniture.
Sources: Eastern United States and Canada
Characteristics: Straight to wavy grain pattern with fine texture. Red to tan in color with dramatic streaks of yellows and creams. Distinct aroma emitted when machined, and dust can be a respiratory irritant.
Workability: Machines similarly to western red cedar
Finishing: Takes stains and clear finishes well
Price: Inexpensive
D. Redwood
Uses: Outdoor furniture, decks, fences, and siding
Source: West coast of United States
Characteristics: Straight, fine grain with few knots or blemishes. Relatively light weight. Reddish brown with cream-colored sapwood. Naturally resistant to deterioration from UV sunlight, insects, and moisture.
Workability: Machines and sands easily
Finishing: Takes stains and clear finishes well
Price: Moderate to expensive and not widely available in all nominal dimensions
E. Cypress
Uses: Exterior siding and boat building. Interior and exterior trim, beams, flooring, cabinetry, and paneling.
Source: Mississippi delta region of the United States
Characteristics: Straight, even grain pattern with low resin content. Naturally resistant to deterioration from UV sunlight, insects, and moisture.
Workability: Machines and sands easily
Finishing: Takes stains and clear finishes well
Price: Inexpensive where regionally available
Sampling of Exotics
A. Padauk
Uses: Indoor furniture, cabinetry, flooring, turning, and veneer
Source: West Africa
Characteristics: Coarse texture, straight interlocked grain
Workability: Machines easily with sharp steel or carbide blades and bits
Finishing: Takes stains and clear finishes well
Price: Moderate to expensive
B. Zebrawood
Uses: Turning, inlay, decorative veneers, furniture, and cabinetry
Source: West Africa
Characteristics: Interlocked, light and dark variegated grain pattern
Workability: Somewhat difficult to machine; use carbide blades and bits.
Finishing: Can be difficult to stain evenly
Price: Expensive
C. Wenge
Uses: Inlay, turning, and decorative veneers
Source: Equatorial Africa
Characteristics: Hard, dense straight grain with coarse texture. Heavy.
Workability: Dulls steel blades and bits quickly, so carbide cutters are recommended. Drill pilot holes for screws and nails.
Finishing: Pores should be filled before finish is applied.
Price: Moderate
D. Honduras Mahogany
Uses: Indoor and outdoor furniture, veneers and trim, and boat-building
Source: Central and South America
Characteristics: Straight, interlocked fine grain. Dimensionally stable.
Workability: Machines well with carbide blades and bits
Finishing: Takes stains and clear finishes well
Price: Moderate
E. Purpleheart
Uses: Pool cues, decorative inlay, veneers, and indoor and outdoor furniture.
Source: Central and South America
Characteristics: Straight grain with coarse texture
Workability: Gum deposits in the wood make it difficult to machine; cutting edges dull quickly
Finishing: Takes stains and clear finishes well.
Price: Moderate
F. Teak
Uses: Boat-building, indoor and outdoor furniture, veneers, and flooring
Source: Southeast Asia, Africa, Caribbean
Characteristics: Straight grain with oily texture. Dense and hard.
Workability: High silica content will dull steel blades and bits quickly. Oily surfaces require cleaning with mineral spirits first or glue will not bond.
Finishing: Takes oil finishes well
Price: Expensive
G. Rosewood
Uses: Inlays, turning, veneers, cabinetry, furniture, and musical instruments
Source: Southern India
Characteristics: Interlocked grain with medium to coarse texture
Workability: Dense structure dulls cutting edges quickly
Finishing: Takes stains and clear finishes well
Price: Expensive


