
23,99 €
Mehr erfahren.
- Herausgeber: CICO Books
- Kategorie: Geisteswissenschaft
- Sprache: Englisch
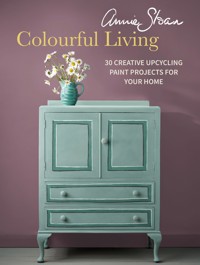
Annie Sloan's complete guide shows you how to use paint to decorate any of the surfaces in your home. Learn the basic skills for using paint on walls and furniture, alongside masterful techniques for painting floors, fabrics, lighting and more. Her 75 step-by-step projects will guide you through using paint to makeover your home, with clear pictorial instructions alongside helpful tips and tricks. With each project learn the essential skills of stencilling, printing, waxing, gilding and dyeing fabric, as well as how to best use Annie's own Chalk Paint® range. Get inspired with Annie's top tips on choosing colours and perfect palettes to work with. The Annie Sloan Collection contains all you need to know to begin your paint journey, for beginners all the way up to paint aficionados. So get ready to unleash your own creativity with paint!
Das E-Book können Sie in Legimi-Apps oder einer beliebigen App lesen, die das folgende Format unterstützen:
Veröffentlichungsjahr: 2021
Ähnliche


the Annie Sloan
collection
the Annie Sloan
collection
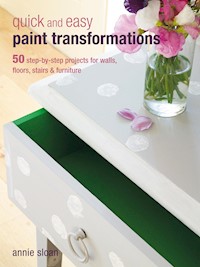
75 step-by-step paint projects and ideas to transform your home
Published in 2021 by CICO Books
An imprint of Ryland Peters & Small Ltd
20–21 Jockey’s Fields
341 E 116th St
London WC1R 4BW
New York, NY 10029
www.rylandpeters.com
10 9 8 7 6 5 4 3 2 1
Text © Annie Sloan 2021
Design and photography © CICO Books 2021
Projects in this book previously appeared in Annie Sloan Paints Everything, Color Recipes for Painted Furniture and More, and Quick and Easy Paint Transformations
The author’s moral rights have been asserted. All rights reserved. No part of this publication may be reproduced, stored in a retrieval system, or transmitted in any form or by any means, electronic, mechanical, photocopying, or otherwise, without the prior permission of the publisher.
Chalk Paint is a registered trademark of Annie Sloan Interiors in the United States.
A CIP catalog record for this book is available from the Library of Congress and the British Library.
ISBN: 978 1 80065 029 9
E-ISBN: 978 1 80065 071 8
Printed in China
Photographer: Christopher Drake
Editor: Martha Gavin
Art director: Sally Powell
Production manager: Gordana Simakovic
Head of production: Patricia Harrington
Publishing manager: Penny Craig
Publisher: Cindy Richards
contents
introduction
tools and materials
PART 1: painted floors,walls,ceilings,furniture,and more
Paris Grey parquet floor
Painted floor
Painted rug
Staircase
Striped stairs
Painting and waxing a wall
Polished plaster
Washed wood wall
Painting rough walls
Painted panel wall
Ceiling and rafters
Carved oak chest of drawers
Warehouse rustic chest of drawers
Patchwork drawers
Pastel chest of drawers
Arc painted chest of drawers
White wax bureau
Smooth and shiny bureau
Limed oak sideboard
Bookcase with glass doors
Venetian-inspired cupboard
Wax-resist bed
Swedish rustic table
Painted teak table
Faux marble tabletop
Ombré coffee table
Bathroom cabinet
Textured paint cabinet
Washed pine bookcase
Swedish-colored side table
Rustic seaside chairs
Sanded kitchen chairs
Limed look oak chair
Painted fabric chair
Wicker chair
Warehouse leather chair
Garden chair
Garden planter
French workman’s shelf
Distressed ladder
Distressed mirror
Ironwork lamps
Candelabra
Wall sconce
Painted chandelier
PART 2: paint effects andtechniquesfromhandpainting,frottage,gilding,anddecoupage,to printing, stenciling, anddyeing
Cow parsley chest
Stenciled and hand-painted chest of drawers
Wet paint drawing drawers
Victorian table
Brush-shape patterned console table
Painted glass bowl
Spotted shelves
Frottage wall
Rough and luxurious wall
Crackle-painted hooks
Crackled lamp base
Gilded and painted 1920s glass-fronted cabinet
Gilded mirror
Gilded trumeau mirror
Real gold gilded tray
Gilded wall stencils
Copper leaf bath
Decoupage chest of drawers
Decoupage sideboard
Typographical chest of drawers
Potato-print side table
Tile-effect stencil table
Printed pillow
Printed table runner
Stenciled rug
Swedish painted blind
Alphabet transfer banner
Shibori lampshade
Dyed lace sheer curtain
Dyeing fabric with paint
Index
Useful addresses
introduction
After developing and writing about my quick and easy paint transformations, color recipes for furniture, and basically painting everything I could, here is a collection of my favorite projects! This is a celebration of thirty years since the invention of my unique range of Chalk Paint, showcasing my greatest hits of projects using this paint.
Let this book be your ultimate painted library. It is part of a greater story about interior decorating, involving fabrics, walls, and floor treatments, where paint can be used to transform your home in a natural and stylish way. I want to excite and inspire you to paint everything and anything you can get your hands on.
The projects that have been selected truly epitomize my art and interior design style, and you could even describe this book as my “Best of” album. My versatile Chalk Paint range, which I developed in 1990, has continued to evolve and develop with new techniques and treatments, and can be used on anything! The possibilities are endless: as well as using it on wood, the paint works on fabrics, concrete, plastics, glass, leather, marble, and metal.
Start off by working with the base. It is very important to understand the piece of furniture and it’s not necessary to have a plan that you follow rigidly. It is quite acceptable to change your mind, because as you paint, the furniture starts to tell you what it wants and needs. The age, texture, and color of the wood, plus the shape and style of the furniture, are all determining factors in how you will paint it. As the first coat goes on, characteristics start appearing and you will begin to have ideas that might differ a little from the original plan. Part of the fun is working with new inspiration and it is this that will make the piece unique.
Color combinations are probably the most important thing to get right. Hard contrasts, lots of colors without an anchor, too many hot colors, or too many same-toned colors are all things I try to avoid when working. If you are not confident with color, a good rule is to try using just two colors, or three at the most. This book is a huge shout-out for the power of color and how colors can be combined. If anything gets my juices going, then it’s how color and texture work together.
Don’t underestimate the power of simple techniques to create salient and striking designs, from potato-printing on drawers to gilding and using metal leaf, or painting, tying, dyeing, and dipping fabrics. I have printed, stenciled, and reverse-stenciled on fabrics, walls, and furniture. I have also painted in a painterly, freehand way and in a controlled way. All these skills are valid.
Finally, trust your creative artistry and instincts. I have been inspired by art and artists, fashion, and design, and I’ve thought inside the box and outside the box, being conventional and unconventional. I have designed lots of easy projects and a few projects that will need a little more skill. Please enjoy the collection, be inspired, and, above all, paint everything!
tools and materials
As you flick through the projects in this book, you’ll see that none of them calls for specialist equipment. Have a few pots of paint in your chosen colors, some brushes, and clean rags to hand and you are all set to get started.
paint
The starting point is to choose the right paint for the job. This will make painting your furniture an enjoyable experience because the paint will be responsive and you will be able to work in a practical, flexible way. There are many paints on the market, but I have designed the projects in this book with my purpose-made Chalk Paint in mind (see page 224 for stockists).The paint can be applied to most surfaces or used as a dye for fabrics (see www.anniesloan.com for information on unsuitable surfaces). It has a very matte texture and absorbs wax easily, and has been specially created to be used in a huge variety of ways—for example, as a wash, with or without texture, applied thickly, on fabric, or as a dye—which is why it lends itself so well to painting everything.
One of the great bonuses of using this particular paint is that there is no need to prepare furniture first by priming or rubbing down, which means you can start painting easily and quickly while you have the urge. The paint, despite being water-based, even mixes easily with the solvent-based wax too, so you can color the final finish to get the exact color you want. As a general guide, you will need 1-quart (1-liter) cans of paint for large projects and small project pots for painting and decorating smaller areas. For the most part, you only need to apply one coat of Chalk Paint, but where two coats are necessary, apply the first one with a big brush.
One of the most exciting and interesting ways to use the paint is on fabric. I used to do this many years ago, but have recently rediscovered this technique. One method is to use it as a dye by washing fabric in heavily diluted paint and the effect is wonderful—I have rewashed one dyed linen sheet several times now and the color has remained the same. The other method is to paint and then wax upholstered chairs with my paint, which creates a stunning effect.
color
Working with a good palette of colors is important, as is being able to mix them. I use a palette of ready-mixed neutrals with stronger colors, working on the premise that you can lighten strong colors but can’t make a light color strong. My already-aged colors, such as Duck Egg Blue, can be lightened with Old White, but for colors like Provence, which is rather clean, it might be better to add Country Grey to dull it and give it a little complexity. Of course, waxes can change the color too, so take this into consideration when you are applying your chosen paint.
My paints are made so that they can be mixed together, which means you can also create your own colors. To do this, begin by mixing different paints together on paper, in a paint roller tray, or on an Annie Sloan MixMat™. Use your fingers or small brushes to work out the proportions of each color. Once you have determined the ratio of colors, you can go on to make larger quantities, using this as your guide. Start with the greater quantity and then add the second and third colors, testing all the time to see where you are in the mix.
Color is extraordinary because it changes so much according to the context within which it is used—a color that looks great in one room could look like dirty pondwater in another because of light (either artificial or natural) and the surroundings. Don’t worry if your initial choices do not give the effect that you hoped for—with the methods in this book you can change the tone and color of a piece using washes and colored waxes.
brushes
Your brush does not have to be expensive, but it does need to have certain qualities because working with bad brushes can be very frustrating. I find that using a brush that is a mix of synthetic and bristle is the best. The hairs should be fairly long and flexible with a little bounce to allow you to be expressive in your work.
Have a collection of brushes to hand, such as a large one at least 3–4in (8–10cm) wide for painting onto the furniture with speed and a smaller 1–2in (2.5–5cm) brush to work paint into the intricate parts, such as moldings and corners. I tend to work with a 2in (5cm) and 1in (2.5cm) brush. In some projects I recommend which brush to use, but it’s more important to pick a size that feels comfortable for you to use and suits the size of the piece of furniture or wall/floor being worked on.
Don’t choose brushes that are too short since the paint will not flow well, and don’t use a brush with hard and inflexible bristles, because the paint will look scratchy. Don’t have a floppy brush, because you will have to work too hard to make the paint spread.
I often mention artists’ brushes—by this, I mean soft-haired ones from an artists’ supplier. Cheap craft brushes will only result in frustration, as they are not responsive and the hairs quickly become floppy or fall out. The most expensive artists’ brushes are made from sable hair, which are very good, although squirrel hair and high-quality synthetic brushes don’t cost as much and work extremely well, offering the right amount of strength and spring. I use a range of artists’ brushes: two flat-ended brushes, known as “one strokes,” ¼in (6mm) and ½in (12mm) in size and made from high-quality synthetic hair; and two pointed brushes in a size 4 and a size 6, both made from sable hair.
wax, sandpaper, and varnish
I wax more or less everything I paint to get the right finish for my furniture and walls. I find it makes my projects strong and practical and gives them a beautiful, workable finish. I recommend that you choose a soft wax that can be applied easily with a brush. I often use a 1in (2.5cm) brush to apply wax, but you can use a large brush to get it done quickly if it feels more comfortable. After adding a layer of clear wax to a piece, you can then start applying dark wax or coloring the clear wax with some of my paint to alter the finish.
For the distressed look, or for achieving a very fine finish, you need to be able to sand the waxed surface to reveal the wood or another coat of paint—so have a range of fine-, medium-, and coarse-grade sandpapers at hand for this purpose. I produce an Annie Sloan range of Sanding Pads in all three grades. I find that using just the fine and medium grades is usually enough, but sometimes move on to the coarser paper if I really want to distress the furniture.
The only time I use varnish is on floors, when doing decoupage and transfer work, and when I use the crackle varnish set. I prefer to apply wax to my work at the end because it has such a soft finish, can be colored and changed as you work, and stops the work chipping.
cloths
Finally, have a good supply of clean, dry, lint-free cloths to hand so you can wipe brushes, polish wax, apply and wipe off paint, and generally use them to clean. I often buy old sheets from thrift stores and charity shops and find these are ideal.
PART 1
painted floors, walls, ceilings, furniture, and more
Paris Grey parquet floor
Parquet is a very old form of flooring that uses small, usually rectangular, blocks of wood, which are pieced together like a mosaic to form a simple pattern. It became very popular in the 1950s and ’60s, and is now returning to popularity. Finding evenly colored parquet flooring in perfect condition is not easy, as I discovered with this particular parquet, but I was able to even out the differences with a wash of one color. Each floor will be different, so do a test patch before you begin. I chose to do a wash of Paris Grey over the wood before lacquering it. Other paint-wash colors that would work well over the wood are Graphite, one of the whites, or Duck Egg Blue.
you will need
• Chalk Paint in Paris Grey
• Pail (bucket)
• Large sponge
• Large flat brush
• Clean, dry, lint-free cloths
• Lacquer
• Large sponge roller
1 Test the color of the Paris Grey wash with the lacquer over it on a small piece of spare wood. When you are happy with the mix of paint and water, make a pail (bucket) of the mix and apply with the sponge, wiping and rubbing it all over the floor. When applying the paint mix, you need to be quick and decisive, and work on the floor in sections.
2 After using the sponge to apply the paint, you may find that you need to spread the paint so that it is even. This will depend on the absorbency of the wood.
3 Use the flat brush to get into the edges and corners of the room.
4 To get an even effect on the floor, rub off any excess with a clean, dry cloth.
5 Stir the lacquer well before using a large sponge roller to apply it all over the floor. Using a sponge roller ensures you have a thin coat. Use a flat brush to reach the edges, again applying only a thin coat. Once dry, apply a second coat of lacquer in the same way.
painted floor
The original paint on my kitchen floor was starting to wear away and the concrete underneath began to show through. Rather than simply apply one color I wanted to try something new to give the floor a more interesting look. I decided to go for a rustic approach, selecting gray as my base coat and then applying squares of buttery Cream and Old White quickly and simply with a square sponge.
you will need
• Paint tray and roller
• Masking tape and string
• Chalk Paint in Paris Grey, Old White, and Cream
• Square sponge
• 2in (5cm) paintbrush
• Clear, extra strong varnish
1 Use a roller to cover the floor with the base gray color. Make sure you have vacuumed the floor before you start to avoid any unwanted detritus when you apply the paint.
2 Starting in the center of the room, tape a piece of string to the floor from one side of the room to the other. Spread the Old White evenly in the paint tray. Dip the square sponge into the tray, making sure it is wholly covered, and press onto the floor at regular intervals, using the string as a guide. Repeat on the other side of the string. When you have done two lines of squares, move the string for the next two lines and continue until the whole room is done.
3 Go over some of the squares you have already made with a third color.
Print some next to each other and leave gaps in other areas. The sponge will cover the squares unevenly so some of the white will show, but it is this randomness that looks so appealing.
4 Give the floor two coats of extra strong varnish, using a brush at the edges and a roller over the rest.
painted rug
Floors are easy to paint, whether they are concrete or wood—simply use a sponge roller, with a brush for the edges. Depending on the type of floor and the color you choose, you will need either one or two coats of paint, plus a final coat of floor lacquer as a sealant.
Painting a rug is a bit of extra fun and a cheeky solution when you despair of finding a real rug in the right size, color, and design for your newly painted floor. After painting this floor with two coats of Old Ochre, I felt it needed a little something to give it focus but instead of holding out in my search for the perfect rug, I decided to paint one. Drawing around a blanket meant that I could get a very natural shape, so that the “rug” looks real.
you will need
• Chalk Paint in Old White and French Linen
• Blanket, to use as a template
• Pencil
• Large, flat-ended brush
• 1in (2.5cm) brush
• Clean, dry, lint-free cloth
• Floor lacquer
• Lacquer brush
1 Take a blanket and fold it to the size you want for your painted rug. Lay it in position on the floor.
2 Draw around the blanket lightly in pencil, following its slightly uneven outline—the pencil line will be covered by the paint.
3 Holding the flat-ended brush at right angles to the floor, paint on Old White, following the pencil line but covering it, and allowing the odd wobble or curve, so that it is like the outline of a fabric rug. Paint the outside of the rectangle first, then fill it in. Let it dry.
4 Dilute the French Linen with a little water. With the 1in (2.5cm) brush, paint a narrow band that loosely follows the edges of the rug, about 2in (5cm) in. (If you don’t feel confident about doing this, draw a pencil line first as a guide, covering it as you paint.) Pull the brush along slowly and deliberately, dabbing off any excess paint with a clean, dry cloth, so that the band has added interest and is not completely flat. When the paint becomes too opaque, add a little more water. Let the paint dry, then cover the entire rug with a coat of floor lacquer, to seal it.
This is such an easy way to trick the eye! From afar, the rug looks like the real thing. Only closer inspection reveals that it is, in fact, painted! And if in time the paint becomes too scuffed, it’s very easy to paint a new rug.
staircase
Painting a whole staircase is a quick, practical, and economical solution to camouflaging a new step added to an existing staircase, and also allows you to add some extra color to the area. Adding a coat of paint to the stairs opens up many possibilities—from highlighting the edging, as I have done, to applying vertical stripes, painting the steps a different color to the risers, or simply using one bold color.
you will need
• Chalk Paint in Château Grey and Scandinavian Pink
• 2in (5cm) paintbrushes for applying paint
• Paint trays
• Extra-strong semi-matte lacquer
• 4in (10cm) brush for lacquer
1 I have chosen two colors that work well together, Scandinavian Pink for the edging and Château Grey for the rest. Simply paint the whole staircase first with the gray, then once it is dry paint the edging in the pink.
2 When all the paint is dry, varnish the staircase with a strong lacquer. I have used a water-based semi-matte product.
tip If your floorboards are in good enough condition you could apply the paint thinly as a wash, painting it on and wiping it off if you want a slightly more opaque effect. The same application of lacquer would follow.
striped stairs
This is a modern staircase comprising 14 stairs, which was fairly unremarkable, rather dark, and generally needed cheering up. It was inspired by a staircase which caught my eye on the Pinterest website because of its wobbly, uneven nature. Although all that was needed here was a series of horizontal lines, it was a difficult undertaking. Making certain that the rhythm of loud, quiet, deep, and high colors works well requires time and planning.
Remember that the cool colors—blues, greens, and quiet Old Violet—are used more frequently than the few lines of the hot, bright colors. There are only about nine or ten stripes of these hot colors, yet they dominate over the cooler stripes.
you will need
• A good selection of Chalk Paint (see below for guidance on color choices)
• 2in (5cm) flat synthetic brush
1 Each stripe of paint is not only a little wobbly but is also of a different width and some are on the step and the riser too, so blurring the definition of the stairs giving it an interesting twist.
2 This detail of newel post shows a different technique—lime washing on oak (see page 55), which makes a great contrast to the colorful stripes.
tip Use a flat synthetic brush which can easily get into edges and corners. Don’t overload the brush to avoid paint pooling and making raised edges.
Choosing the colors that work together should be done in advance, before you are tempted to begin painting. Aim for a group of some dark and light neutrals, many cool colors, and just a few warm colors. I repeated each color several times, especially the neutrals and cool colors. I started with a smaller group of colors, but found I added a few more as I went. Sample pots are a good way to use a lot of colors economically.
painting and waxing a wall
I wanted to give this wall a really smart polished look, but with a little texture in the paint so that it didn’t look too flat. Graphite paint looks very good with the white plaster statue against it and certainly makes a great statement. In contrast, Old White with clear wax also looks very appealing as a polished wall. A stronger color with clear and dark wax could also look good.
you will need
• Chalk Paint in Graphite
• Sponge roller and paint tray
• Tin of clear wax
• Cloth or 2in (5cm) paintbrush for applying wax
• Cloth for polishing
tip If you have a really large area to paint and wax you might find the polishing is best done with an electric buffer.
1 Apply two coats of Graphite paint using a sponge roller. Have some solid areas of paint but don’t try to make the whole wall completely opaque. Avoid creating a pattern or texture as this can become too busy. Remember that when you apply the clear wax any pattern will become much more apparent.
2 Using a cloth or a large brush apply lots of clear wax to the wall. Spread the wax all over the surface to create a thin layer—there shouldn’t be any excess because it will be worked over the whole wall. Don’t leave any thick areas of wax as this might dry white. Polish the next day—this is easier on the second day—for a really good sheen.
polished plaster
I wanted to give this wall color, depth, and interest. The finished result has little flecks of white from the base color, as well as touches of Arles and Old Ochre, but still looks and feels very smooth. There are many color options for this technique, such as Burgundy under Arles, with small patches of deep red coming through.
you will need
• Chalk Paint in Arles and Old Ochre
• Woolen roller and paint tray
• Water
• 4in (10cm) paintbrush
• Cloths for removing excess paint and wax
• Tin of clear wax
• 2in (5cm) paintbrush for applying wax
• Fine- or medium-grade sandpaper
1 Apply the Arles using a woolen roller so that the paint is rough and textured. Don’t roll out too far because this can make the paint too smooth.
2 Once the first coat is dry, apply a wash using Old Ochre diluted 50/50 with water. Take a large brush in one hand and paint the wall with the Old Ochre mix. With the other hand, use a cloth to spread the paint thinly and mute the Arles underneath. Allow the paint to dry for half an hour or so—a few damp spots can make interesting marks.


